arrow
at
"Loudness." Use
CONTROL to
vary
loudness
from
+50
above the nominal +00 point (louder) to —SO
below the
nominal
+00 point (softer). Note: These
figures represent
arbitrary
volume units,
not decibels.
NOMINAL PITCH (of sample)
Point arrow at
"Norn pitch." Use
CONTROL to set
the initial
pitch
of the
sample in semitones.
To transpose up,
choose
a
higher
number. To transpose down, choose a lower number.
Note: If
you
trigger the
sound
with the PLAY button, a
higher
number will
produce a
lower
pitch. This
is because as
the
sample gets higher in pitch, the PLAY button
(which keeps put-
ting out the same note) will transpose
the note lower
by a
corre-
spondingly greater
amount.
FINE
PITCH
Point arrow
at
"Fine Pitch." Use CONTROL
or
the
+,
—
,
and
number
keys to adjust
the pitch
plus
or minus 1
semitone,
in
cent (hundredth of
a
semitone)
increments.
PAGE 04 1
REPLAY MODE SELECT
-2* «REPLAY MODE
On«
shot
(I).
Looping
(2).
Alternating
(3)
A sample may be played
back in one of three ways. Point arrow
at "Replay mode"
and indicate your
choice
with a number key:
(1
)
One
shot. Triggering the sample will
cause it to play
for the
duration of the sample,
then
stop.
This
is
the
default setting.
(2)
Looping. If
you
hold down a key, the sample will
play
all the
way
through. If the key is still
held
down, the sample will
play again from beginning to end and keep repeating
in
this
manner for
as
long as
the
key is down.
Note: The entire
sample need not
be
looped; a portion can
be designated
for
looping, as set on Pages 06,
07,
and
08.
(3)
Alternating. If you
hold down a key, the
sample will play all
the way through. If
the key is still held
down, the sample will
play again from end to beginning, then from
beginning to
end, from end to
beginning,
and so on for
as
long
as
the key
is down.
Note:
The
entire sample
need not
be looped;
a portion can be
designated
for alternating looping,
as
set
on PAGES
06,
07,
and
08.
PAGE05JTIME DIRECTION
(NORMAL/REVERSE)
-|?
5
tTIME DIRECTION
Normal
(I).
Rotrsi
(2)
Point
arrow
at "Time Direction." Use
a
number
key to enter
either:
(1
)
The sample plays
from beginning
to
end.
(2)
The sample
plays from
end
to
beginning
("backward
tape"
effect).
IMPORTANT
INFORMATION
ABOUT
PAGES
06, 07,
and 08
Looping a
sample,
which
creates a
continuous, sustained
tone
from
a
short
sample,
is
an
art and a
science.
Much of this art
in-
volves
finding
the
proper
loop
points and sample
length,
the
parameters
adjusted
on PAGES 06, 07,
and 08.
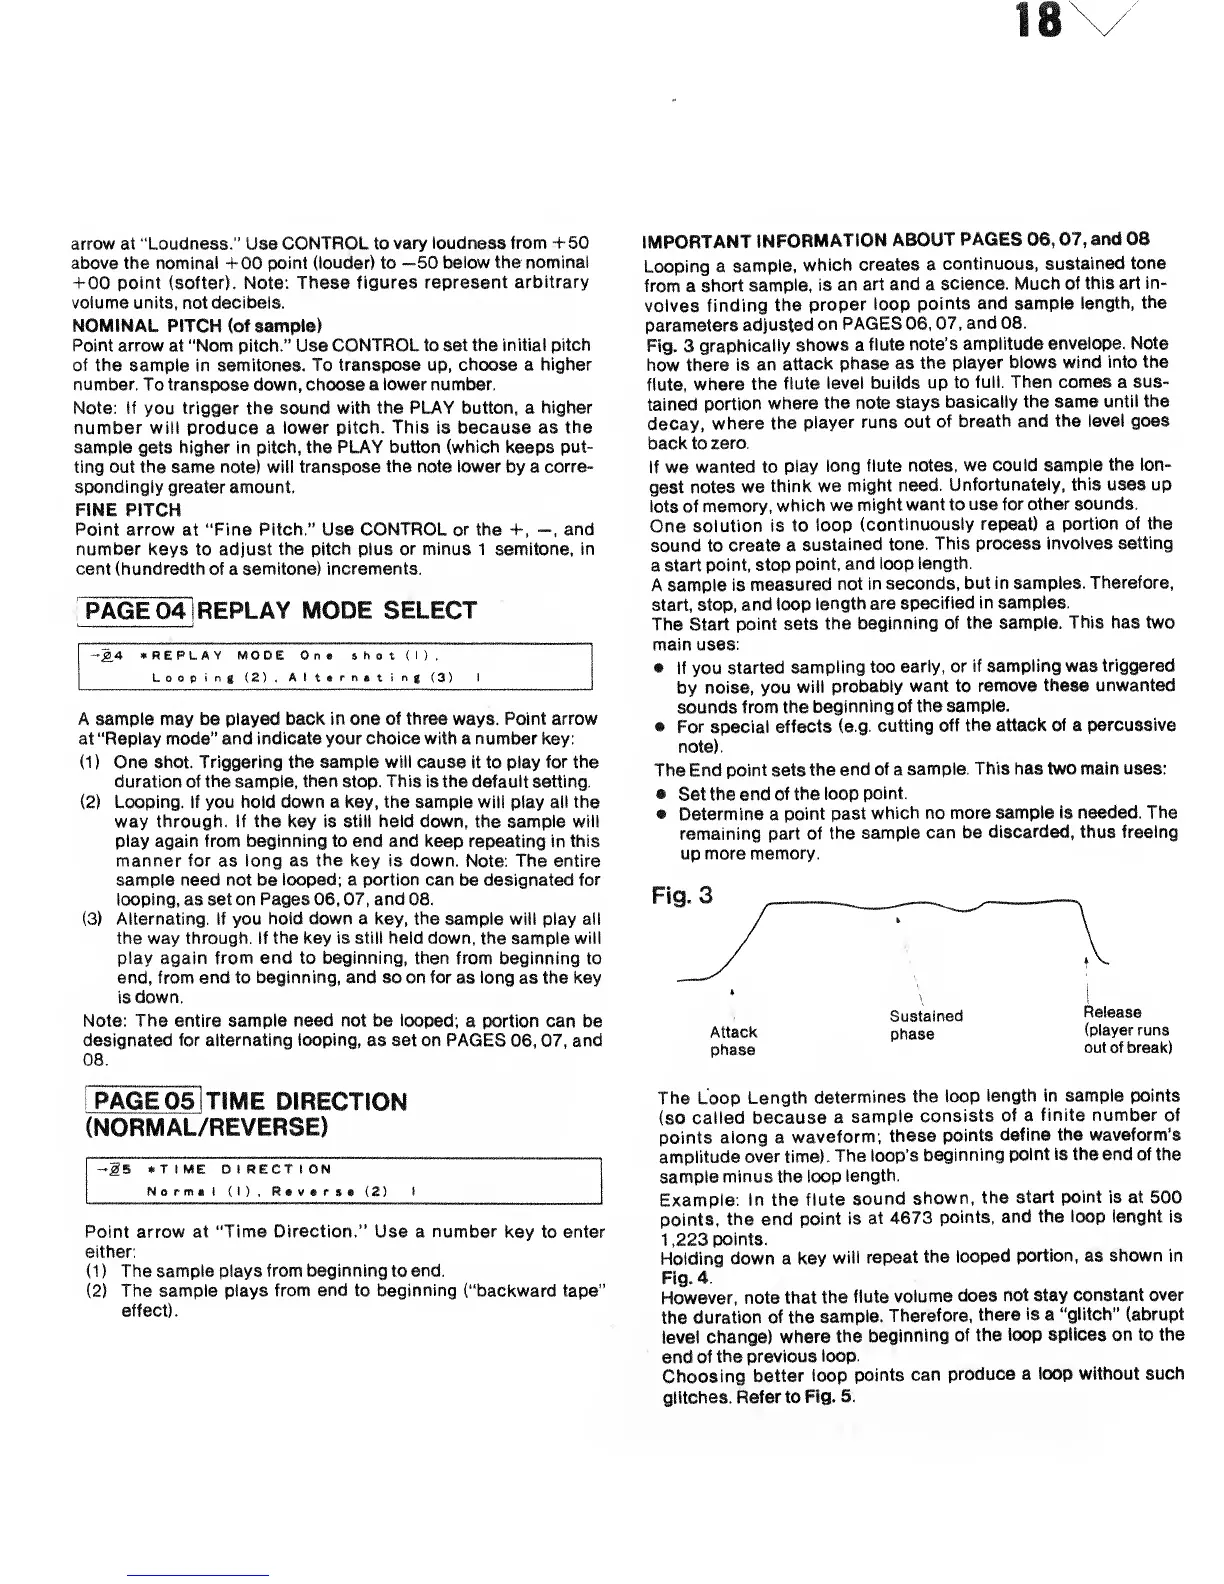
Fig.
3
graphically
shows a
flute
note's
amplitude
envelope. Note
how there is
an
attack
phase as
the
player blows
wind into the
flute,
where
the
flute
level builds
up to
full. Then comes a
sus-
tained
portion
where
the note
stays
basically
the same until
the
decay,
where
the
player
runs out
of
breath and the level goes
back to
zero.
If we
wanted to
play
long flute notes,
we could sample
the lon-
gest
notes we
think
we
might need.
Unfortunately, this uses up
lots of
memory,
which
we
might want to
use for other sounds.
One
solution is
to loop
(continuously
repeat)
a
portion
of the
sound to
create a
sustained
tone.
This process involves
setting
a start
point, stop
point,
and loop
length.
A sample
is
measured
not in
seconds,
but in samples.
Therefore,
start, stop,
and loop
length
are
specified
in samples.
The Start
point sets
the
beginning
of the sample.
This has two
main uses:
•
If
you
started
sampling
too
early, or
if sampling was triggered
by
noise, you
will
probably
want to
remove these unwanted
sounds from
the
beginning of
the sample.
*
For special effects
(e.g.
cutting
off
the
attack
of
a
percussive
note).
The End
point sets
the end
of
a
sample.
This has two main uses:
•
Set the end of
the loop
point.
*
Determine a
point
past
which no more
sample is needed. The
remaining
part of
the sample
can be
discarded, thus freeing
up more
memory.
Fig. 3
;
Sustained
Release
Attack
phase
(player runs
phase
out of break)
The
Loop
Length
determines
the
loop
length in sample points
(so
called because
a
sample
consists
of a
finite number
of
points along a
waveform;
these
points
define
the
waveform's
amplitude
over time).
The loop's
beginning
point
is
the end of the
sample
minus the loop
length.
Example:
In the
flute
sound
shown,
the
start point
is at 500
points,
the
end
point
is
at 4673
points,
and
the loop
lenght is
1
,223
points.
Holding
down
a
key
will repeat
the
looped
portion,
as
shown
in
Fig.
4.
However, note that
the
flute
volume
does
not stay
constant over
the
duration
of the sample.
Therefore,
there
is a "glitch" (abrupt
level
change)
where
the
beginning
of
the loop splices on to the
end
of
the previous
loop.
Choosing
better
loop
points
can
produce a
loop without such
glitches.
Refer to
Fig.
5.
 Loading...