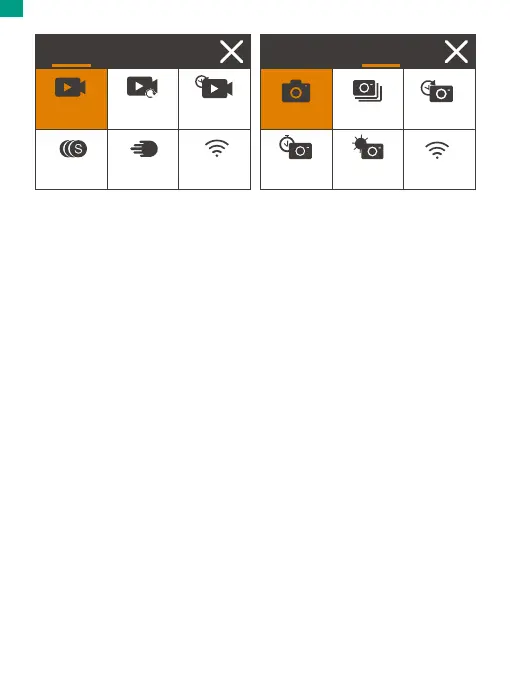
Switching shooting modes
To switch shooting modes, first enter the mode menu, then tap on the "Video" or
"Photo" option to access the video or photo mode menu. You will be able to select
the desired video or photo mode from the available options.
Tip: You can also swipe left or right to switch between Video and Photo modes.
Entering the settings screen
To enter the settings screen, first make sure the camera is on the preview screen,
then tap on the Settings icon in the bottom right corner, or press and hold the
Shutter button. Now you're free to configure the photo, video, and system settings
respectively.
Using the shutter button
When the camera is set up in Photo or Video mode, press the Shutter button to
capture photos or start video recording. To stop recording in Video mode, press
the Shutter button again.
Entering the playback screen
To enter the playback screen, tap the Playback icon in the bottom left corner. You
will be able to access the video or the photo set to playback or delete files. To exit
the playback screen, simply tap the Back icon in the upper right corner.
Charging the camera
To charge your camera, connect it to a USB adapter or computer using the USB
cable. The charging indicator will turn red and remain on. It will black out when
fully charged.
Tip: The battery can last up to 90 minutes of 4K video recording when fully charged.
SlowMotion FastMotion Wifi
TimeLapse
Loop
Record
Normal
Video Photo
Self-Timer
Long
Exposure
Wifi
TimeLapseBurstSingle
Video Photo
01 02 03 04
05 06
07 08 09 10 11
12 13 14 15 16
17 18 19 20 21
22 23 24 25 26
EN