OB001 Optical Heart Rate Armband
Operation Guide
Please charge the sensor in the rst use and when the battery is low (red ashing
LED). Please make sure the charging contacts on the back of the sensor with that of
the charging dock are clean and dry before charging to prevent any poor connection.
1 To charge the sensor, align the charging contacts on the back of the sensor with
that of the charging dock. See Figure A.
2 Put the sensor into the charging dock as shown in Figure B.
3 Connect the USB power port to your computer or plug directly into a USB wall
charger.
4 The green indicator will ash continuously when charging. Once the battery is
fully charged, the green light will stop ashing and remain statically on.
5 Take out the sensor from the charging dock by sliding up or down. See Figure C.
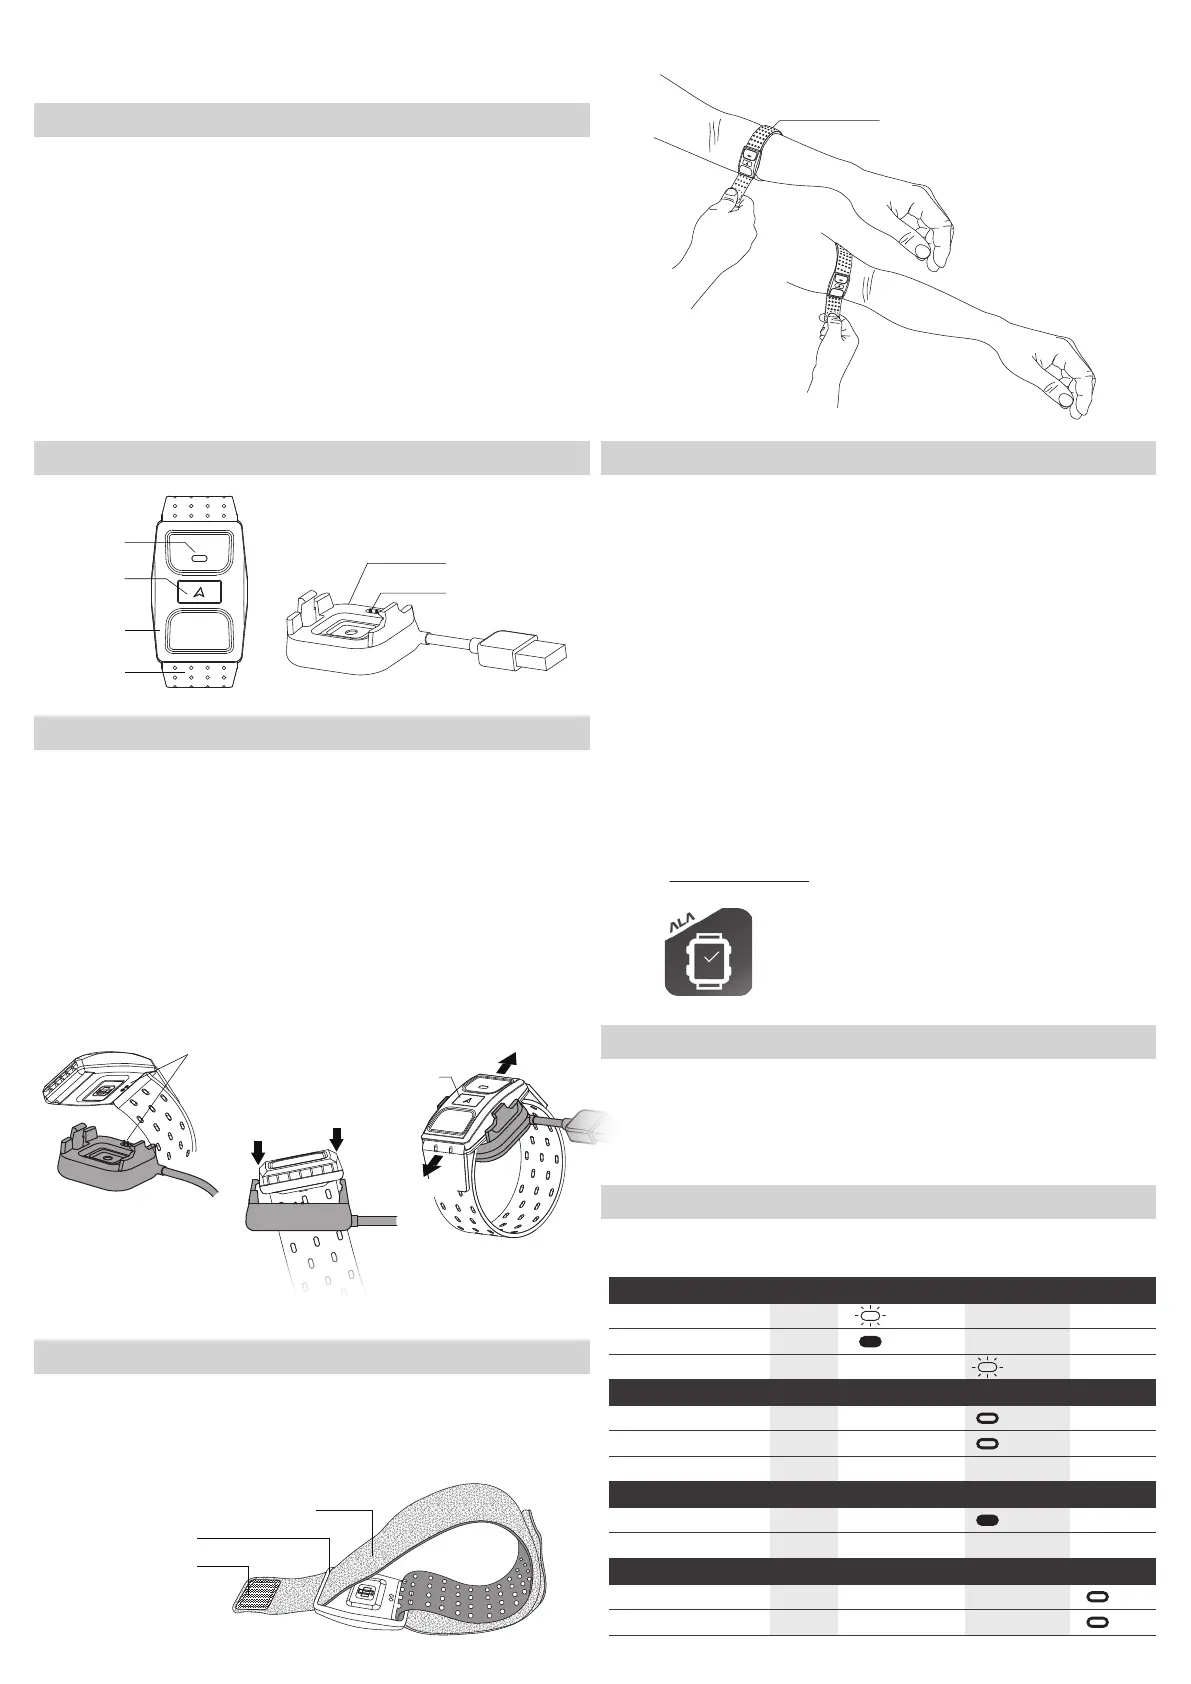
PART NAMES
HOW TO CHARGE
FEATURES
Dual mode technology
Compatible with sport watch, cycling computer, tness equipment, and smartphone
with Bluetooth® and ANT+; also works with most Fitness Apps via Bluetooth®.
Storage function
This wearable device monitors your heart rates and the number of steps you take
during exercise. The built-in memory can independently record and store heart rate
data and SPM(steps per minutes); no need to bring your smartphone or wear your
watch when exercising. After exercising, you can synchronize the data to Ala Connect
through Bluetooth® to review the training summary and analysis.
Lightweight and comfortable
The sensor and armband are less than 20 grams; can be worn on the forearm or
upper arm.
USB charging dock
Armband
Sensor
LED indicator
Button
Charge contacts
Lock on
Lock on first
Slide up
Charging contacts
LED
Indicators
A
B
C
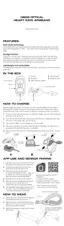
To ensure accurate step count measurements,
wear the sensor on the inner forearm.
HOW TO WEAR
Slide both ends of the armband through the buckles at both ends of the sensor.
Wear the sensor on the inside of forearm or upper arm. Please do not wear it on
the wrist and avoid any tattoo and hair.
Adjust the tightness to make sure the sensor fits the arm.
Velcro
Fuzzy side facing the outside
Buckles
After synchronizing with the Ala Connect, the sensor can be automatically
calibrated. To avoid errors in time correction, please synchronize immediately before
the initial use and when it is fully charged after a battery drain.
1 Scan QR Code or search for Ala Connect on Apple Store or Google Play and
download.
2 Press the button once with the white light on to synchronize and turn on sensor.
3 Open Ala Connect and add device according to the instructions. User’s profile will
be written into the sensor automatically once the device is successfully added and
connected. Be sure to turn on Bluetooth® on your smartphone to synchronize.
4 Once the synchronization is completed, press the button to turn off.
5 Wear the sensor and exercise.
6 For recording, press and hold the button until the red light is on; to end the
exercise mode, press and hold the button until the red light is on before it turns
off (this action will also turn the sensor off ).
7 To synchronize your training data with your device wirelessly, press the button for
the white light and open both Bluetooth® and Ala Connect on your smartphone.
8 The uploaded training data will be stored in the cloud.
Log in cloud.alatech.com.tw to check your activity report and results.
APP USE AND SENSOR PAIRING
System requirements of APP installation:
• Support iOS 9 or later
• Support Android 5.1 or later
• Built-in Bluetooth 4.0 or later
* Also compatible with other apps, such as Wahoo tness.
Slide down
The sensor only comes with one button; the operation of different uses is described
as follows:
OPERATION
Charge Button Green Red
When used as an independent training device
Light Indicate of heart rate
Synchronizing Data
Note 3
Charging Flash
Constant ON
Fully charged
Low battery
Note 1
Turn on and Start Recording Long press
Long press
Press once
Press once
Press once
Stop Recording and Turn o
Manual lap
Heart rate not detected
Heart rate detected
Note 2
Turn on and Synchronizing
Stop Syncing and Turn o
• The sensor is water-proofed. You can clean it with water; be sure to dry it with
cloth immediately after washing it.
• It is recommended to wash the armband with water (under 40°C). DO NOT use
the brightener, soap or softener. DO NOT soak, iron, dry clean, bleach and twist.
HOW TO CLEAN
2PF2972100800XX, 2020/02 V3
Flash
Light up
Light up
Light up
Light up
Constant ON
White
 Loading...