19-EN
Text compatible CDs contain text information such as the disc name and
track name. Such text information is referred to as “text”.
Notes
• Some characters may not be displayed correctly with this device,
depending on the character type.
• “NO SUPPORT” is displayed when the desired text information cannot
be displayed on this unit.
• The text or tag information may not be correctly displayed, depending
on the contents.
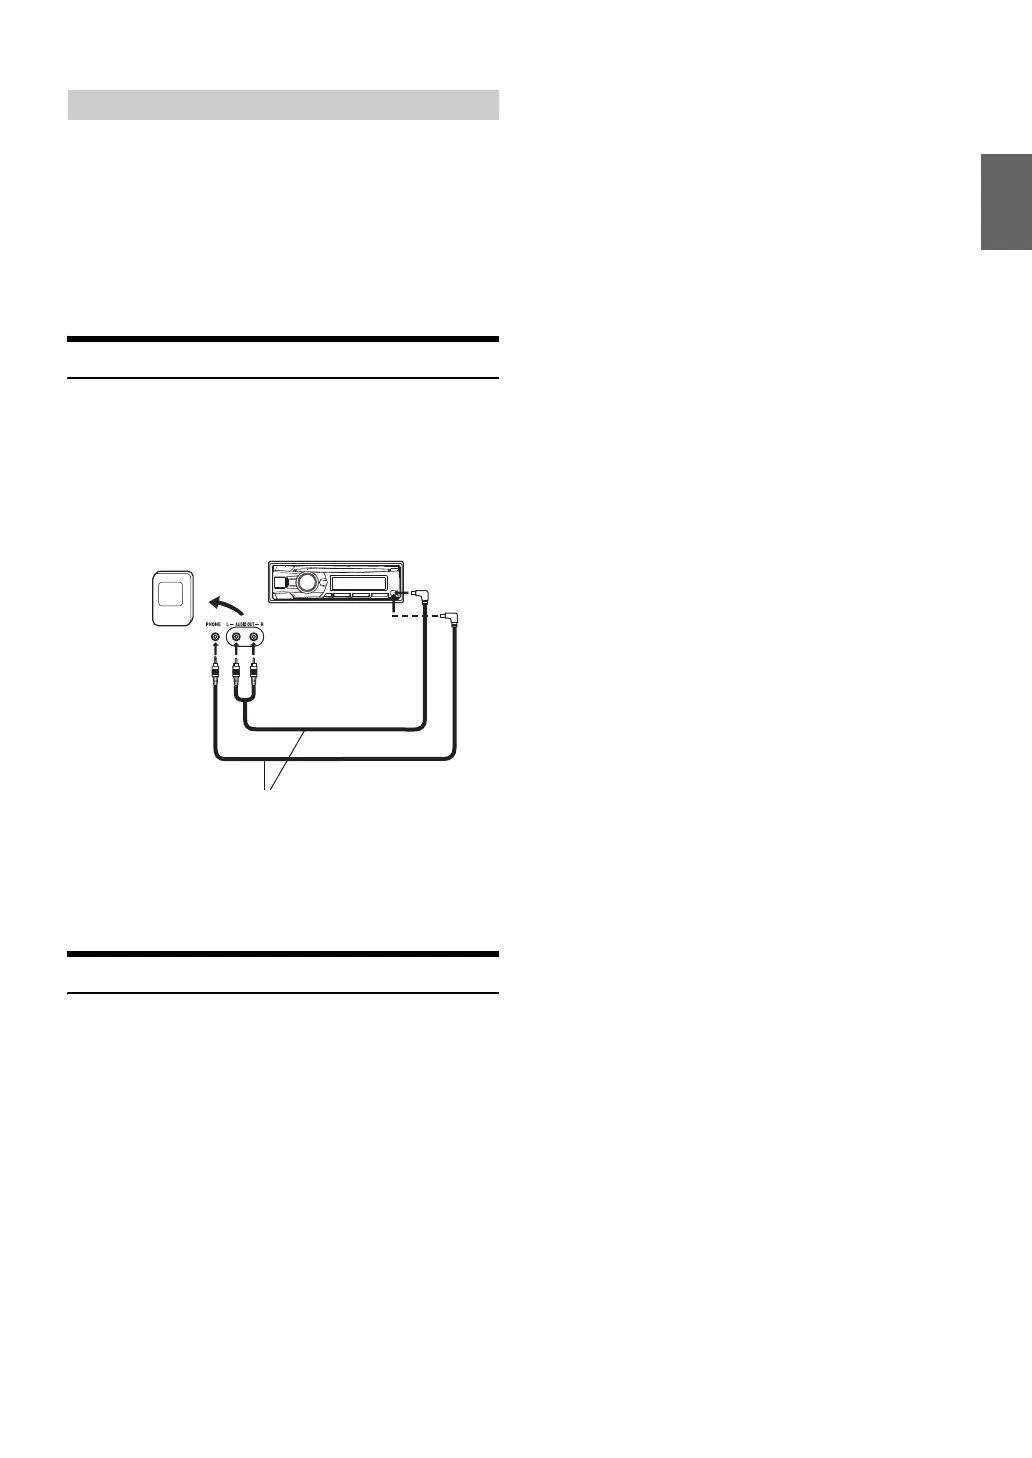
Using the Front AUX Input Terminal
Connect a portable music player, etc. by simply connecting it to the
input on the front panel. An optional adapter cable is required (standard
RCA to 3.5ø mini-phono plug or 3.5ø to 3.5ø mini-phono plug).
Press VSOURCE, and select the AUXILIARY mode to
listen to the portable device.
Note
• This function is available only when AUX SETUP is set to ON. For
details, refer to “Setting the AUX SETUP mode” on page 21.
Option Menu Setting
You can quickly adjust the setting items relevant to the current SOURCE
by using Option Menu.
1
Press and hold ENTER/OPTION for at least 2 seconds
to activate the Option menu of the current source.
Note
• The option menu varies depending on the source.
2
Turn the Rotary encoder to select the desired setting
item, and then press ENTER.
3
Turn the Rotary encoder to change the setting, and then
press ENTER.
After the setting, the display will return to the current source
automatically.
Setting item:
TUNER mode:
TUNER SET
*1
SOURCE VOL
*2
MX SETTING
*3
TUNER SET
SiriusXM mode:
TUNE SCAN
*4
ALERT MEMO
*5
SXM SET
*6
SOURCE VOL
*2
MX SETTING
*3
TUNE SCAN
DISC mode:
CD SET
*7
SOURCE VOL
*2
MX SETTING
*3
CD SET
USB mode:
SOURCE VOL
*2
MX SETTING
*3
SOURCE VOL
iPod mode:
APP DIRECT
*8
IPOD SET
*9
SOURCE VOL
*2
MX SETTING
*3
APP DIRECT
AUX mode:
AUX SET
*10
SOURCE VOL
*2
MX SETTING
*3
AUX SET
Pandora mode:
SOURCE VOL
*2
MX SETTING
*3
SOURCE VOL
BT AUDIO mode:
BT SET
*11
SOURCE VOL
*2
MX SETTING
*3
BT SET
Phone mode (Non-calling mode):
PHONE SET
*12
SOURCE VOL
*13
PHONE SET
Phone mode (Calling mode):
MIC GAIN
*14
CALL SOUND
*14
SPK SWITCH
*15
VOICE MUTE
*16
CALL WAIT
*17
END CALL
*18
SOURCE VOL
*13
MIC GAIN
*1 The setting items are the same as TUNER setting in SETUP
mode. For details, refer to “SETUP” on page 21.
*2 You can individually emphasize or weaken the volume level
of the current source to create your own tonal preference. The
setting values in Option mode and in SETUP mode are
linked. Refer to “Setting the Source Volume Level” on page 16.
*3 Refer to “Setting the Media Xpander mode” on page 17.
*4 Displayed only when SiriusXM Tuner-SXV200 is connected.
For details, refer to “Tune Scan Function” on page 38.
*5 Refer to “Storing the desired Artist and Song Alerts” on
page 39.
*6 ALERTSETUP, GAME ALERT, P-LOCK, SIGNAL IND and
TUNE START can be selected in this mode. For details about
these settings, refer to “SiriusXM Setting” on page 36.
*7 PLAY MODE can be selected in this mode. For details, refer
to “Playing MP3/WMA Data (PLAY MODE)” on page 22.
*8 Refer to “Setting the iPod Control” on page 31.
*9 The setting items are the same as iPod setting in SETUP
mode. For details, refer to “iPod/iPhone Search Mode
Setting” on page 23.
*10 AUX NAME can be selected in this mode. For details, refer to
“Setting the AUX NAME mode” on page 21.
*11 FW VERSION can be selected in this mode. You can see the
current firmware version about BLUETOOTH by using this
setting.
*12 CALL SOUND, CALLER ID, PB UPDATE, PB ORDER,
AUTO ANS, SPEAKER SL and FW VERSION can be
selected in this mode. For details about these settings, refer to
“BLUETOOTH SETUP” on page 25.
*13 The Hands free phone talk level, ring tone level and
microphone gain level can be adjusted by using this setting.
The setting values in Option mode and in SETUP mode are
linked. Refer to “Adjusting the volume (SOURCE VOL)” on
page 26.
*14 Refer to “Setting the BLUETOOTH sound quality” on
page 26.
*15 While calling, the call sound can be switched between the
unit and Smartphone by using this setting.
This operation can also be done by pressing BAND. Refer to
“Call Switching Operation” on page 29.
*16 While calling, and the Voice Mute is activated, the
microphone input will mute instantly and “VOICE MUTE”
will blink. This operation can also be done by pressing .
Refer to “Muting the microphone input quickly (Voice Mute)”
on page 29.
About “Text”
Portable player, etc.
Main unit
or
Optional adapter cable (RCA pin
plugs [red, white] 3.5ø miniplugs)
or (3.5ø miniplugs).