18
01.05CDE171R-QRG.fm
ALPINE CDE-171R 68-21627Z69-A (EN/DE/FR)
• Lors de la connexion des câbles au système électrique du
véhicule, il faut être conscient des composants installés en
usine (tel qu’un ordinateur de bord). Veillez à ne pas vous
raccorder à ces fils pour alimenter l’appareil. Lorsque
vous raccordez le CDE-171R/CDE-171RR/CDE-171RM/
CDE-170R/CDE-170RR/CDE-170RM au boîtier à
fusible, assurez-vous que le fusible du circuit désigné
pour le CDE-171R/CDE-171RR/CDE-171RM/
CDE-170R/CDE-170RR/CDE-170RM possède
l’ampérage approprié. Sinon, vous risquez
d’endommager l’appareil et/ou le véhicule. En cas de
doute, consultez votre revendeur Alpine.
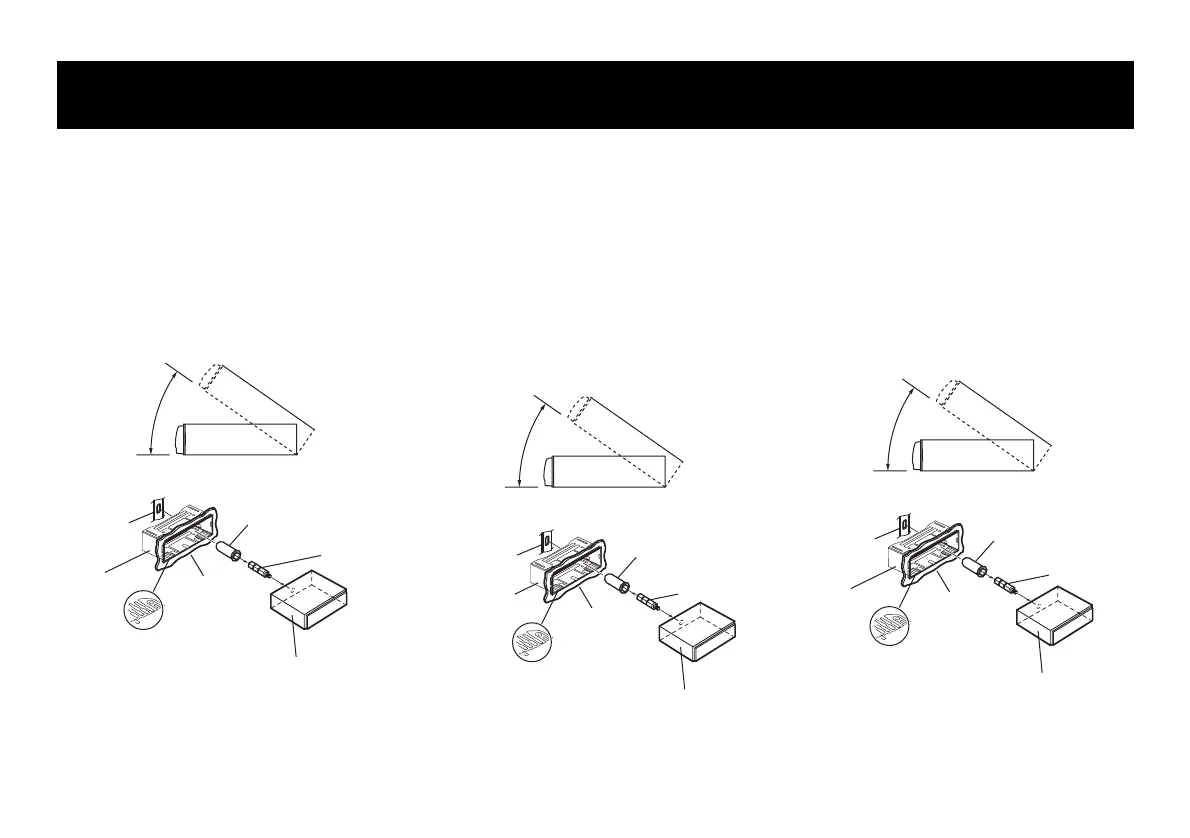
• L’unité principale doit être fixée à moins de 35 degrés du
plan horizontal, de l’arrière vers l’avant.
1
* Si la gaine de montage installée n’épouse pas bien la
forme du tableau de bord, les plaques de compression
peuvent être légérement pliées pour remédier au
probléme.
Moins de 35°
Support
Boulon à tête
hexagonale
(fourni)
Cet appareil
Plaques de compression*
Capuchon de
caoutchouc (fourni)
Gaine de
montage
(fournie)
Tableau de
bord
•
Wenn Sie Anschlüsse an das elektrische System des
Fahrzeugs vornehmen, berücksichtigen Sie bitte alle
werkseitig bereits installierten Komponenten (z. B. Bord-
Computer). Zapfen Sie nicht die Leitungen solcher
Komponenten an, um dieses Gerät mit Strom zu versorgen.
Wenn Sie das CDE-171R/CDE-171RR/
CDE-171RM/CDE-170R/CDE-170RR/CDE-170RM an den
Sicherungskasten anschließen, achten Sie darauf, dass die
Sicherung für den Stromkreis, an den Sie das CDE-171R/
CDE-171RR/CDE-171RM/CDE-170R/
CDE-170RR/CDE-170RM anschließen wollen, einen
geeigneten Ampere-Wert aufweist. Andernfalls kann es zu
Schäden am Gerät und/oder am Fahrzeug kommen. Wenden
Sie sich im Zweifelsfall bitte an Ihren Alpine- Händler.
• Der Einbauwinkel des Gerätes sollte weniger als 35 Grad
betragen.
1
* Wenn der angebrachte Einbaurahmen lose im
Armaturenbrett sitzt, können die Druckplatten leicht
gebogen werden, um das Problem zu beheben.
Weniger als 35°
Halterung
Sechskant-
Stiftschraube
(beiliegend)
Dieses Gerät
Druckplatten*
Armaturenbrett
Einbaurahmen
(beiliegend)
Gummikappe
(beiliegend)
• When making connections to the vehicle’s electrical
system, be aware of the factory installed components (e.g.
on-board computer). Do not tap into these leads to
provide power for this unit. When connecting the
CDE-171R/CDE-171RR/CDE-171RM/CDE-170R/
CDE-170RR/CDE-170RM to the fuse box, make sure the
fuse for the intended circuit of the CDE-171R/
CDE-171RR/CDE-171RM/CDE-170R/CDE-170RR/
CDE-170RM has the appropriate amperage. Failure to do
so may result in damage to the unit and/or the vehicle.
When in doubt, consult your Alpine dealer.
• The main unit must be mounted within 35 degrees of the
horizontal plane, back to front.
1
* If the installed mounting sleeve is loose in the dashboard,
the pressure plates may be bent slightly to remedy the
problem.
Installation
Less than 35°
Bracket
Hex Bolt
(Included)
This unit
Pressure Plates*
Rubber Cap
(Included)
Mounting
Sleeve
(Included)
Dashboard
01.00CDE171R-QRG.book Page 18 Wednesday, September 19, 2012 10:26 AM

 Loading...