Installation Location/Emplacement de
l’installation/Ubicación de la instalación/
Montageort/Posizione di montaggio/
Monteringsplats/Место установки
Install to the Rear Garnish/Installez la caméra sur la carrosserie arrière/
Instalación en el acabado trasero/Montage am Heckklappengriff/
Montaggio sulla modanatura posteriore/Montering i bakluckan/
Установка сзади над номерным знаком
Fig.2/Schéma 2/Fig.2/
Abb. 2/Fig.2/Bild 2/Рис. 2
Fig.3/Schéma 3/Fig.3/
Abb. 3/Fig.3/Bild 3/Рис. 3
2.5
13
30
21
Fig.1/Schéma 1/Fig.1/
Abb. 1/Fig.1/Bild 1/Рис. 1
English
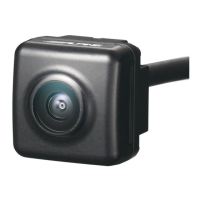
1 Attach the mounting bracket to the camera mounting stage
with the angle adjustment screw as shown in the figure.
2 Attach the camera to the camera mounting bracket C. Pull
the camera cable through to th
e camera mounting bracket
C, and secure with the hex screws ! (see Fig. 2).
3 Loosen the camera mounting bracket C and angle
adjustment screw. Determine the attachment angle, and
carefully tighten the angle adjustm
ent screw.
4 Make a 13 mm hole in the rear bumper camera mounting
bracket (see Fig. 3).
5 Pull the camera cable inside the car through the hole made in
step 3.
6 Peel off the adhesive seal from the camera mounting bracket
a
nd attach the camera mounting bracket on the chassis of the
vehicle. If required, fix the camera mounting bracket using
self-tapping screws.
Attach the camera in a position where it does not touch the
number plate.
Use retail touch-up paint to paint the surface and surrounding
area when a hole has been made in a metal surface.
Waterproof securely the hole made for the camera cable using a
commercially-available waterproof tape or sealing material.
If necessary, use a self-tapping screw " to fix the camera
mounting bracket (In the case of a plastic mount area).
•
•
•
•
*OGPSNBUJPOPO%JTQPTBMPG0ME&MFDUSJDBMBOE&MFDUSPOJD&RVJQNFOU
BOE#BUUFSZBQQMJDBCMFGPSDPVOUSJFTUIBUIBWFBEPQUFETQFBSBUF
XBTUFDPMMFDUJPOTZTUFNT
*OGPSNBUJPOTVSMFUSBJUFNFOUEFT%ÊDIFUT&MFDUSJRVFTFU
&MFDUSPOJRVFT%&&&QPVSMFTQBZTBZBOUBEPQUÊTVOUSBJUFNFOU
TÊQBSÊTEFDFTEÊDIFUT
*OGPSNBUJPOFO[VS&OUTPSHVOHWPO&MFLUSPVOE&MFLUSPOJLHFSÅUFO
VOE#BUUFSJFOBOXFOECBSGÛS-ÅOEFSEJFFJOTFQBSBUFT
4BNNFMTZTUFNÛCFSOPNNFOIBCFO
*OGPSNBDJÓOTPCSFMBFMJNJOBDJÓOEF7JFKPT&RVJQPT&MÊDUSJDPTZ
&MFDUSÓOJDPTBTÎDPNP#BUFSÎBTBQMJDBCMFFOMPTQBÎTFTRVFIBO
BEPQUBEPTJTUFNBTEFSFDPHJEBTFMFDUJWBEFSFTJEVPT
"WWFSUFO[FTVMMPTNBMUJNFOUPEJEJTQPTJUJWJFMFUUSPOJDJHVBTUJPVTBUJ
FEFMMFCBUUFSJFWBMJEPQFSRVFJQBFTJDIFIBOOPBEPUUBUPJMTJTUFNB
EJSBDDPMUBEJGGFSFO[JBUB
*OGPSNBUJPOPNÇUFSWJOOJOHBWBWGBMMGSÇOFMFLUSJTLBPDIFMFLUSPOJTLB
QSPEVLUFSPDICBUUFSJFSUJMMÅNQMJHUGÕSMÅOEFSTPNIBSJOGÕSUTZTUFN
GÕSÇUFSWJOOJOHPDITPSUFSJOHBWBWGBMM
 Loading...