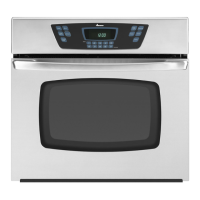
This document is the owner's manual for an Amana Electric Self-Cleaning Wall Oven, specifically model AOES2730, with additional alphanumeric characters potentially following the model number for other series. It provides comprehensive instructions for installation, operation, care, cleaning, and troubleshooting.
Function Description
The Amana Electric Self-Cleaning Wall Oven is designed for baking, broiling, and self-cleaning. It features an electronic control panel that manages various cooking functions, a clock, a timer, and an interior oven light. The self-cleaning function uses high oven temperatures to burn off food residue, simplifying maintenance. The oven is equipped with a cooling fan that operates during heating to protect the electronic controls. A self-diagnostic system is integrated into the electronic control to alert users to potential errors or problems with F-codes displayed.
Usage Features
The oven offers a range of features to enhance cooking and user convenience:
- Electronic Control Panel: The central interface for all oven operations. It includes pads for LIGHT, TIMER ON/OFF, CLOCK, STOP TIME, OVEN CANCEL, COOK TIME, CLEAN, BROIL, and BAKE, along with arrow pads for setting temperature and time.
- Clock and Timer: The CLOCK pad sets the time of day, while the TIMER ON/OFF pad operates a kitchen timer that does not control oven functions but can be set for up to 9 hours and 55 minutes.
- Baking: To bake, users press the BAKE pad and use the arrow pads to set the desired temperature, which can range from 170°F to 550°F in 5-degree increments. The oven preheats, and a signal sounds when the set temperature is reached.
- Timed Baking: This feature allows users to set a specific cooking duration (up to 11 hours and 59 minutes). After placing food in the oven, the COOK TIME pad is pressed, followed by setting the desired cooking time with the arrow pads. Then, the BAKE pad is pressed, and the temperature is set. The oven automatically turns off after the set time elapses, and an end-of-cycle signal sounds.
- Delayed Baking: For delayed baking, users set a desired stop time (up to 11 hours and 59 minutes ahead) and a cooking duration. The oven's electronic control automatically calculates the start time. This feature is useful for preparing meals to be ready at a specific future time.
- Broiling: The broiling system uses intense heat for searing and charbroiling. Users place food on the broiling grid and pan, then press the BROIL pad. The broil setting can be adjusted between "HI" (for red meats) and "LO" (for fruits, vegetables, toasting, and warming breads) using the arrow pads. The oven door should remain closed during broiling.
- Oven Rack Placement: Racks can be easily removed and repositioned to different levels within the oven cavity. The manual advises against lining the oven bottom or racks with foil to prevent damage or fire.
- Child Lockout: A safety feature that disables the electronic oven control to prevent accidental programming by children. It is activated by pressing and holding BAKE and COOK TIME pads for 5 seconds and deactivated the same way.
- 12-Hour Automatic Cancel: If a cooking function runs for more than 12 hours without any interaction with the control panel, the oven automatically turns off as a safety measure.
- Oven Light: An interior light can be turned on or off using the LIGHT pad, providing visibility inside the oven.
Maintenance Features
The manual provides detailed instructions for maintaining the oven, focusing on the self-cleaning function and general cleaning procedures:
- Self-Cleaning Cycle: This feature uses very high temperatures to clean the oven interior. Before starting, users must remove oven racks, broiler pan, and any other utensils. The CLEAN pad is pressed, and the cleaning time (between 2 and 4 hours, with 3 hours recommended) is set using the arrow pads. The oven door locks automatically during the cycle, indicated by "LOCK" flashing and then remaining solid in the display. After the cycle, the door unlocks once the oven has cooled to a safe temperature.
- Delayed Self-Clean Cycle: Similar to delayed baking, this allows users to set a future stop time for the self-cleaning cycle. The control calculates the start time based on the desired cleaning duration and stop time.
- Interrupting Self-Clean: The self-clean cycle can be interrupted by pressing the OVEN CANCEL pad. The door will unlock once the oven has cooled sufficiently.
- General Cleaning: The manual outlines specific cleaning methods for various parts of the oven:
- Heating Elements: Do not clean; any food residue will burn off.
- Broiler Pan and Grid: Clean with soap and a non-abrasive plastic scouring pad. Can also be cleaned in a dishwasher.
- Inside Oven Door: Clean the outside of the door and window with warm soapy water.
- Oven Door Gasket: Do not clean or move the braided gasket; avoid getting cleaning materials on it.
- Outside Finish: Wash all glass with a cloth dampened in soapy water, then rinse and polish with a dry cloth.
- Oven Interior Surfaces (non-self-cleaning areas): Cool before cleaning. Wipe frequently with mild soap and water, rinsing thoroughly.
- Control Panel: Wash with a cloth dampened in soapy water, then rinse and polish with a dry cloth.
- Oven Racks: For heavy soil, clean by hand and rinse thoroughly. Ensure racks are dry before replacing.
- Replacing Oven Light: Instructions are provided for safely replacing the 120-volt, 40-watt appliance bulb, emphasizing disconnecting power and ensuring the bulb and lens are cool.
- Removing Oven Door: Detailed steps are given for removing the oven door for cleaning or servicing, highlighting the need for careful handling due to its weight and the risk of pinching hands in the hinge area.