December 1997 7 RS1300003 Rev. 0
User Operation
2. Connecting Water Supply
WARNING
To avoid electrical shock which can cause severe
personal injury or death, disconnect power to
refrigerator before connecting water supply. After
connecting water supply, connect power.
Caution
To avoid property damage, observe the following:
• Confirm water pressure to water valve is between
20 and 100 pounds per square inch.
• Tighten nut by hand to avoid cross threading.
Finish tightening nuts with pliers and wrenches. Do
not overtighten.
• Check for water leaks and correct if necessary
before returning refrigerator to normal location and
24 hours after connecting.
Important
• Before connecting water supply, contact a plumber to
connect copper tubing to household plumbing in
compliance with local codes and ordinances.
• A self-piercing or
3
/16" saddle valve is not
recommended. Both reduce water flow, become
clogged with time and may cause leaks if repair is
attempted. The correct type of shut off valve requires
a
1
/4" hole to be drilled in water supply pipe prior to
valve attachment. The manufacturer is not
responsible for property damage caused by improper
water connection.
Materials Required
1
/4" (6 mm) flexible copper tubing. Length of copper
tubing must reach from water supply connection plus an
additional 8' (2 m) for service loop behind refrigerator.
Procedure
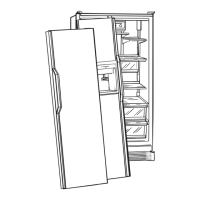
1. Remove plastic cap from water valve inlet port.
Place brass nut and brass sleeve on copper
tubing. Insert copper tubing into water valve inlet
port. Connect brass nut on copper tubing to water
valve inlet port. Confirm copper tubing is secure by
pulling on copper tubing.
A
B
C
D
E
A. “P” clamp B. Copper tubing
C. Brass nut D. Brass sleeve
E. Water valve inlet connection
2. Turn on water supply to refrigerator and check for
leaks. Correct any leaks.
3. Create service loop using extreme care to avoid
kinks. Secure copper tubing to refrigerator cabinet
with a “P” clamp.
4. Plug in power cord.
5. Move refrigerator into final location.
6. Level refrigerator and align doors.
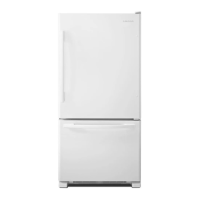
a. Remove toe grille.
b. Turn roller adjustment screw to raise or lower
refrigerator cabinet until refrigerator is stable.
Some models have both front and rear adjustable
rollers.
c. Models with Hinge Adjusting Cam
If tops of doors are not aligned after leveling,
loosen refrigerator door hinge screws
1
/2 turn.
Turn cam clockwise 1 increment at a time until
doors are aligned. Open and close doors. Tighten
hinge screws.
A
B
C
D
A.Rear roller adjustment screw
B.Door hinge screws
C.Hinge adjusting cam
D.Front roller adjustment screw
 Loading...