SmartCom
2
Control Installation and User Manual
16
SmartCom
2
Control Installation and User Manual
17
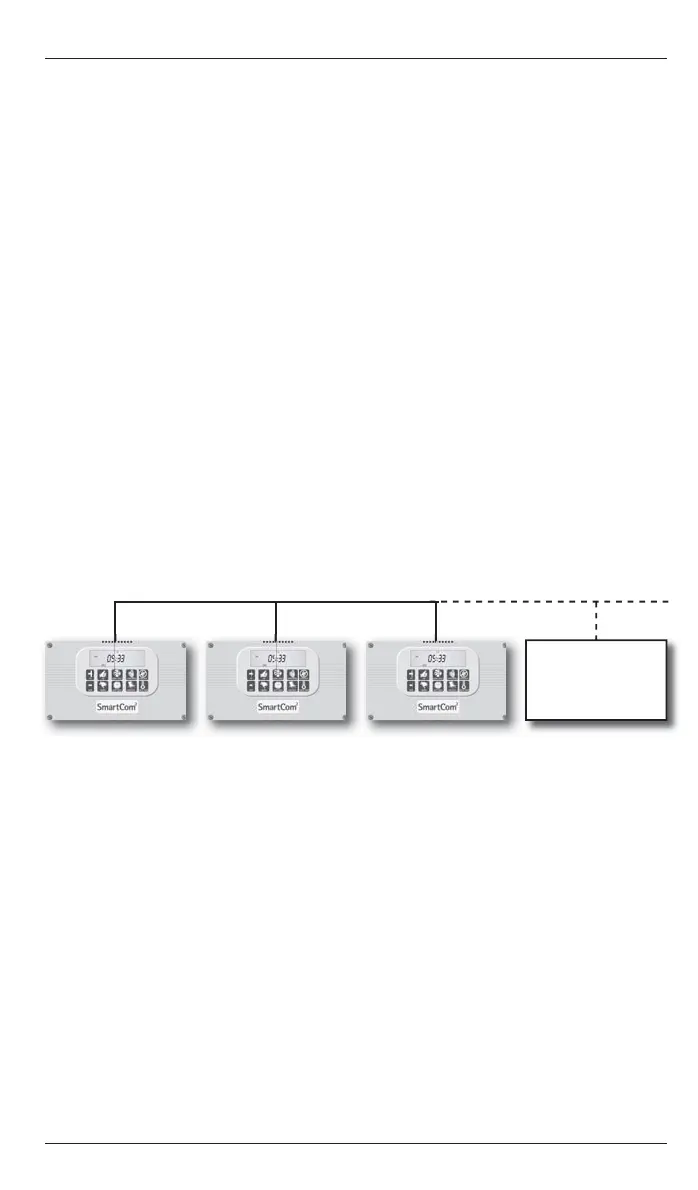
Master
C1=01
Zone A
Slave 1
C1=02
Zone B
Slave 2
C1=03
Zone C
Up to 15
Figure - Check Temp (Multi-zone)
3.8.1 Setting up the network.
First decide which SmartCom
2
is to be the master then, with reference to section
4.2, set the following engineer functions
C1 = 01
C2 = Number of SmartCom
2
s in the Network
Whilst setting up the network the master controller will display communication
errors, these will clear once the network is complete. The slave controllers can now
be programmed in turn.
C1 = SmartCom
2
number
C2 = Number of SmartCom
2
s in the Network
Figure - Networked Controllers
3.8 Networked Controllers (SC-NET only)
With the SmartCom² Network version up to 16 controllers can be linked together
to form a multi-zone heating system. This allows one SmartCom² (the master) to
communicate with the other controllers (the slaves). The master control has the
following capabilities:
Updating the clock on the master controller will globally update the slave
controllers.
The set program and set temperature functions on the slave controllers can be
accessed from the master controller.
The room and set temperatures of the slave controllers can be viewed from the
master controller.
VENT ONLY, HOLIDAY, or OVERTIME buttons on the master controller are applied
to the entire network.
External inputs to the master will apply to the entire network.
LOCKOUTs on slave controllers will be displayed on the master controller and can
then be cleared on each individual controller or from the master controller.
The following functions cannot be programmed over the network and must be
carried out locally on each slave controller:
Modes, i.e. HEAT ONLY, AUTO, etc.
Engineer functions
●
●
●
●
●
●
●
●
When modifying the set program or set temperatures on the master controller in
a multi-zone system, the display will show the [ZONE] icon along with the fl ashing
zone number. Press + or – to display the appropriate zone you want to program.
Press OK to accept. The program and temperatures can now be set for that zone.
●
3.9 Checking the temperature
3.9.1 Pressing the CHECK TEMP button will display the sensor temperature on
the fi rst press and the set temperature on the second press. The third
press will return the display to normal. The display will return to normal 10
seconds after the second press if CHECK TEMP is not pressed a third time.
3.9.2 Pressing the CHECK TEMP and the + button together will display the duct
temperature. The display will return to normal after 10 seconds if not
cancelled by UNDO.
3.8.2 Operating the master controller
Pressing the CHECK TEMP button on the master controller will display the sensor
temperature and set temperature for the master zone (Zone 1) as well as the
slave zones (Zone 2, 3, etc.) The fi rst and second press of the CHECK TEMP button
will display the sensor temperature and set temperature for Zone 1. The third
and fourth press will display the sensor temperature and set temperature for
Zone 2. Further presses will display all other zones. A slave controller will display
temperatures for its zone only.
●
Figure - Holiday mode
Press + or – to increase or decrease the number of holiday days (Values from 00 to
31 are acceptable). Zeros [00] indicates no holiday period set.
Press OK to accept the holiday setting. The [HOLIDAY] icon will be shown along
with the normal display until the start of the holiday period.
The holiday period will start at midnight on the day that it is initiated. From then
on the [HOLIDAY] icon along with the number of days left will be displayed. When
the holiday period expires, the [HOLIDAY] icon clears and the controller returns to
normal operation.
Pressing the UNDO button, at any time, will cancel the holiday period.
●
●
●
●
3.10 Setting a temporary Holiday period
The controller can operate in holiday mode, with frost protection, for a number of
days. The holiday mode is set as follows:
Press the HOLIDAY button. The [HOLIDAY] icon will be displayed and the number
of holiday days will fl ash. The [DAYS] and [OK?] icons are also displayed.
●
If you forget the PIN code there is a master PIN code that is factory set by the
manufacturer. This master PIN code over-rides the unique PIN code and will enable
you to change the PIN code again. Please call the manufacturer for this master PIN
code.
●