EasyManua.ls Logo

American Standard Low Profile Studio S Toilet Elongated Right Height with Seat 2548A User Manual

American Standard Low Profile Studio S Toilet Elongated Right Height with Seat 2548A
4 pages
To Next Page IconTo Next Page
Page #1 background imageLoading...
Page #1 background image
RECOMMENDED TOOLS AND MATERIALS
Putty Knife Regular Screwdriver Adjustable Wrench
Hacksaw Wax Ring/Gasket Closet Bolts
Sealant Tape Measure Carpenters Level
ITEMS INCLUDED
x1 T-Handle
x2 T-Bolt Nuts
SAVE FOR FUTURE USE
2
1
CAUTION: PRODUCT IS FRAGILE. TO AVOID BREAKAGE AND POSSIBLE INJURY HANDLE WITH CARE!
Product names listed herein are trademarks of AS America, Inc.
© AS America, Inc. 2020
NOTE: Pictures may not exactly define contour of china and components.
Low Profile Studio
®
S Toilet
Model 2548A - Elongated, Right Height
®
with Seat
7302429-100 Rev. 1 2/20
INSTALLATION INSTRUCTIONS
CARE AND MAINTENANCE
Thank you for selecting American Standard - the benchmark of fine quality for over 140 years. To ensure this product is
installed properly, please read these instructions carefully before you begin. (Certain installations may require professional
help.) Also be sure your installation conforms to local codes.
!
ROUGHING-IN DIMENSIONS:
NOTE: Distance from wall to closet flange centerline must be as listed below:
IMPORTANT:
Water supply on the wall is required at 10" (254mm) minimum from centerline of the toilet. See rough-in for outside toilet supply line installation.
For behind toilet or hidden supply line installation, install supply at centerline of toilet 11-1/2" (292mm) above finished floor using 'compact' 1/2"
1/4 to 1/2 turn shutoff valve.
NOTE: Depending upon the compact 1/4 turn supply valve purchased, ensure it will correctly fit and operate at the location behind the trap way
inside the toilet!
Check your supply and hose dimensions. Requires a 1/2" (13mm) Supply Valve and Hose.
The geometry of the toilet gives space for these 2 supply line installation locations.
20" x 1/2" Flexible Supply Hose for outside and inside installation of toilet supply line.
Standard 1/2" Supply valve for outside toilet installation or 1/2" 1/4-1/2 turn compact
supply valve for behind or hidden supply line installation.
REMOVE OLD TOILET
a. Close toilet supply valve and flush tank completely. Towel or sponge remaining water from tank and bowl.
b. Disconnect and remove supply line. NOTE: If replacing valve, first shut off main water supply!
c. Remove old mounting hardware, remove toilet and plug floor waste opening to prevent escaping sewer gases.
d. Remove closet bolts from flange and clean away old wax, putty, etc. from base area.
NOTE: Mounting surface must be clean and level before new toilet is installed!
Two water supply line locations are suggested with this toilet, outside of toilet or behind toilet locations.
Water supply valve will need to be relocated. Refer to roughin for water supply locations suggested.
SUPPLY
LINE
1" (25 mm)
16-1/2"
(419 mm)
31-1/8"
(790 mm)
*
5-1/2"
(140 mm)
15-3/8"
(392 mm)
16-3/8"
(416 mm)
12"
(305 mm)
*
11-1/2"
(292 mm)
FINISHED WALL
FINISHED FLOOR
FINISHED
FLOOR
*
10"
(254 mm)
18-1/2"
(468 mm)
BEHIND TOILET
SUPPLY LINE
Question and Answer IconNeed help?

Do you have a question about the American Standard Low Profile Studio S Toilet Elongated Right Height with Seat 2548A and is the answer not in the manual?
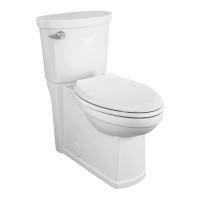
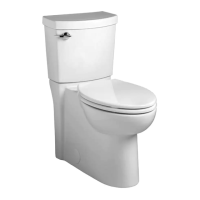
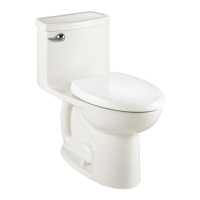
American Standard Low Profile Studio S Toilet Elongated Right Height with Seat 2548A Specifications

General IconGeneral
BrandAmerican Standard
Model Number2548A
CategoryToilets
Toilet TypeTwo-Piece
Bowl ShapeElongated
Rough-In Size12 inches
HeightRight Height
ADA CompliantYes
Seat IncludedYes
MaterialVitreous China
ColorWhite
WarrantyLimited Lifetime
Flush TypeGravity
Water Consumption1.28 GPF
Seat TypeSlow Close
Flush Valve Size3 inch

Summary

INSTALLATION INSTRUCTIONS CARE AND MAINTENANCE

RECOMMENDED TOOLS AND MATERIALS

Lists necessary tools and materials for toilet installation.

ITEMS INCLUDED

Details the components provided with the toilet.

REMOVE OLD TOILET

Step-by-step guide for removing the existing toilet.

ROUGHING-IN DIMENSIONS

Provides critical measurements for toilet placement and water supply.

INSTALL CLOSET BOLTS

Instructions for installing closet bolts into the toilet flange.

INSTALL WAX SEAL

Procedure for applying the wax ring to the toilet's waste flange.

WATER SUPPLY CONNECTION TO TOILET

Guidance on connecting the water supply hose to the toilet system.

POSITION TOILET ON FLANGE

Steps for aligning and securing the toilet onto the closet flange.

INSTALL TOILET

Final steps for setting the toilet and connecting the water supply.

INSTALL TOILET SEAT

Instructions for installing the toilet seat according to manufacturer.

INSTALL COVER

Procedure for attaching the rear seat cover by snapping it into place.

CARE AND CLEANING

REMOVING/CLEANING REGULATOR

TROUBLESHOOTING GUIDE

Does not flush

Addresses issues preventing the toilet from flushing.

Poor or sluggish flush

Solutions for weak or slow toilet flushing performance.

Toilet leaks

Troubleshooting steps for identifying and fixing toilet leaks.

Toilet does not shut off

Diagnoses and fixes for toilets that continuously run.

Related product manuals