Do you have a question about the Ameriwood HOME QUEEN and is the answer not in the manual?
Unit can tip over causing severe injury or death. Anchor unit to stud in wall if instructed.
Do not allow children to climb on unit. Place heavy items on lower shelves or drawers.
Contact customer service for assistance before returning the product.
Call 1-800-489-3351 (toll free) Monday-Friday 9am - 5pm CST for assistance.
Visit ameriwoodhome.com for warranty and product information.
Open item in area of use. Identify, sort parts. Avoid excessive heavy lifting.
Tap dowels lightly. Orient Cam Locks correctly. Use all nails for back panel.
Do not use harsh chemicals. Never push, pull, or drag furniture.
Read instructions carefully, follow order, separate and count parts.
Ensure adequate room. Gather required tools: screwdrivers and hammer.
Use power drills cautiously. Slow down and stop when screw is tight to prevent stripping.
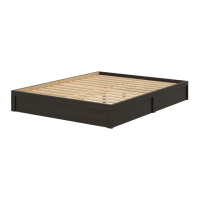
Identifies Top (A) and Upper Rail (D) components.
Identifies Left/Right Vertical Molding (B/C) and Stringer (G).
Identifies Legs (H) and Frame Assembly (I).
Fasten one Frame Assembly (I) to the Upper Rail (D) using three screws (#A12930).
Fasten the Stringer (G) to both Frame Assemblies (I) using six screws (#A12930).
Attach Legs (H) to the assembly using eight screws (#A12930), noting orientation.
Attach Vertical Moldings (B, C) using ten screws (#A12930), adjusting alignment.
Insert and turn five quick connects (#A22980) to join Upper Rail (D) and Top (A).
Install two connecting plates (#A54285) between the bed frame and Legs (H) for reinforcement.
Register online for trend details, surveys, deals, and replacement parts.
Rate your product on your retailer's website and provide feedback.
| Brand | Ameriwood HOME |
|---|---|
| Model | QUEEN |
| Category | Indoor Furnishing |
| Language | English |