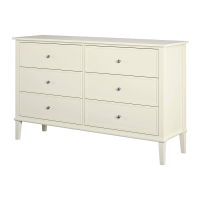
Do you have a question about the Ameriwood HOME Crescent Point 6 Drawer Dresser and is the answer not in the manual?
Unit can tip over causing severe injury or death; anchor to stud, limit climbing.
Put heavy items low, two people for assembly.
Contact support for help; visit website for tips.
Assemble in area, identify, sort, and count parts.
Use hammer for dowels, orient cam locks correctly, use all nails.
Left/Right Sides, Top/Center Panels.
Bottom Bars, Front Bar, Support Bar.
Drawer Fronts, Sides, Back, Bottom, Supports, Back Panel.
Minifix Bolt, Cams, Euro Screw, Csk Screws, Unitar Screw.
Wood Dowels, Nail Pins.
Drawer Slides (300mm), Handles.
Allen Key, Glue, Metal/L-Mounting Brackets.
Read steps, gather tools, ensure space, count parts.
Caution with drills to avoid stripping screws.
Learn how to use the cam lock system for assembly.
Attach main panels A, B, D and frame parts E, F, G, I using wood dowels (part 4).
Insert wood dowels (part 5) into drawer sides L, M, O.
Attach drawer fronts J, K, frame part H, and top panel C using Minifix bolts (1) and L-Mounting Brackets (17).
Attach metal L-brackets (13) to frame part H using Csk screws (7).
Install drawer slides (21, 22) onto panels A, B, D using Euro screws (6).
Insert and engage cam locks (part 2) onto frame parts F and H.
Connect frame parts E, F, H using Unitar screws (18) and Allen key (15).
Connect frame parts E, G using Unitar screws (18) and Allen key (15).
Connect frame parts D, E, F, G, H using Unitar screws (18) and Allen key (15).
Attach drawer support Q to the frame using cam locks (part 2).
Connect panels A, I, D and frame parts E, G, H using cam locks (part 2).
Connect panels A, D and frame parts E, G, H using cam locks (part 2).
Connect panels A, B, D and frame parts E, G, H using cam locks (part 2).
Attach front bar H to the main assembly using Csk screws (7).
Attach top panel C to the main assembly using cam locks (part 2).
Secure back panel Y to the frame using nail pins (10).
Assemble drawer sides L, N, M, O using Csk screws (8).
Slide drawer bottom Z into the assembled drawer sides.
Attach drawer fronts J/K to drawer assembly using cam locks (part 3).
Attach drawer handles (14) to drawer fronts J/K using Csk screws (9).
Attach drawer slides (22) to drawer fronts J/K using Csk screws (7).
Install the anti-tip safety bracket to secure the unit to the wall.
Top panel supports up to 75 lbs / 33.3 kgs.
Each drawer supports up to 35 lbs / 15.5 kgs.
Bottom panel supports up to 75 lbs / 33.3 kgs.
Do not place TVs on furniture; risk of injury.
Certificate applies to the Dorel Home Furnishings product in this manual.
Product complies with CPSC Ban on Lead-Containing Paint (16 CFR 1303).
Product distributed by Dorel Home Furnishings; manufactured in Shah Alam, Malaysia.
Receive trend details, surveys, exclusive deals, and part service.
Register product by visiting ameriwoodhome.com.
Rate product on retailer's website and leave feedback.
| Brand | Ameriwood HOME |
|---|---|
| Model | Crescent Point 6 Drawer Dresser |
| Category | Indoor Furnishing |
| Language | English |