This document is an instruction manual for Amica gas cooktops, specifically models PHCZ6511, KMG13169C, and PHCG4.1ZpZtC. It provides comprehensive information on the installation, operation, maintenance, and troubleshooting of these appliances.
The cooktops are designed for cooking and are not to be used for any other purpose, such as heating, as this can be dangerous. The manufacturer emphasizes user safety and efficiency, stating that the cooktops' safety and functionality are checked at the factory. Users are strongly advised to read the manual thoroughly before use to ensure proper and correct operation and to prevent accidents. The manual should be stored near the appliance for easy reference.
Function Description:
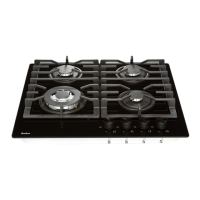
The Amica cooktops are gas-powered cooking appliances equipped with multiple burners for various cooking needs. They feature control knobs for adjusting flame size and an ignition system. Some models include leak protection, which automatically cuts off the gas supply if the flame extinguishes. The cooktops are designed to be installed into a worktop.
Important Technical Specifications:
- Model Identifiers: PHCZ6511 / KMG13169C, PHCG4.1ZpZtC, 1106076
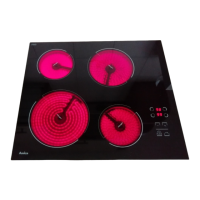
- Hob Type: Gas-electric (indicated as O/V/O, likely referring to electric ignition for gas burners)
- Number of Gas Burners: 4
- Energy Efficiency for each gas burner (EE gas burner):
- FL (Front Left): 53.5
- RL (Rear Left): 53.5
- RR (Rear Right): 53.5
- FR (Front Right): 53.5
- C (Center): -
- Energy Efficiency of gas hob (EE gas hob): 53.5
- Dimensions:
- Height: 98 mm
- Depth: 520 mm
- Width: 600 mm
- Weight: 12.5 kg
- Burner Heat Loads:
- WOK burner: 2.8 kW
- Small burner: 1 kW
- Medium burners: 1.8 kW
- Appliance Class: See rating plate
- Gas Connection: R1/2" connecting pipe for gas connection. For LPG (propane-butane), a Ø 8 x 1 mm hose coupling is threaded onto the connector.
- Gas Types: The cooktops are delivered with burners suitable for the gas type specified on the type plate and guarantee certificate (e.g., 2H G20/20mbar). Conversion to other gas types (e.g., 3+, 3B/P G30/28+30mbar, 3B/P G30/37mbar, 3B/P G30/50mbar) is possible by replacing nozzles and adjusting the reduced valve flow.
- Nozzle Diameters (for different gas types):
- 2H G20/20mbar: Small (72), Medium (92), Large (-), WOK (55 + 2 x 75)
- 3+, 3B/P G30/28+30mbar: Small (52), Medium (67), Large (-), WOK (37 + 2 x 55)
- 3B/P G30/37mbar: Small (46), Medium (62), Large (-), WOK (37 x 2 x 52)
- 3B/P G30/50mbar: Small (45), Medium (52), Large (-), WOK (26 + 2 x 45)
Usage Features:
- Energy Saving: The manual provides tips for saving energy, such as using appropriate cookware (flat, thick-bottomed pots with lids), selecting properly sized cookware, keeping burner surfaces clean, and avoiding installation near cooling appliances.
- Flame Selection: The flames should be light blue with a clearly visible inner cone. The size of the flame is adjusted via the control knob. For initial cooking, a large flame is recommended, then reduced to a saving flame position to maintain cooking. Stepless adjustment is also possible. It is prohibited to adjust the flame between the "Burner OFF" and "Burner ON large flame" positions.
- Ignition (Zp models): Press and turn the control knob anti-clockwise to the "Burner ON large flame" position. Hold until the gas ignites, then release and set the desired flame size.
- Ignition with Leak Protection (Zt models): Press and hold the burner's control knob depressed for approximately 10 seconds in the "Burner ON large flame" position to activate the protection device. If the protection doesn't activate, repeat the attempt. The leak protection will cut off the gas supply if there is no flame for about 60 seconds.
- Cookware Selection: The diameter of the pot should be slightly larger than the flame, ideally 2.5-3 times the flame diameter. Recommended pot diameters are: 90-140 mm for small burners, 140-220 mm for medium burners, 200-240 mm for large burners, and 220-260 mm for WOK burners. The pot's height should not exceed its diameter. Using lids during cooking minimizes heat loss and decreases cooking time.
- Emergency Procedures: In case of a gas leak, turn off all burners, set the gas cut-off valve to OFF, ventilate the kitchen, and report the unit for repair to a licensed service department. Do not use the appliance until it has been repaired.
- Troubleshooting: The manual includes a troubleshooting guide for common issues like the appliance not working (power cut), burner not igniting (flame slots contaminated, power cut, gas supply break, contaminated igniter), igniter not working (contaminated igniter), and burner extinguishing (control knob released too soon).
Maintenance Features:
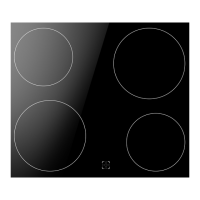
- Daily Cleaning: The ceramic plate should be cleaned daily using warm water and mild dishwashing liquid. Abrasive or aggressive cleaning agents, scrubbing powders, or scratching sponges should not be used.
- Burners and Grate Cleaning: Soiled burners and grates should be removed, washed with warm water and dishwashing products, then wiped dry. Flame openings in the rings under the caps must be kept clean. Steel wire or drill holes should not be used. Burner elements must always be clean to prevent hampered gas flow and incorrect flame.
- Work Panel Cleaning: The enamel-coated work panel should be cleaned with warm water and a mild solution of dishwashing liquid.
- Periodic Inspections: Regular inspections of control elements and units are recommended. After the warranty expires, technical inspections by a service department should be ordered every two years. All operational faults must be repaired, and cooktop units maintained according to the maintenance schedule.
- Gas Type Conversion: Conversion to a different gas type must only be carried out by a licensed and authorized technician. This involves replacing burner nozzles and adjusting the reduced valve flow rate. A label indicating the new gas type must be placed on the appliance after conversion.
- Valve Adjustment: Valve adjustment is performed with the control knob set at the "Burner ON saving flame" position. The knob is removed, and the flame is adjusted with a tiny screwdriver. After adjustment, the burner should be heated at full open for 10 minutes, then turned to the saving setting. The flame should not extinguish or move to the nozzle.