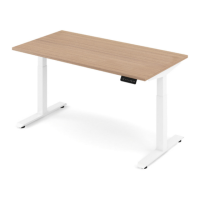
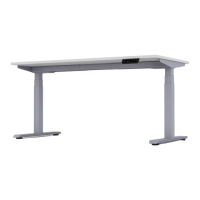
The Activ Pro 2.0 is a height-adjustable desk designed for use in various environments, including residential and commercial settings. It is available in models APS2 and APS3 for the desk, and APS2B and APS3B for the height-adjustable base. The desk's primary function is to allow users to easily adjust its height, promoting ergonomic working postures and flexibility.
Important Safety Instructions and Warnings:
The manual emphasizes several critical safety instructions to prevent injury and damage. Users must read all instructions before use and save them for future reference.
Technical Specifications:
- Models: Activ Pro 2.0 Height Adjustable Desk (APS2, APS3), Activ Pro 2.0 Height Adjustable Base (APS2B, APS3B).
- Rating: 120Vac, 60Hz, 5A.
- Maximum Load: 250 lbs (including worksurface).
- Maximum Weight of AMQ Worksurface: 60 lbs.
- Maximum Load Allowed on Activ Pro 2.0 Desk (with AMQ worksurface): 190 lbs.
- Duty Cycle: 2 minutes of continuous operation on / 18 minutes non-operation off.
- Worksurface Dimensions (AMQ):
- Width: 46", 48", 52", 54", 58", 60", 64", 66", 70", or 72".
- Depth: 23", 24", 29", or 30".
- Thickness: 1".
- Worksurface Overhang: Must be 1" +/- 1/16" (distance from side of support cantilever to edge of worksurface).
- Worksurface Depth Limitation: Not to exceed 30" (762 mm).
- Worksurface Width Limitation: Maximum 72" (1828 mm).
- Worksurface Longitudinal Position: On cantilever must be on centerline +/- 1/8" (3.17 mm).
- Fasteners: Adjustable-height bases include fasteners for AMQ worksurfaces. These may be suitable for worksurfaces with medium-density or higher particleboard/fiberboard cores with HPL, LPL, or veneer & backers, and a thickness of 0.984" (25 mm) or greater. Fasteners must be located a minimum of 0.984" (25 mm) from any edge. All fastener locations provided in base attachment features MUST be used.
- Flammability: Any worksurface or similar large part > 10ft² must have a flame spread < 200 and a smoke developed index < 450 when tested per UL 723.
- Sharp Edges: All accessible edges of the worksurface must meet UL 1439 test for sharp edges.
Usage Features:
- Height Adjustment: The desk allows for easy height adjustment using an LED control handset.
- Memory Presets: Up to 4 height memory presets can be programmed. To program, use the up/down arrows to find the desired height, then press "M" followed by the number 1, 2, 3, or 4. To test, adjust the table to a different height, then push the programmed number. The base may require holding the button for 2-3 seconds to activate.
- Handset Installation Options: The handset can be installed flush with the worksurface for easy access or inset by 1/2" (bottom edge flush, top inset).
- Optional Castors: The desk can be fitted with castors (with brakes) for mobility, replacing the standard glides.
Maintenance Features:
- Regular Inspection: Users are advised to regularly inspect for damage, broken parts, and loose fasteners.
- Authorized Repairs: Any repairs must be made using only factory-authorized parts and methods.
- Contact for Support: For missing parts, assembly difficulties, or product-related questions, contact cc@amqsolutions.com.
Components and Hardware:
- Hardware: M1016 (x8), ST518 (x2), ST525 (x19), M616 (x8), Cable Management Clip (x2), 8mm Allen Key, 4mm Allen Key.
- Components: Column set (left & right, 3-stage or 2-stage), Stretcher Frame, Wire Management, T-Type Cantilever set (left & right), C-Type Cantilever set (left & right), Controller cable (x1), Power cable (x1), Control Box (x1), LED control handset (x1).
- Feet Set: Available in 23" or 28" (23" for 23" or 24" depth worksurface; 28" for 29" or 30" depth worksurface).
- Optional: Castor with brake (x4).
Assembly Process Overview:
- Preparing for Assembly: Lay the worksurface top-down on the floor, place the Stretcher Frame on it, and open the frame.
- Adjusting Stretcher Frame & Cantilevers: Adjust the Stretcher Frame to the desired width, insert cantilevers on each end, ensure the worksurface is center-aligned with the cantilever depth, and has a 1" overhang on each end. Tighten all inset screws using a 4mm Allen key.
- Attaching Stretcher Frame: Double-check the position of the Stretcher Frame and Cantilevers, then fix 8 frame screws (ST5*25) with a wireless drill.
- Attaching Columns: Press columns to snap buckles into stretcher frame grooves. Adjust columns and cantilevers, then tighten M6*16 screws (x8) with a 4mm Allen key.
- Attaching Cantilevers and Handset: Use a wireless drill to tighten ST518 screws (x2) for the handset and ST525 screws (x8) for the cantilevers onto the worksurface.
- Feet Assembly: Attach feet using M10*16 socket screws (x8). Match all 4 holes first to confirm fit before tightening completely with an 8mm Allen key.
- Attaching Wire Management: Slide to open the cover of the Wire Management. Position it centered with the worksurface width and between the Stretcher Frame and the worksurface edge, then attach with wood screws (ST5*25 x3).
- Attaching Control Box: Place the control box on top of the slot plate and push it inside to snap it onto the slot plate. Ensure the M1 connector faces the middle stretcher bar connector.
- Connecting Handset and Power:
- Connect the Left motor to the M2 port and the Right motor to the M1 port.
- Connect the power plug after motors and handset are connected.
- Reset the base by holding the down arrow button until it reaches its lowest height.
- Attach plastic cable management clips to secure cables and wires.
- Organize exposed wires into the Wire Management box and close the cover.
- Replacing Glides with Castors (Optional):
- Adjust the desk to its lowest height and flip it over approximately 90° (handset facing up) on a level floor, preferably with carpets (requires two people).
- Remove the glides.
- Use a number 17 open wrench (not provided by AMQ) to secure the castors.
- Lock the castors. Two people are needed to turn the desk upright.
- Program Height Memory Presets: Follow the steps outlined in the "Usage Features" section.
The Activ Pro 2.0 is designed to be a versatile and user-friendly height-adjustable desk, provided all safety and assembly instructions are strictly followed.