This document is a user manual for the UBIND60FLC Induction Hob, providing instructions for installation, operation, and maintenance.
Function Description
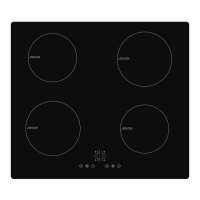
The UBIND60FLC is an induction hob designed for cooking. Induction cooking is an advanced, efficient, and economical technology that generates heat directly in the pan through electromagnetic vibrations, rather than heating the glass surface indirectly. The glass surface becomes hot only as a result of the pan warming it up. The hob features four cooking zones, each with an "INDUCTION" label, and a touch control panel for operation.
Important Technical Specifications
- Model: UBIND60FLC
- Cooking Zones: 4 Zones
- Supply Voltage: 220-240V~
- Installed Electric Power: 6400W
- Product Size (L×W×H): 590mm x 520mm x 58mm
- Building-in Dimensions (A×B): 565mm x 495mm
- Minimum Space Around Hole for Installation: 5 cm
- Minimum Work Surface Thickness: 30 mm
- Minimum Safety Distance between Hotplate and Cupboard Above: 760 mm
- Max Power per Heating Zone: 2000W (two zones), 1200W (two zones)
Usage Features
The induction hob is operated via a touch control panel. The controls are responsive to touch, requiring no pressure, and a beep is heard with each registered touch. It's important to keep the controls clean, dry, and free of objects to ensure proper operation.
Starting to Cook:
- Touch the ON/OFF control for 3 seconds. The hob enters standby mode, indicated by "–" on all displays.
- Place a suitable pan on the desired cooking zone, ensuring the pan bottom and cooking zone surface are clean and dry.
- Select the relevant zone using the "Zone select key" (A). The selected zone's symbol will illuminate.
- Adjust the power level using the "+" (E) and "-" (D) keys. The power level starts at 5. Pressing "+" increases the level from 5 to 9, while pressing "-" decreases it from 9 to 0. If no heat setting is chosen within 1 minute, the hob automatically switches off. The heat setting can be modified at any time during cooking.
Cookware Compatibility:
- Only use cookware with a base suitable for induction cooking, identifiable by an induction symbol or by a magnet test (a magnet should be attracted to the pan's base).
- Cookware made from pure stainless steel, aluminum, copper without a magnetic base, glass, wood, porcelain, ceramic, and earthenware is not suitable.
- Pans should have a smooth, flat base, be the same size as the cooking zone, and be centered on the zone for maximum efficiency. Pans less than 140 mm in diameter may not be detected.
- Avoid using cookware with jagged edges or curved bases.
- Always lift pans off the hob; do not slide them to prevent scratching the glass.
Finishing Cooking:
- Select the relevant zone using the "Zone select key" (A).
- Press the "-" key to decrease the power to "0", or press "+" and "-" simultaneously to immediately set the power to "0".
- "H" will be displayed for hot cooking zones, indicating they are hot to touch. This disappears when the surface cools to a safe temperature and can be used as an energy-saving function to heat further pans.
Child Lock Function:
- To prevent unintended use, the controls can be locked.
- Touch the "Child lock key" (B) for 3 seconds. The timer indicator will show "Lo".
- To unlock, ensure the hob is on, then touch and hold the "Child lock key" for a while.
Keep Warm Function:
- Touch the "Zone select key" for the desired zone; an indicator next to the key will flash.
- Touch the "Keep warm key" (G); the cooking zone indicator will display "SSS".
- To cancel, select the cooking zone and touch the "Keep warm key" again. The cooking zone will turn off.
Pause Function:
- When the hob is on and working, press the "Timer key/Pause key" (F) for 3 seconds. All burners will stop, and all LED indicators will show "=".
- Press the "Timer key/Pause key" (F) for 3 seconds again to restart all settings at their previous levels.
Timer Function:
The timer can be used in two ways:
-
As a Minute Minder (without selecting a cooking zone):
- Ensure at least one cooking zone is on.
- Touch the "Timer key/Pause key" (F). The minder indicator will flash, and "10" will show.
- Set the time using the "+" or "-" controls. A single touch adjusts by 1 minute; touch and hold adjusts by 10 minutes. Touching both "+" and "-" cancels the timer.
- The display shows the remaining time. A buzzer sounds for 30 seconds when the time finishes.
-
To Turn Off One or More Cooking Zones:
- Select the relevant working cooking zone using the "Zone select key" (A).
- Press the "Timer key/Pause key" (F); the timing indicator flashes.
- Set the time from 1 to 99 minutes using the "+" and "-" buttons (1-minute or 10-minute adjustments). Touching both "+" and "-" cancels the timer.
- The display shows the remaining time, and the timer indicator flashes for 5 seconds. A red dot next to the power level indicator illuminates to show the zone is selected.
- When the timer expires, the corresponding cooking zone switches off automatically. Other zones continue operating.
- If using the timer as an alarm and to switch off a zone, the alarm time is shown first. Pressing the cooking zone key shows the switch-off timer's remaining time.
Maintenance Features
Safety Warnings and Protection:
- Cracked Surface: If the surface is cracked, switch off the appliance immediately to avoid electric shock.
- Over-Temperature Protection: A temperature sensor monitors the hob's internal temperature. If excessive temperature is detected, the hob automatically stops operation.
- Detection of Small Articles: If an unsuitable or non-magnetic pan, or a small metallic item (knife, fork, key) is left on the hob, it automatically goes into standby in 1 minute. The fan will continue to cool the hob for another minute.
- Auto Shutdown Protection: This safety feature automatically shuts down the hob if cooking is left unattended. Default working timers vary by power level (e.g., 240 minutes for levels 1-3, 90 minutes for level 9). If a pot is removed, the hob stops heating immediately and switches off after 2 minutes.
Troubleshooting (Failure Display and Inspection):
The hob displays protective codes for abnormalities:
- U (No pot or unsuitable pot): Replace the pot.
- ER03 (Water/pot on control): Clean the user interface.
- F1E (Connection failure between display board and mainboard): Check cable connection or replace mainboard/power.
- F3E (Coil temperature sensor failure): Replace the coil sensor.
- F4E (Mainboard temperature sensor failure): Replace the mainboard.
- E1E (Ceramic glass plate temperature too high): Restart after the hob cools down.
- E2E (IGBT temperature too high): Restart after the hob cools down.
- E3E (Abnormal supply voltage - too high): Inspect power supply; power on after it's normal.
- E4E (Abnormal supply voltage - too low): Inspect power supply; power on after it's normal.
- E5E (Cooking zone temperature sensor failure): Check cable connection or assembly.
Users are advised not to disassemble the unit themselves and to contact the service department for repairs.
Installation Considerations:
- Installation must be performed by qualified personnel.
- The hob should not be installed directly above dishwashers, fridges, freezers, washing machines, or clothes dryers due to humidity.
- Ensure proper heat radiation for reliability.
- Walls and the area above the hob must withstand heat.
- Sandwich layers and adhesives must be heat-resistant.
- The power cord must not be accessible after installation.
- The power cord must not touch hot parts and its temperature should not exceed 75°C.
- The unit must be placed on a stable, smooth surface during installation.
- Cut out the worktop to the specified dimensions and seal the cut edge with silicone or PTFE before fitting the hob.
- Stretch the supplied seal along the underside edge of the hob, ensuring ends overlap.
- Do not use adhesive to fix the hob. Apply gentle downward pressure to fit it into the cutout, ensuring a good seal.
Electrical Connection:
- Connect to the mains power supply only by a suitably qualified person.
- Ensure the domestic wiring system, voltage, and power supply cable sections are suitable for the hob's power draw.
- Do not use adapters, reducers, or branching devices.
- If connecting directly to the mains, an omnipolar circuit-breaker with a minimum opening of 3mm between contacts must be installed.
- The installer must ensure correct electrical connection and compliance with safety regulations.
- The cable must not be bent or compressed and should be regularly checked and replaced by authorized technicians.