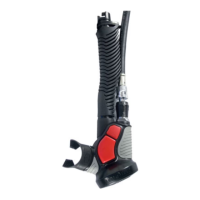
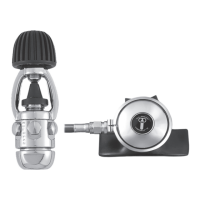
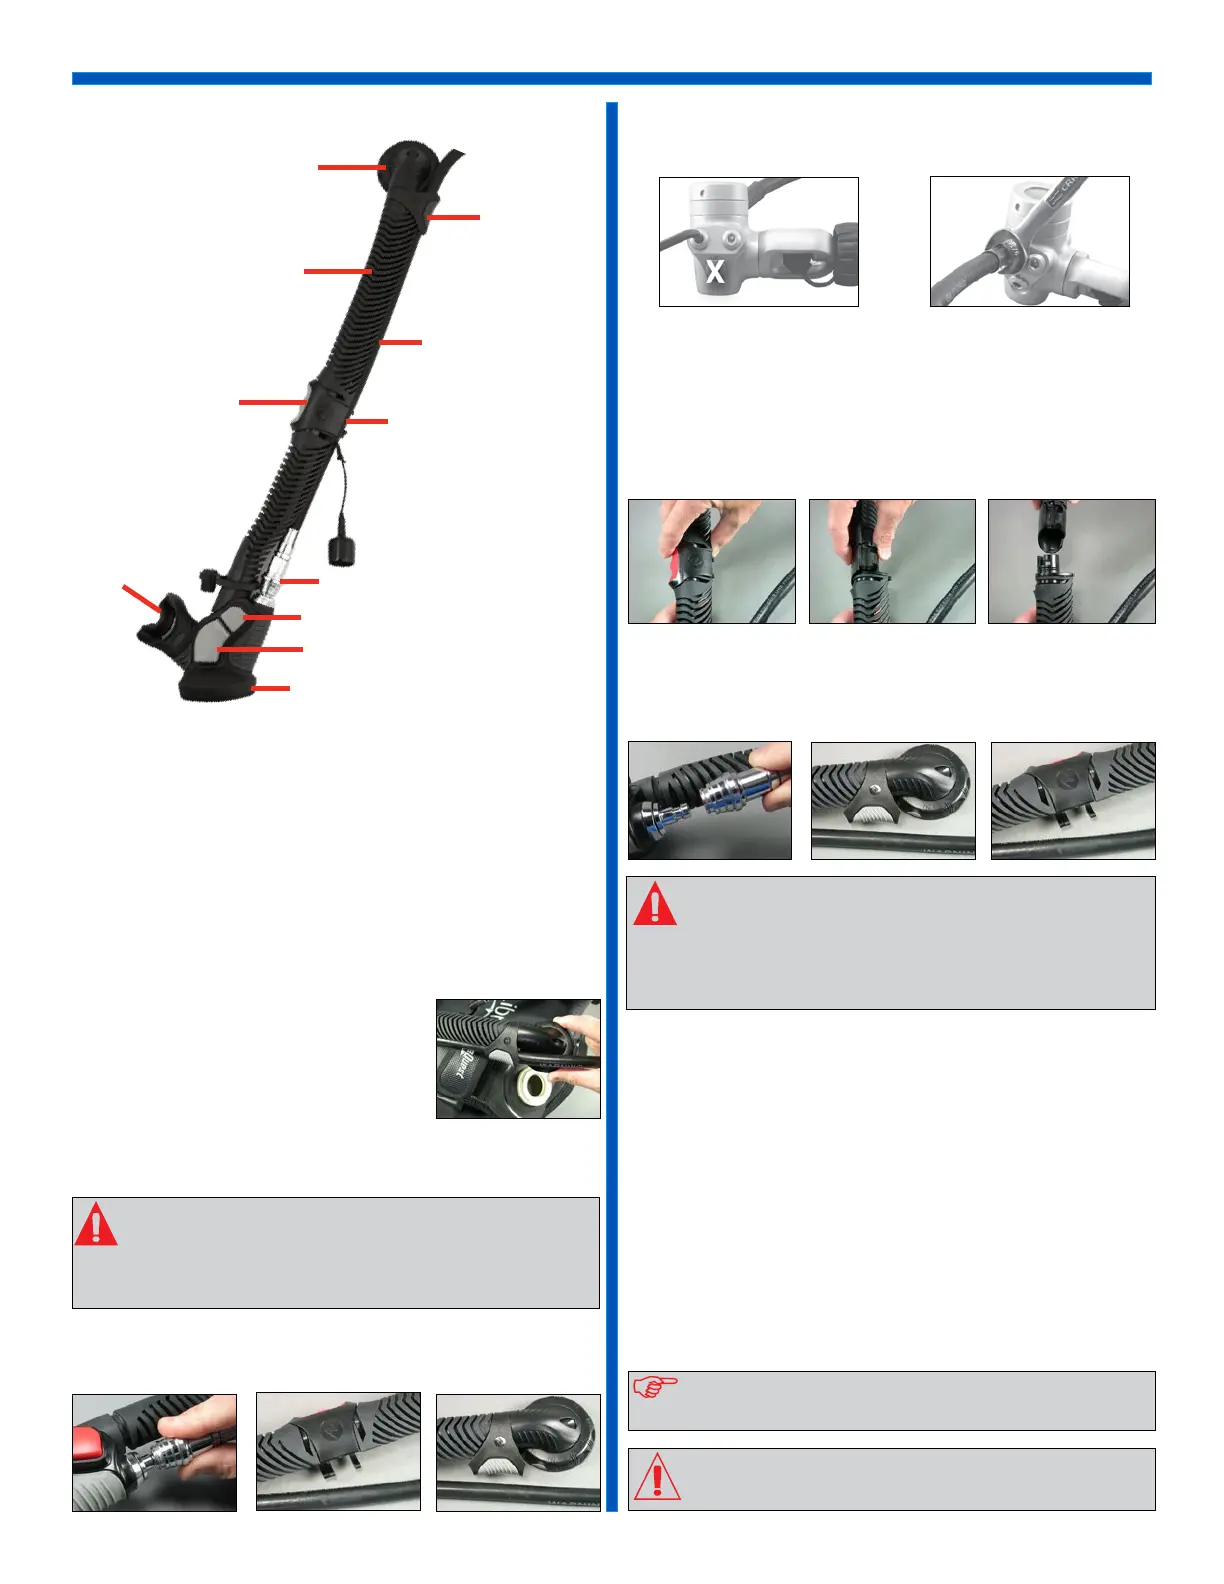
RELIEF VALVE
CORRUGATED HOSE
TRIM GRIP
UPPER HOSE
GUIDE
MEDIUM PRESSURE
(MP) HOSE
QUICK DISCONNECT FITTING (QD)
MIDDLE HOSE GUIDES
POWER INFLATION BUTTON
ORAL INFLATION/DEFLATION
BUTTON
PURGE BUTTON
MOUTHPIECE
QUICK REFERENCE
INSTALLATION
Aqualung recommends that you bring your Airsource, buoyancy compensa-
tor and regulator together to your authorized dealer for the installation of
your Airsource. The retailer can also answer any questions you may have
pertaining to the information in this manual. If it is not possible to return to
your authorized dealer, you may install the Airsource onto your BC and at-
tach the MP inator hose to your rst stage by carefully following the steps
in the following procedure.
WARNING: DO NOT connect the inator hose to a high
pressure (HP) port. This may cause the hose to burst when
pressurized, which can result in serious injury. If you are
unsure which regulator port is medium pressure (MP) or
high pressure (HP), consult your regulator owner’s manual
or your dealer before attaching the hose.
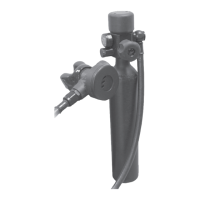
1. Remove the medium pressure (MP) inator hose from the male QD tting
of the Airsource by grasping the collar of the MP inator hose and sliding it
upwards. detach the MP inator hose from the middle and upper hose guides.
To install, unscrew original inator assembly coun-
terclockwise at the shoulder. Place new Airsource
assembly onto threaded portion, and screw clock-
wise until tight. Make sure the gasket is in place and
in good condition on the threaded portion of the BC.
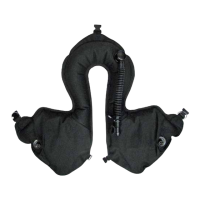
Attaching Airsource to BC
Attaching MP Hose to the First Stage
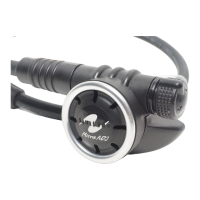
Removal/Replacement of the Airsource from the
Trim Grip
2. Remove the port plug from a medium pressure (MP) port on the regulator
using an appropriately sized wrench. Check to ensure the hose o-ring is present
and in good condition, tighten the threaded end of the hose into the port. Torque
to 40 inch-pounds (4.5 Nm) with a 9/16” wrench.
The Airsource is specically designed so that the lower unit can be easily
detached and stored with your regulator.
1. REMOVAL: While holding the molded hose steady just below the Trim
Grip™, turn the Trim Grip 1/4 turn clockwise with the other hand. Pull the Trim
Grip upward to disengage the lower assembly.
2. REPLACEMENT: Follow step #1 in reverse order.
3. To re-attach the MP inator hose, push the QD hose tting onto the male
QD tting of the Airsource. Ensure the MP hose is securely connected. Clip the
MP hose into the hose guides.
INFLATION
Just as with a conventional inator, power (MP) or oral ination can be
utilized when using the Airsource. Both procedures need to be practiced
to become familiar.
BC Ination
The power inator is a primary means for adding air to the otation cell.
The power ination system enables you to inate the BC simply by pressing
the small grey ination button. With practice you will soon be able to quickly
make buoyancy adjustments without interrupting your diving activity.
Medium Pressure (MP) Power Ination
NOTE: Whenever inating or deating your BC, be sure to make
small but frequent adjustments. Larger adjustments make the
maintenance of neutral buoyancy difcult.
CAUTION: If when pressing the red ination button there is
no airow, conrm the medium pressure (MP) inator hose is
attached securely.
WARNING: DO NOT disconnect the MP inator hose while
underwater unless in an emergency situation. Disconnecting
the MP inator hose while underwater will allow water and
debris to enter the regulator causing premature wear and
possible freeow. If the MP inator hose is disconnected while
underwater, the Airsource must be returned to an Authorized
Aqualung Dealer for service.
AIRSOURCE III SECOND STAGE OWNERS MANUAL
3