Do you have a question about the AquaSource FS3A0000 and is the answer not in the manual?
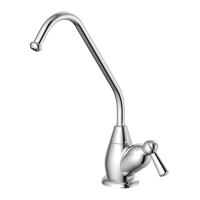
Lists all parts (A-F) and their quantities for the dispenser package.
Lists hardware components (AA, BB) and their quantities included in the package.
Advises on plumbing codes, drain cover, and tube connection integrity during installation.
Lists assembly time, required tools, and pre-installation checks for the dispenser.
Instructions to turn off the water supply and remove the existing faucet if necessary.
Guidance on selecting the dispenser's mounting hole location and required diameter.
Connects RO system brine water line to the dispenser's air gap and drain.
Connects simple systems and uses an optional plug for the air gap hole.
Instructions for installing the dispenser and base through the sink opening.
Attaches the slotted washer, spacer, lock nut, and nut to the dispenser shank.
Connects the quick connect adapter to the end of the dispenser shank.
Inserts the fresh water line from the RO system into the quick connect adapter.
Turns on water supply, checks for leaks, and flushes the system for 15 minutes.
Advises on periodic cleaning with a soft cloth and avoiding abrasive materials.
Addresses leaks from the handle or weeping hole and improper pipe connections.
Explains warranty coverage, claims process, buyer responsibilities, and disclaimers.
Details all available replacement parts with their corresponding part numbers for ordering.
| Brand | AquaSource |
|---|---|
| Model | FS3A0000 |
| Category | Kitchen & Bath Fixtures |
| Language | English |