Do you have a question about the Argo POLIFEMO and is the answer not in the manual?
Switch off immediately and contact service centre for problems; do not attempt repairs.
Do not remove or replace parts yourself as it may affect product safety.
Avoid touching the power cord with wet or damp hands to prevent electric shock.
Do not insert objects into grilles to prevent leaks or short-circuits.
Do not spray flammable substances or pesticides near the product.
Do not use if the cord or plug is damaged; replacement must be done by qualified personnel.
Do not bend or place heavy objects on the power cord.
Turn off and unplug before any maintenance or moving.
Always unplug from the socket when the appliance is not in use.
Press OFF, then unplug by the plug, not the cord.
Do not pour water over the product to avoid short-circuits and damage.
Avoid directing airflow at children for extended periods for health reasons.
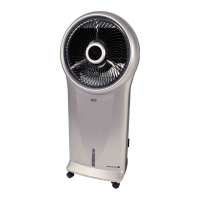
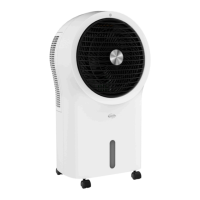
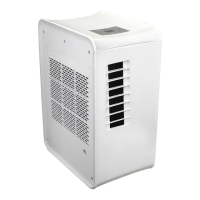
The front grille that directs airflow.
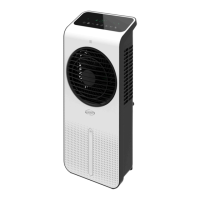
Shows operational status and settings.
Indicates the current water level in the tank.
Interface for manual operation of the appliance.
A dedicated space to store the remote control.
Handles for easy transportation of the appliance.
Access point for the evaporative panel with dust filter.
The panel responsible for cooling and humidification.
Reservoir for water used in cooling mode.
Area for winding and storing the power cord.
Components allowing mobility of the appliance.
Overview of buttons like Start/Speed, Cooler/Humidifier, Timer, Mode, and Swing.
Explanation of the three fan modes and their speed patterns.
Details on indicators for fan speed, mode, and timer.
Instructions for using the remote control and its buttons.
Guide on inserting and removing batteries (CR2032).
Instructions to fill the tank with demineralized water for cooler mode.
Guidance on using synthetic ice packs for enhanced cooling.
Procedures for cleaning the outside surface, dust filter, and cooling panel.
Recommendations for storing the appliance when not in use.
This document outlines the operation, features, and maintenance of the Argo Polifemo evaporative air cooler, designed to provide both fan and cooling/humidifying functions.
The Argo Polifemo is a versatile appliance that functions as both a fan and an evaporative cooler/humidifier. When operating as a fan, it offers three distinct modes: Normal, Natural, and Sleep, each with three fan speed options (low, medium, and high). In its cooler/humidifier mode, the unit utilizes demineralized water from a rear tank. Air is drawn from the room, passed through a dust filter and an evaporative panel. This panel is continuously humidified by a system that draws water from the tank and sprays it onto the panel. As hot air passes through, some of the water evaporates, cooling the air before it is released back into the room, creating a sensation of reduced temperature. The appliance is designed for ease of use, requiring no complex installation; it simply needs to be placed on a flat, stable surface and connected to a standard power socket. A sound indicates when the appliance is in standby, ready to be switched on or off via the START/SPEED and OFF buttons, respectively. A low water level in the tank triggers a continuous 10-second sound alert, after which the cooling mode automatically stops. The unit also automatically shuts down if the tank is removed.
The appliance is controlled via a user-friendly control panel and a remote control, both featuring identical membrane buttons for convenience.
Remote Control: The remote control mirrors all functions of the main control panel. It uses a CR2032 -3V Lithium/Manganese button cell battery. To insert/remove batteries, open the cover on the back, ensure correct polarity, and then re-slot the cover.
Filling the Water Tank: The tank must be filled with demineralized water for cooler/humidifier mode. Counter-rotate the tank knob by 90°, remove it, fill up to the maximum level mark, then reposition and turn the knob. For enhanced cooling in warmer months, users can freeze one of the supplied synthetic ice packs until solid and add it to the water in the tank. This helps absorb heat from the water. A slight smell or unusual water colour may be noticed during the first use, which is not a health risk.
Regular maintenance is crucial for the appliance's longevity and efficient operation. Always unplug the appliance before any cleaning or maintenance procedures. Never submerge the product in water.
Storage: For prolonged periods of non-use, disconnect the power cord and store the appliance with its manual in its original packaging, in a cool and dry place.
| Energy efficiency class (cooling) | A |
|---|---|
| Timer | Yes |
| Timer duration (maximum) | 24 hours |
| Noise level | 64 dB |
| Refrigerant | R290 |
| Colour | White |
| Type | Portable |
| Cooling power | 10000 BTU/h |
| Timer duration (minimum) | 0.5 hours |
| Airflow (high speed) | 370 m³/h |
| Depth | 345 mm |