HELPLINE NO 08448012949
8
ORIGINAL INSTRUCTIONS
Fig.E
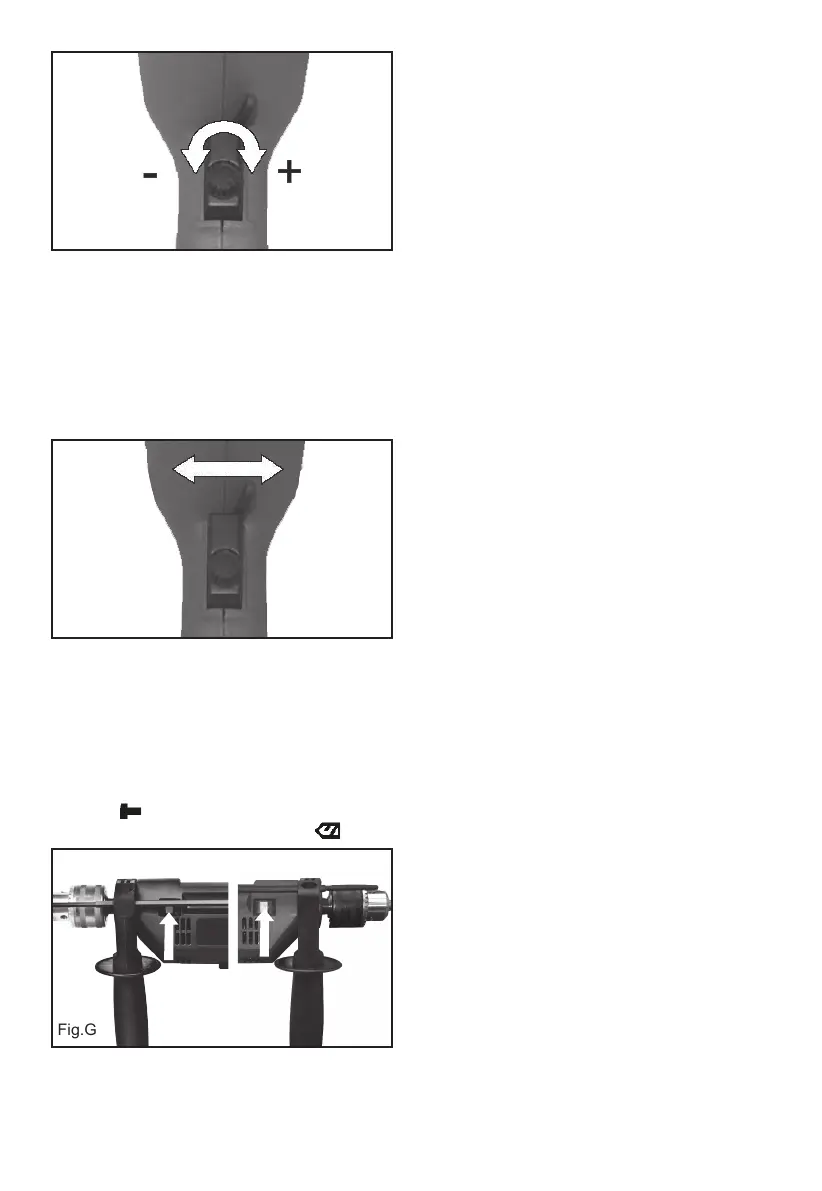
6. CHANGING ROTATIONAL DIRECTION
(See Fig. F)
To change the rotational direction, push the
forward/reverse selector switch to the “R” position
indicated on your drill. The rotation will now
be forward rotation. Push the forward/reverse
selector switch to “L” position indicated on your
drill. The rotation will be reverse rotation.
Fig.F
Reverse rotation
(L)
Forward rotation
(R)
NOTE: Never change the forward/reverse
switch whilst the drill in operation or the on/
off switch is locked.
7. DRILL/IMPACT ACTION SWITCH
(See Fig. G)
When drilling masonry and concrete push the
drill/impact action selector switch into the hammer
position “ ”. When drilling wood, metal, plastic
push the switch into the drill position “ ”.
Fig.G
Hammer Drill
WORKING HINTS FOR YOUR
IMPACT DRILL
1. DRILLING MASONRY AND CONCRETE
Select the drill/impact action selector switch to the
“hammer symbol” position. Tungsten carbide drill
bits should always be used for drilling masonry,
concrete etc with a high speed.
2. DRILLING STEEL
Select the drill/impact action selector switch to
the “drill symbol” position. HSS drill bits should
always be used for drilling steel with a lower
speed.
3. SCREW DRIVING
Select the drill/impact action selector switch to the
“drill symbol” position. Use a low speed to drive in
or remove screws.
4. PILOT HOLES
When drilling a large hole in tough material (i.e.
steel), we recommend drilling a small pilot hole
rst before using a large drill bit.
5. DRILLING TILES
Select the drill/impact action selector switch to the
“drill symbol” position to drill the tile. When tile has
been penetrated, switch over to “hammer symbol”
position.
6. COOL THE MOTOR
If your power tool becomes too hot, set the speed
to maximum and run no load for 2-3 minutes to
cool the motor.
MAINTENANCE
1. Your power tool requires no additional
lubrication or maintenance. There are no user
serviceable parts in your power tool.
2. Never use water or chemical cleaners to clean
your power tool. Wipe clean with a dry cloth.
3. Always store your power tool in a dry place.
4. Keep the motor ventilation slots clean.
5. If you see some sparks ashing in the
ventilation slots, this is normal and will not
damage your power tool.
6. If the supply cord of this power tool is
damaged, it must be replaced by a specially
prepared cord available through the service
organization.