This document provides operating instructions for the Ariston CP 059 MD (X) AUS S and CP 859 MT (X) AUS S cooker and oven models. It covers warnings, assistance, a description of the appliance, installation, start-up and use, timer functions, troubleshooting, precautions, tips, and maintenance.
Warnings and Assistance
The appliance and its accessible parts become hot during use, so care must be taken to avoid touching heating elements. Children under 8 years of age should be kept away unless continuously supervised. Children aged 8 and above, and persons with reduced physical, sensory, or mental capabilities, or lack of experience and knowledge, can use the appliance if they have been given supervision or instruction concerning its safe use and understand the hazards involved. Children should not play with the appliance, and cleaning and user maintenance should not be performed by children without supervision.
Unattended cooking on a hob with fat or oil can be dangerous and may result in fire. Never try to extinguish a fire with water; instead, switch off the appliance and cover the flame with a lid or a fire blanket. Do not use harsh abrasive cleaners or sharp metal scrapers to clean the oven door glass, as this can scratch the surface and lead to shattering. The internal surfaces of the compartment may become hot. Steam cleaners or pressure cleaners should never be used on the appliance. Any liquid should be removed from the lid before opening it. The glass cover (if present) should not be closed when gas burners or electric hotplates are still hot.
Ensure the appliance is switched off before replacing the lamp to avoid electric shock. The use of inappropriate hob guards can cause accidents. When placing the rack inside, ensure the stop is directed upwards and towards the back of the cavity.
For assistance, never use the services of an unauthorised technician. When contacting service, have the following information ready: the type of problem, the appliance model (Mod.), and the serial number (S/N), which can be found on the data plate.
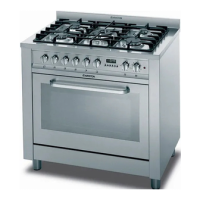
Appliance Description
The cooker features a hob with various gas burners and an electric oven.
Hob Overview:
The hob includes:
- AUXILIARY gas burner
- SEMI-RAPID gas burner
- RAPID gas burner
- TRIPLE RING gas burner
- DC-DR gas burner
- Hob grid
- STABILIZING CHAIN (30 cm long)
- SAFETY DEVICE: Activates if the flame accidentally goes out (due to spills, drafts, etc.), interrupting the gas supply to the burner.
- IGNITOR for Gas BURNERS
Control Panel:
The control panel features:
- Control knobs for GAS BURNERS
- TIMER
- ELECTRIC OVEN THERMOSTAT KNOB (for temperature selection)
- ELECTRIC OVEN SELECTOR KNOB (for cooking mode selection)
- Electric heating element INDICATOR LIGHT
Installation
Before operating the appliance, read the operating instructions carefully for safe installation and operation. Keep these instructions for future reference and ensure they stay with the appliance if it is sold or moved. Installation must be performed by a qualified professional according to the provided instructions. Any adjustments or maintenance must be done after disconnecting the cooker from the electricity supply.
Room Ventilation:
The appliance must be installed in permanently-ventilated rooms, complying with national legislation. The room must be adequately ventilated to provide sufficient air for gas combustion (at least 2 m³/h per kW of installed power). Air inlets, protected by grilles, should have a duct with an inner cross-section of at least 100 cm² and be positioned to prevent obstruction. These inlets should be enlarged by 100% (minimum 200 cm²) if the hob surface lacks a flame failure safety device. If air is provided indirectly from adjacent rooms (not communal parts, increased fire hazards, or bedrooms), inlets should have a ventilation duct leading outside. After prolonged use, open a window or increase fan speed.
Liquefied petroleum gases are heavier than air and collect near the floor, so rooms with LPG cylinders must have external openings for gas escape. LPG cylinders (partially or completely full) should not be installed or stored below ground level (cellars). Only the cylinder in use should be stored in the room, away from heat sources that could raise its temperature above 50°C.
Positioning and Levelling:
The appliance can be installed alongside cupboards no taller than the hob surface. The wall behind the appliance must be non-flammable, heat-resistant (T 90°C). Install the appliance in the kitchen, dining room, or studio flat (not the bathroom). If the hob top is higher than cupboards, install the appliance at least 500 mm away. If installed under a wall cabinet, there must be a minimum distance of 420 mm between the cabinet and the hob top (700 mm if cabinets are flammable). Do not position blinds behind the cooker or within 200 mm of its sides. Hoods must be installed according to their manuals. To level the appliance, screw the adjustable feet into the provided places on each corner of the cooker's base.
Disposing of Combustion Fumes:
Efficient disposal of combustion fumes requires a hood connected to a safe natural suction chimney or an electric fan that operates automatically when the appliance is switched on.
Electrical Connection:
The appliance must be earthed. It is designed for alternating current at the supply voltage and frequency indicated on the rating plate (under the hob or in the instruction booklet). Ensure local supply voltage matches the rating plate.
For models without a plug, fit a standard plug suitable for the load and connect to a socket. For direct mains connection, a double-pole switch with at least 3 mm contact separation, suitable for the load and complying with standards, must be fitted between the appliance and the mains supply. The yellow-green earth wire must not be interrupted. The supply cable must not reach temperatures above 50°C. For installation above a built-under oven, the hob and oven must be connected separately for safety and easy removal. Do not use adapters or shunts. Before connecting, ensure the limiter valve and domestic system can withstand the load, the supply system is earthed, and the socket/switch is accessible.
Mains lead wire colours: Green & Yellow (Earth), Blue (Neutral), Brown (Live). Connect Green & Yellow to "E" or coloured Green/Green & Yellow. Connect Brown to "L" or coloured Red. Connect Blue to "N" or coloured Black. Failure to observe accident-prevention regulations relieves the manufacturer of liability.
To replace the cable, use a H05VV-F rubber cable with a 3 x 1.5 mm² cross-section. The yellow-green earth wire must be 2-3 cm longer than the others.
Gas Connection:
Connection to the gas network or cylinder can be done with a flexible rubber or steel hose, complying with national legislation and ensuring the appliance suits the gas type (check rating sticker). For liquid gas from a cylinder, install a pressure regulator complying with national regulations.
Ensure gas supply pressure matches values in the burner and nozzle specifications table for safe and durable operation and efficient energy consumption.
For flexible rubber hose connection, ensure the hose complies with national legislation (8 mm internal diameter for liquid gas, 13 mm for methane). Once connected, ensure the hose does not contact parts above 50°C, is not pulled, twisted, kinked, bent, compressed, is easy to inspect, shorter than 1500 mm, and firmly clamped at both ends. If these conditions are not met or for class 2 - subclass 1 appliances, use a flexible steel hose.
For flexible jointless stainless steel pipe to a threaded attachment, ensure hose and gaskets comply with national legislation. Remove the hose holder on the appliance (1/2 gas male attachment). The hose length should not exceed 2 metres, and it should not be compressed or contact moving parts.
After installation, check for leaks using a soapy solution; never use a flame.
Adapting to Different Types of Gas:
The appliance can be adapted to a gas type other than the default (indicated on the rating label).
Adapting the Hob:
To replace nozzles for hob burners:
- Remove hob grids and slide burners off their seats.
- Unscrew nozzles with a 7 mm socket spanner and replace with nozzles suited to the new gas type (refer to Burner and nozzle specifications table).
- Replace all components in reverse order.
For separate "double flame" burners:
- Remove grids and slide burners from housings. The burner has two separate parts.
- Unscrew burners with a 7 mm wrench spanner. The internal burner has one nozzle, the external burner has two (same size). Replace nozzles with models suited to the new gas type.
- Replace all components in reverse order.
Adjusting Hob Burners' Minimum Setting:
- Turn the tap to the minimum position.
- Remove the knob and adjust the regulatory screw (inside or next to the tap pin) until the flame is small but steady. If connected to liquid gas, fasten the regulatory screw as tightly as possible.
- While the burner is alight, quickly change the knob position from minimum to maximum and vice versa, checking the flame is not extinguished.
Hob burners do not require primary air adjustment.
After adjusting for a different gas type, replace the old rating label with a new one corresponding to the new gas type (labels available from Authorised Technical Assistance Centres). If gas pressure differs from recommended, fit a suitable pressure regulator to the inlet hose.
Safety Chain:
To prevent accidental overturning (e.g., if a child climbs on the oven door), safety chains MUST be installed. The cooker comes with safety chains that must be fixed with a screw (not supplied) on the wall behind the appliance, at the same height as the fixing point. Ensure chains are fixed at the back of the cooker, tight and parallel to the floor. After installation, chains must be kept in tension.
Start-up and Use
Using the Hob:
Lighting the burners:
For each BURNER knob, a ring indicates flame strength. To light a burner:
- Bring a flame or gas lighter close to the burner.
- Press the BURNER knob and turn it anti-clockwise to the maximum flame setting.
- Adjust flame intensity by turning the knob anti-clockwise to the desired level (minimum to maximum).
If fitted with an electronic igniter, press the BURNER knob and turn it anti-clockwise towards the minimum flame setting until the burner lights. Keep the knob pressed for 2-3 seconds to allow the safety device to heat up. The burner might extinguish when the knob is released; repeat the process, holding the knob longer. If the flame accidentally extinguishes, switch off the burner and wait at least 1 minute before relighting. If equipped with a flame failure safety device, press and hold the BURNER knob for 2-3 seconds to keep the flame alight and activate the device. To switch off, turn the knob clockwise until it reaches the stop position.
The selected burner can be regulated using the corresponding knob: Off, Maximum, Minimum. To switch off, turn the knob clockwise until it stops at the "Off" position.
The "separate double flame" burner:
This burner has two concentric burners that can operate together or separately. Using the double flame at maximum provides high power, reducing cooking times compared to conventional burners. It also offers more uniform heat distribution at the pan bottom when both burners are used at minimum. To maximize its potential, never set the inside ring to minimum and the outside ring to maximum simultaneously. Pots and pans of all sizes can be used. For smaller pots, use only the internal burner. There is a separate control knob for each "separate double flame" burner: one for the external burner and one for the internal burner.
Practical advice on using the burners:
For efficient burner operation and gas saving, use pans with a lid and a flat base, sized appropriately for the burner. The hob is fitted with reducing pan stands, which should only be used on auxiliary burner "A" and on the DC-DR (inner) "B". For best performance, ensure pan bottoms are completely even.
WARNING! The glass lid can break if heated. Turn off all burners and electric plates before closing the lid (applies to models with glass cover only).
Using the Oven:
The oven has a stop system to prevent racks from fully coming out. To extract racks completely, lift them while holding the front part.
Before operating, remove all plastic film from the appliance sides. The first time you use it, heat the empty oven with the door closed at maximum temperature for at least half an hour. Ensure the room is well ventilated before switching off and opening the oven door. The appliance may emit a slight odour from protective substances burning off.
MULTI-FUNCTION OVEN:
The oven offers nine heating element combinations for versatile cooking. Turn the selector knob "13" to choose a cooking function, then set the desired temperature with the thermostat knob "12".
For traditional cooking (roasts, biscuits, etc.) in conventional mode, use the function (hot above + below). Place food in the oven only when it reaches the selected temperature, preferably on one shelf.
To provide heat only to the bottom or top, turn the selector to (hot below) or (hot above).
With the function (hot above and below + fan assistance), traditional cooking is combined with fan assistance.
With the function "fan assisted", heat is transmitted through pre-heated air circulated by a fan. The oven heats up quickly, so food can be placed in it when switched on. Simultaneous cooking on both shelves is possible.
The "fast defrosting" function uses no heating elements, only the oven light and fan.
Grill operation uses high heat output for browning food surfaces, especially meats that should remain tender inside. To grill, turn the selector knob "13" to (grill) or (grill + fan). During grilling, do not set the thermostat knob above 200 °C and keep the oven door closed (even in monigrill mode).
Oven light:
The oven light comes on automatically when the selector knob is turned to any position.
Indicator light "14":
Indicates the oven is heating up. When the light goes out, the required temperature has been reached. When the light alternately comes on and goes out, the thermostat is maintaining constant oven temperature.
Spit - Rotisserie:
This accessory is for grilling. Insert meat along the spit rod, securing it with adjustable forks. Introduce supports "A" and "B" into the drip tray "E" holes, rest the rod groove on seat "C", and insert the oven rack into the lowest guide. Insert the spit rod into its hole, moving the groove forward into seat "D". Start the grill and rotisserie by turning the thermostat knob "13" to the position with the or symbol.
Timer (Electric Oven)
The programmer allows presetting the oven and grill for:
- Delayed start with a preset cooking time.
- Immediate start with a preset cooking time.
- Timer function.
Button functions:
- : Timer with hour and minutes.
- : Length of cooking time.
- : End cooking time.
- : Manual change.
- : Change time (backwards).
- : Change time (forwards).
How to Reset the Digital Clock:
After power connection or outage, the clock display will blink and read "0:00". Press the and buttons simultaneously, then use the - and + buttons (within 4 seconds) to set the exact time. Use + to move time forwards, - to move time backwards.
Alternatively, press the button, then use - and + buttons to reset the time.
Manual Operation Mode for the Oven:
After time is set, the programmer is automatically in manual mode. Press the button to return to manual mode after every "Automatic" cooking session.
Delayed Start Time with Preset Cooking Length:
Set the length and end cooking times. Example: display shows 10:00.
- Turn the oven control knob to the desired cooking setting and temperature (e.g., convection oven at 200°C).
- Press the and buttons, then use - and + buttons (within 4 seconds) to set the cooking time (e.g., 30 minutes). Display will show "10:30". Release the button; within 4 seconds, current time will reappear with the symbol and "auto."
- Press the button, then use - and + buttons to set the end cooking time (e.g., 13:00). Display will show "13:00".
- Release the button; within 4 seconds, current time will show "10:00".
When "auto" is lit, it indicates preset length and end cooking time for automatic mode. The oven will turn on automatically at 12:30 to finish cooking within 30 minutes. When the oven is on, the symbol (cooking pot) appears. The button can display cooking time length, and the button can display end cooking time. At the end of cooking, an acoustic signal sounds. Press any button (except - and +) to turn it off.
Immediate Start Time with Preset Cooking Length:
If only the cooking time length is set, the cooking session starts immediately.
Cancelling a Preset Cooking Time:
Press the button, and use the - button to set the time to "0:00". Then press the manual cooking mode button.
Timer Feature:
The timer counts down from a set time. It does not control oven operation but emits an acoustic signal when time runs out. Press the button; display will read "0:00". Use - and + buttons to set the desired time. Release the button; timer starts. Display will show current time. At the end, an acoustic signal sounds, which can be turned off by pressing any button (except - and +), and the symbol will turn off.
Changing and Cancelling Settings:
Settings can be changed anytime by pressing the corresponding button and using - or +. If cooking time length is cancelled, end cooking time is also cancelled. In automatic cooking mode, the appliance will not accept end cooking times prior to its proposed start cooking time.
Buzzer Volume Control:
Once clock settings are confirmed, use the button to adjust the alarm buzzer volume.
Troubleshooting
If the appliance does not function properly, check for interruptions in gas and electrical supplies, and ensure gas valves are open.
Burner does not light or flame is not uniform:
- Check for clogged gas holes.
- Ensure all removable burner parts are correctly mounted.
- Check for drafts around the cooking surface.
Flame does not stay on:
- Ensure the knob is pressed all the way in.
- Keep the knob pressed long enough to activate the safety device.
- Check for clogged gas holes near the safety device.
Burner does not remain on when set to "Low":
- Check for clogged gas holes.
- Check for drafts near the cooking surface.
- Ensure the minimum flame has been adjusted correctly ("Adjusting the low flame" section).
Cookware is not stable:
- Ensure the bottom of the cookware is perfectly flat.
- Ensure cookware is centered correctly on the burner.
Precautions and Tips
This appliance is designed and manufactured according to international safety standards. These warnings are for safety and must be read carefully.
General Safety:
- The instruction booklet accompanies a class 1 (insulated) or class 2 - subclass 1 (recessed between 2 cupboards) appliance.
- These instructions are valid for countries with symbols in the manual and on the serial number plate.
- The appliance is for domestic use only, not commercial or industrial.
- Do not install outdoors; exposure to rain and storms is dangerous.
- When moving or positioning, always use the handles on the oven sides.
- Do not touch the appliance barefoot or with wet/damp hands/feet.
- The appliance must be used by adults only for food preparation, according to this booklet. Other uses (e.g., room heating) are improper and dangerous. The manufacturer is not responsible for damage from improper, incorrect, or unreasonable use.
- Do not touch heating elements or parts of the oven door when in use; they become extremely hot. Keep children away.
- Ensure power supply cables of other electrical appliances do not contact hot oven parts.
- Never obstruct ventilation and heat dispersal openings.
- Always grip the oven door handle in the center; ends may be hot.
- Always use oven gloves when placing/removing cookware.
- Do not use aluminum foil to line the oven bottom.
- Do not place flammable materials in the oven; accidental switch-on could cause fire.
- Always ensure knobs are in the "Off" position when not in use.
- When unplugging, always pull the plug from the mains socket, not the cable.
- Do not perform cleaning or maintenance without disconnecting from electricity mains.
- In case of malfunctions, do not attempt repairs yourself. Contact an authorized Service Centre.
- Do not rest objects on the open oven door.
- Do not let children play with the appliance.
- If the cooker is on a pedestal, take precautions to prevent it from sliding off.
- The appliance should not be operated by people (including children) with reduced physical, sensory, or mental capacities, inexperienced individuals, or those unfamiliar with the product, unless supervised or instructed by someone responsible for their safety.
- Do not let children play with the appliance.
- The appliance is not intended to be operated by an external timer or separate remote-control system.
Disposal:
- Dispose of packaging material according to local legislation for reuse.
- The European Directive 2012/19/EEC (WEEE) requires old household electrical appliances to be disposed of separately from unsorted municipal waste. They must be collected separately for material recovery and recycling, reducing environmental impact. The crossed-out "wheeled bin" symbol indicates this obligation. Consumers should contact their local authority or retailer for disposal information.
Respecting and Conserving the Environment:
- Reduce electricity peak load by using the oven during off-peak hours (late afternoon to early morning). Cooking mode programming options ("delayed cooking" and "delayed automatic cleaning") help organize time efficiently.
- Always keep the oven door closed when using BARBECUE and GRATIN modes for improved results and energy saving (approx. 10%).
- Regularly check and clean door seals to ensure they are free of debris and seal properly, preventing heat dispersal.
Maintenance and Care
Important: Disconnect the appliance from mains supply before cleaning. For a long life, perform thorough general cleaning frequently, following these instructions:
Inside the oven door:
Clean the surface with a cloth moistened with hot water and non-abrasive liquid detergent, then rinse and dry thoroughly.
Inside the oven (models with self-cleaning enamel):
The oven interior is coated with a special self-cleaning microporous enamel glaze. At normal cooking temperatures (200-300°C), it oxidizes and eliminates grease spots. Cleaning is minimal; regularly rub surfaces with a wet cloth after cooking to remove ash and maintain self-cleaning properties. After cooking with liquid overflow or if dirt is not completely eliminated (e.g., grilling at insufficient temperatures for self-cleaning), run the oven at maximum temperature to eliminate grease residue. If, after long-term use, grease stains appear despite maintenance, clean thoroughly with hot water and a soft cloth (no detergents), then rinse and dry. Do not remove caked-on grease with sharp objects, as this can etch the coating. If self-cleaning surfaces are damaged or worn, a kit of self-cleaning panels can be ordered from an authorized Service Centre.
Oven exterior:
- Only clean when the oven is cold.
- Do not clean steel parts or screen-printed symbols with solvents or abrasive detergents. Use a damp cloth with lukewarm water and washing-up liquid.
- Stainless steel may stain if in long-term contact with calcareous water or aggressive detergents (containing phosphorus). Always rinse and dry surfaces thoroughly after cleaning.
- Important: Clean horizontally, in the direction of the steel glazing.
- After cleaning, use specific products for stainless steel to polish surfaces.
- Important: Do not use abrasive powders, aggressive detergents, or acidic substances.
Hob:
- Wash removable burner parts frequently with warm water and soap, removing caked-on substances. Check that gas outlet slits are not clogged. Dry burners carefully before reuse.
- Clean the end part of automatic glow plug ignitors frequently.
Greasing the taps:
If a tap becomes stiff over time, clean inside and replace the grease. This must be done by a manufacturer-authorized technician.
Disassembling/assembling the oven door:
To clean the oven interior, the door can be removed:
- Open the door completely and lift the 2 levers "B".
- Shut the door slightly, then lift it out by pulling out hooks "A".
To reassemble:
- With the door vertical, insert hooks "A" into slots.
- Ensure seat "D" is hooked perfectly onto the slot edge (move door backward/forward slightly).
- Keep the door open fully, unhook levers "B" downwards, then shut the door.
Replacing the oven light bulb:
Ensure the appliance is disconnected from electricity. Unscrew the glass protective cover from inside the oven, unscrew the lightbulb, and replace it with an identical one suitable for high temperatures (300°C). Do not use the oven lamp for ambient lighting.