4
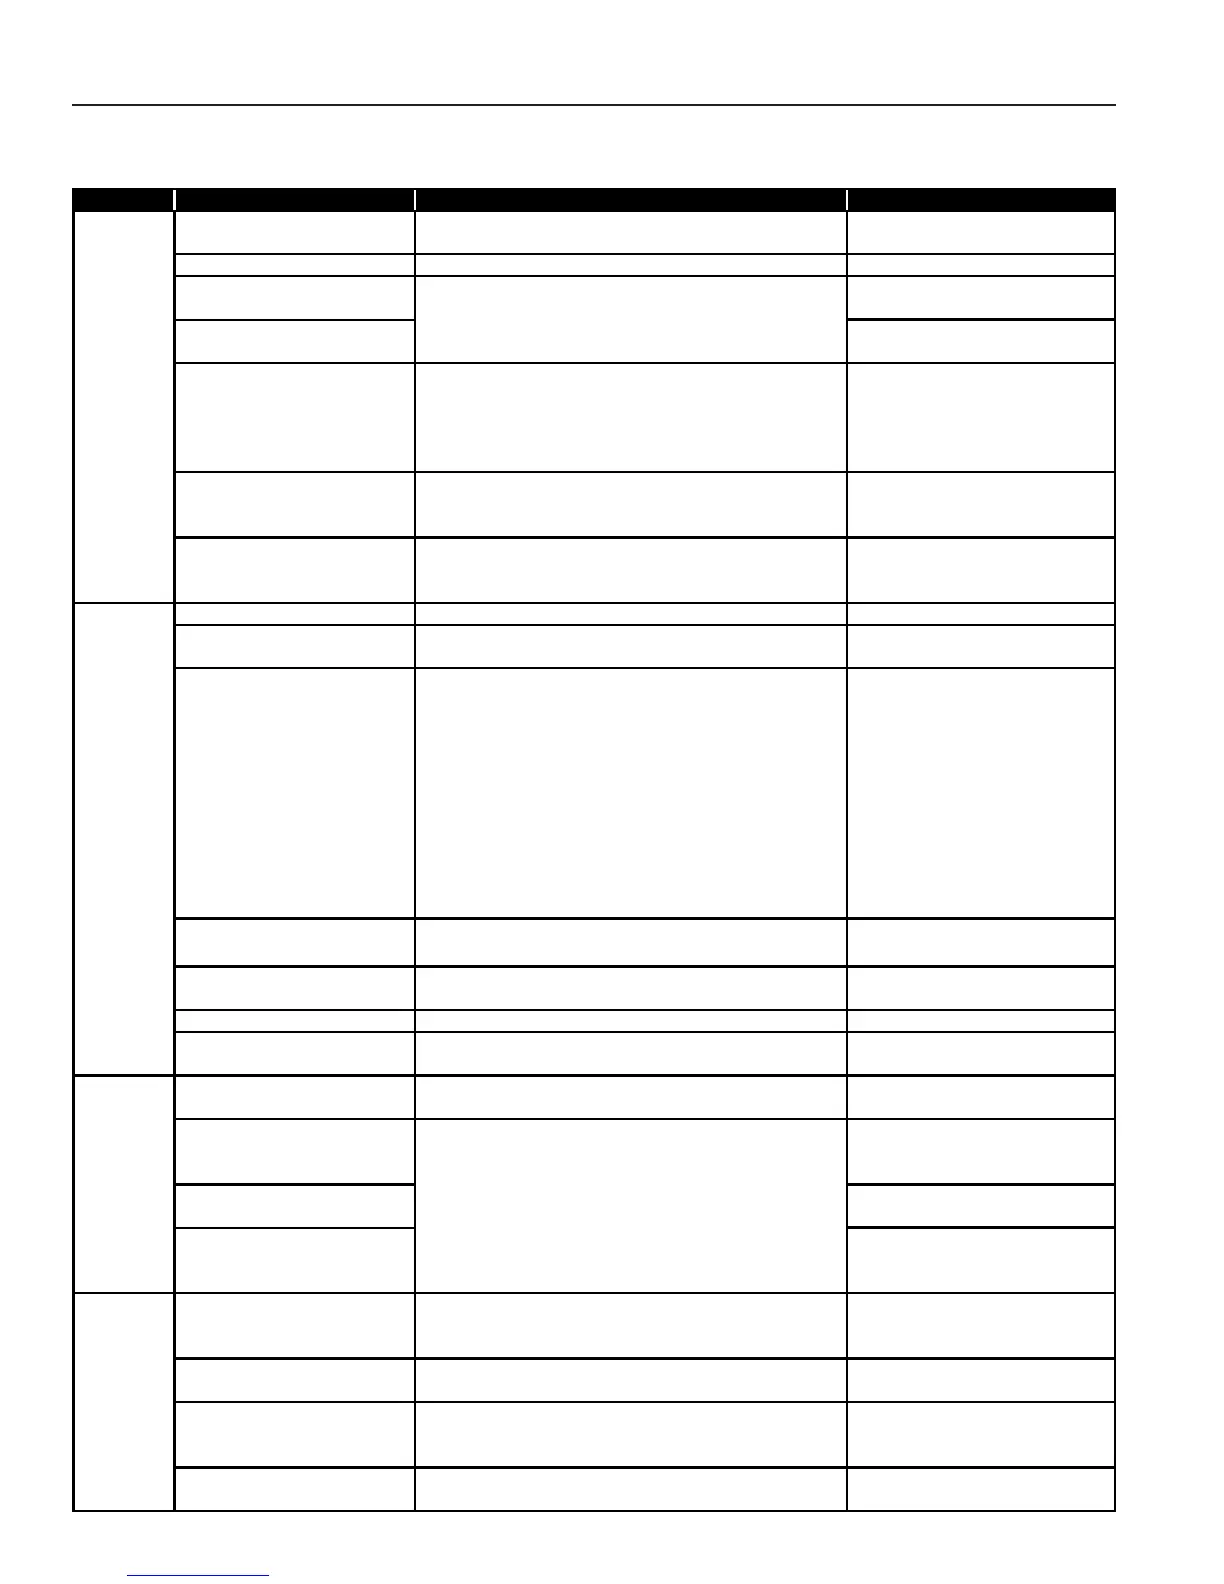
Troubleshooting Guide
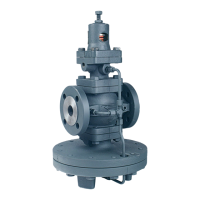
Before working on the valve, make sure that the inlet strainer is clean, bypass valve is closed and
upstream and downstream pressure gauges are working properly. Refer to Figure 3-1.
Problem Cause Test Solution
Inlet pressure is not adequate for
desired results.
Maximum outlet pressure is 85% of the inlet with a
minimum DP = 7 psi.
Raise inlet pressure if possible.
Adjustment is not proper. Turn adjusting screw (27) clockwise. Dismantle and clean.
Orifice is too large in fitting
(30B).
Install proper fitting.
Orifice of fitting (30C) is
plugged.
Clean or replace fitting.
Pilot valve is clogged. Close inlet valve. Remove fittings (30A) and (30B). Turn
(27) adjusting screw counterclockwise until it is loose.
Open inlet steam valve and turn (27) adjusting screw
clockwise. If fluid does not appear at (30A), pilot valve is
clogged.
Disassemble and clean (18) pilot
valve seat. Also, check (15) screen.
Main diaphragms are damaged. Close all valves and remove fitting (30C). Open bypass
valve around PRV. If fluid appears out of diaphragm casing
at (30C), diaphragm has failed.
Disassemble and replace (12) main
diaphragms.
Valve size is too small and
cannot supply enough capacity.
Throttle downstream valve located downstream of sensing
line. If desired pressure can be reached after throttling
valve PRV is too small.
Resize and install larger valve.
A) Adjustment is not proper. Turn (27) adjusting screw counterclockwise. Readjust.
B) Orifice of fitting (30B or C) is
plugged.
Remove and check. Clean or replace fitting.
C) Dirt is either caught between
the main valve and seat or pilot
valve and seat.
1) Close inlet and outlet steam valves.
2) Turn (27) adjusting screw counterclockwise until .
loose.
3) Remove all copper tubing from the side of the valve.
4) Open inlet steam valve.
5) If fluid appears at (30A), proceed to solution #1.
6) If fluid appears at (30B), proceed to solution #2 and
. also see 'D' below.
7) Fluid does not appear at either part, proceed to 'E'
. below.
1) Tighten or loosen adjusting
. screw to flush out dirt. If pilot
. valve still leaks, clean or
. replace it.
2) Disassemble and remove main
. valve (it will lift out easily). If it
. appears shiny at one point,
. apply lapping compound and
. lap the valve and seat (see
. bulletin AY-768 for lapping
. instructions).
D) Dirt is between main spindle
(9) and guide (10).
If valve fails test at (30B)
(as described above in item 6) check while assembled.
Clean.
E) By-pass valve is not shut or is
leaking.
Close and listen with stethoscope. Repair or replace.
F) Sensing line is plugged. Break union and open valve. Clean and replace.
G) Sensing line is not
connected.
Refer to Drawings on Page 1. Install sensing line as shown on
installation drawing on Page 1.
Orifice fitting is partially plugged. Check (30B) and (30C). Remove and clean or replace.
Sensing pipe is installed at a
point where there is too much
turbulence.
Install sensing pipe at another
location.
Liquid is collecting in sensing
line.
Slant pipe away from PRV.
Quick opening/closing valve
located too close to the outlet or
inlet PRV.
Relocate PRV.
Valve size is larger than what
was required causing valve
chatter.
Recalculate load. Check for valve chatter. Change valve or add orifice plate to
outlet of PRV.
Pressure reduction ratio exceeds
20:1.
Verify inlet and outlet pressure. Use two stage reduction.
Fluid velocity is too high. Verify with PRV software (consult factory). Resize station using two stage
reduction or use sound silencer
down from PRV.
Automatic valve (i.e., solenoid) is
too close to PRV.
Visual. Relocate.
Excessive
noise is
present.
Outlet
Pressure
does not
reach
desired
value.
Remove and check.
Secondary
pressure
exceeds the
pressure
setting.
Refer to Drawings on Page 1.
Operation is
unstable.
 Loading...