English
22
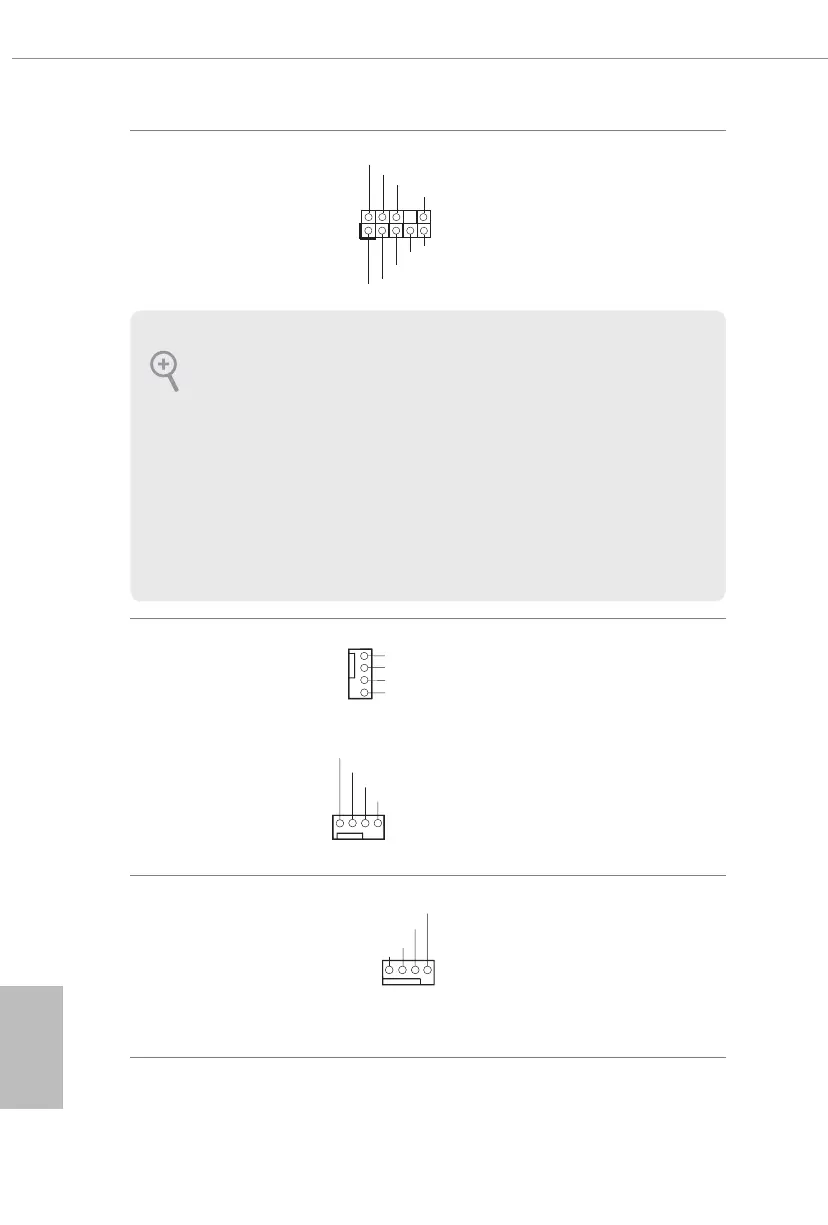
Front Panel Audio Header
(9-pin HD_AUDIO1)
(see p.1, No. 26)
is header is for
connecting audio devices
to the front audio panel.
Chassis/Water Pump Fan
Connectors
(4-pin CHA_FAN1/WP)
(see p.1, No. 27)
(4-pin CHA_FAN2/WP)
(see p.1, No. 21)
(4-pin CHA_FAN3/WP)
(see p.1, No. 22)
is motherboard provides three
4-Pin water cooling
chassis
fan
connectors. If you plan to con-
nect a 3-Pin
chassis
water cooler
fan, please connect it to Pin 1-3.
CPU Fan Connector
(4-pin CPU_FAN1)
(see p.1, No. 5)
is motherboard
provides a 4-Pin CPU fan
(Quiet Fan) connector.
If you plan to connect a
3-Pin CPU fan, please
connect it to Pin 1-3.
J _SENSE
O UT2_L
1
M IC_RET
P RESENCE#
GN D
O UT2_R
M IC2_R
M IC2_L
OUT_RET
1. High Denition Audio supports Jack Sensing, but the panel wire on the chassis
must support HDA to function correctly. Please follow the instructions in our
manual and chassis manual to install your system.
2. If you use an AC’97 audio panel, please install it to the front panel audio header by
the steps below:
A. Connect Mic_IN (MIC) to MIC2_L.
B. Connect Audio_R (RIN) to OUT2_R and Audio_L (LIN) to OUT2_L.
C. Connect Ground (GND) to Ground (GND).
D. MIC_RET and OUT_RET are for the HD audio panel only. You don’t need to
connect them for the AC’97 audio panel.
E. To activate the front mic, go to the “FrontMic” Tab in the Realtek Control panel
and adjust “Recording Volume”.
1 2 3 4
CHA_FAN_SPEED
F A N_SPE E D_CON T R OL
FAN_VOLTAGE
1
2
3
4
G N D
FAN_VOLTAGE
C H A _ F A N _ S P E E D
FA N _ S P E E D _ C O NTRO L
4 3 2 1
GND
+12V
CPU_FAN_SPEED
FAN_SPEED_CONTROL




 To Next Page