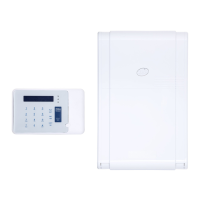
Shed & Garage Alarm
(SAA5015 & SAA5010)
6
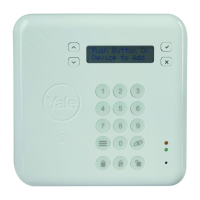
Controls
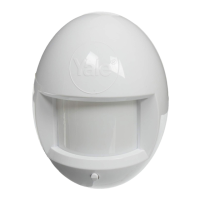
⁄ Motion sensor
¤ Alarm speaker
‹ Keypad
› Battery low LED
fi Additional siren socket
fl Battery compartment
‡ 4.5V AC adaptor socket
(AC adaptor not included)
Battery installation
1 The battery compartment is accessed from
the rear of the alarm unit by removing the
screw from the base and lifting the back
cover B.
2 Insert 4 ‘AA’ size batteries (not included)
following the polarity as shown C. When the
last battery is inserted the alarm will beep
very loudly to indicate that the batteries are
installed properly.
3 Replace the back cover and fix with screw.
The Battery Low LED will light when the
batteries need replacing.
Programming the
alarm
Immediately after inserting the batteries, the
desired 4 digit security code must be set, simply
press the desired 4 digits on the keypad.
Note: After removing the batteries, press
number 4 before installing new ones. The alarm
must be re-programmed with your security code
each time the batteries are removed or
replaced.
Installation
1 Place the alarm in the desired location,
preferably near the front or back door.
2 Remove the back cover and fix it to the wall
using the screws and rawplugs supplied, as
shown D.
3 The alarm body can then be snapped into
place on to the back cover and secured
using the screw at the base.
• Please note that this
alarm can also be
used free standing.
Operation
Leaving the protected area
Press keypad number 4 and a confirmation tone
will indicate that the alarm is armed. You have
30 seconds in which to vacate the area. After
this time, if motion is detected then the alarm
will sound.
Entering the protected area
Type your 4 digit security code within 10
seconds. This will disarm the alarm.
Additional siren socket
This socket can be used to connect the
SAA5030 Additional Siren to the alarm (not
included).
Care and maintenance
To clean the case, simply use a soft slightly
damp cloth with water and wipe dry
immediately.
Caution: Never use chemicals to clean the case,
as they may cause damage to the plastic and
cause the alarm not to function.
Troubleshooting
The unit does not sound when the batteries
are installed
Ensure that the batteries are connected correctly
according to the diagram in the battery
compartment
The alarm does not arm
Ensure that the back plate of the alarm unit is
secure to hold the batteries in place and that the
red light comes on when the keypad buttons are
pressed
The red light on the base of the alarm is on
This is the ‘Battery Low Indicator’. The batteries
need replacing
An ASSA ABLOY Group brand
Instructions
Please keep for future reference
SAA5010
Single room alarm
with programmable code
Battery precautions
When using this product follow these
precautions at all times.
• Use only the appropriate size batteries
• Be sure to follow the correct polarity
when installing the batteries as
indicated in the battery compartment.
Incorrect polarity may cause damage to
the alarm.
• Do not mix different types of battery
such as Alkaline and Carbon-zinc or
old batteries with new.
• If the alarm is not used for long periods
of time, remove the batteries to prevent
damage or injury from possible battery
leakage.
• Do not recharge batteries not intended
to be recharged as they can overheat
and rupture. (Always follow the
manufacturer’s directions.)
C DB
A
⁄
¤
‹
›
fl
Due to our policy of continuous product development, Yale reserves the right to alter the product at anytime without notice.
Yale® is a registered trademark. © 2004 Security Products UK Ltd. All rights reserved.
Yale
The Meadows, Cannock Road
Wolverhampton, WV10 0RR
Telephone +44 (0) 1902 366911
www.yale.co.uk
Email info@yale.co.uk
SAA5010 IFU Rev 2 11/04
Helpline
+44 (0) 1902
635998
Controls
⁄ Motion sensor
¤ Alarm speaker
‹ Keypad
› Battery low LED
fi Additional siren socket
fl Battery compartment
‡ 4.5V AC adaptor socket
(AC adaptor not included)
Battery installation
1 The battery compartment is accessed from
the rear of the alarm unit by removing the
screw from the base and lifting the back
cover B.
2 Insert 4 ‘AA’ size batteries (not included)
following the polarity as shown C. When the
last battery is inserted the alarm will beep
very loudly to indicate that the batteries are
installed properly.
3 Replace the back cover and fix with screw.
The Battery Low LED will light when the
batteries need replacing.
Programming the
alarm
Immediately after inserting the batteries, the
desired 4 digit security code must be set, simply
press the desired 4 digits on the keypad.
Note: After removing the batteries, press
number 4 before installing new ones. The alarm
must be re-programmed with your security code
each time the batteries are removed or
replaced.
Installation
1 Place the alarm in the desired location,
preferably near the front or back door.
2 Remove the back cover and fix it to the wall
using the screws and rawplugs supplied, as
shown D.
3 The alarm body can then be snapped into
place on to the back cover and secured
using the screw at the base.
• Please note that this
alarm can also be
used free standing.
Operation
Leaving the protected area
Press keypad number 4 and a confirmation tone
will indicate that the alarm is armed. You have
30 seconds in which to vacate the area. After
this time, if motion is detected then the alarm
will sound.
Entering the protected area
Type your 4 digit security code within 10
seconds. This will disarm the alarm.
Additional siren socket
This socket can be used to connect the
SAA5030 Additional Siren to the alarm (not
included).
Care and maintenance
To clean the case, simply use a soft slightly
damp cloth with water and wipe dry
immediately.
Caution: Never use chemicals to clean the case,
as they may cause damage to the plastic and
cause the alarm not to function.
Troubleshooting
The unit does not sound when the batteries
are installed
Ensure that the batteries are connected correctly
according to the diagram in the battery
compartment
The alarm does not arm
Ensure that the back plate of the alarm unit is
secure to hold the batteries in place and that the
red light comes on when the keypad buttons are
pressed
The red light on the base of the alarm is on
This is the ‘Battery Low Indicator’. The batteries
need replacing
An ASSA ABLOY Group brand
Instructions
Please keep for future reference
SAA5010
Single room alarm
with programmable code
Battery precautions
When using this product follow these
precautions at all times.
• Use only the appropriate size batteries
• Be sure to follow the correct polarity
when installing the batteries as
indicated in the battery compartment.
Incorrect polarity may cause damage to
the alarm.
• Do not mix different types of battery
such as Alkaline and Carbon-zinc or
old batteries with new.
• If the alarm is not used for long periods
of time, remove the batteries to prevent
damage or injury from possible battery
leakage.
• Do not recharge batteries not intended
to be recharged as they can overheat
and rupture. (Always follow the
manufacturer’s directions.)
C
B
A
⁄
¤
‹
›
fi‡
fl
Due to our policy of continuous product development, Yale reserves the right to alter the product at anytime without notice.
Yale® is a registered trademark. © 2004 Security Products UK Ltd. All rights reserved.
Yale
The Meadows, Cannock Road
Wolverhampton, WV10 0RR
Telephone +44 (0) 1902 366911
www.yale.co.uk
Email info@yale.co.uk
SAA5010 IFU Rev 2 11/04
Helpline
+44 (0) 1902
635998
Description
1 Motion sensor
2 Alarm speaker
3 Keypad
4 Battery low LED
5 Battery compartment
6 4.5V AC adaptor socket
(AC adaptor not included)
Battery Installation
1 The battery compartment is accessed from
the rear of the alarm unit by removing the
screw from the base and lifting the back
cover (as shown in image B).
2 Insert 4 ‘AA’ size batteries (not included)
following the polarity (as shown in image C).
When the last battery is inserted the alarm will
beep very loudly to indicate that the batteries are
installed properly.
3 Replace the back cover and fix with screw.
Note: The Battery Low LED will light when the
batteries need replacing.
Programming the Alarm
Immediately after inserting the batteries, the
desired 4 digit security code must be set, simply
press the desired 4 digits on the keypad.
Note: After removing the batteries, press
number 4 before installing new ones. The alarm
must be re-programmed with your security code
each time the batteries are removed or
replaced.
For more information on this product
visit www.yale.co.uk
Consumer Support: info@yale.co.uk
2
The 2 year guarantee for this
product is active from the date
of purchase (A copy of this
guarantee is available on our
website).
5