EasyManua.ls Logo

Asus RT-N600RU - User Manual

Asus RT-N600RU
92 pages
Print Icon
To Next Page IconTo Next Page
Loading...
User Guide
RT-N600RURT-N600RU
Wireless-N600 High Speed Router
Question and Answer IconNeed help?

Do you have a question about the Asus RT-N600RU and is the answer not in the manual?

Overview

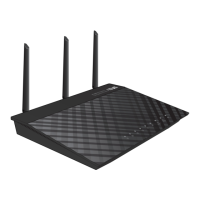
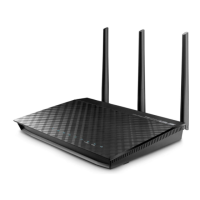
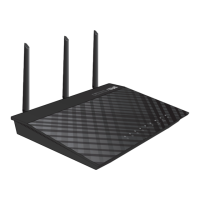
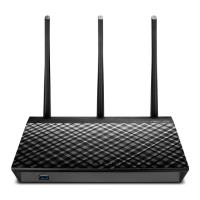
The ASUS RT-N600RU is a Wireless-N600 High Speed Router designed for robust wireless connectivity and file sharing. It operates on a 2.4GHz band, making it suitable for concurrent wireless HD streaming, SMB server functions, and UPnP AV server capabilities for 24/7 file sharing.

Technical Specifications:

  • DC Power Adapter: Output: +12V with max 0.5A current.
  • Operating Temperature: 0~40°C (Storage: 0~70°C).
  • Operating Humidity: 50~90% (Storage: 20~90%).
  • Wireless Standards: IEEE 802.11a/b/g/n wireless capability.
  • LAN Ports: Ethernet RJ-45 (10Base-T/100Base-TX).
  • WAN Connection Types: Dynamic IP, PPPoE, PPTP, L2TP, Fixed IP.
  • Wireless Security: Supports Open System, Shared Key, WPA/WPA2 Personal/Auto-Personal (TKIP + AES encryption), WPA/WPA2 Enterprise/Auto-Enterprise (integrated EAP server or external RADIUS back-end authentication server), Radius with 802.1x, WEP (64-bit, 128-bit).
  • Channel Bandwidth: 20MHz (default) and 40MHz.
  • IPv6 Support: Yes.
  • MAC Addresses for DHCP Manual Assignment: Up to 32.
  • EU Frequency/Power (2.4GHz): 2412-2472MHz (802.11g 6Mbps): 19.81 dBm.

Usage Features:

Getting Started and Setup:

  • Router Setup: The manual emphasizes using a wired connection for initial setup to avoid problems. Users should disconnect existing routers/modems, remove backup batteries, and reboot the cable modem and computer before setting up the ASUS router.
  • Wired Connection: Connect the router's AC adapter to power, connect the computer to the router's LAN port, connect the modem to the router's WAN port, and power on the modem. The LAN LED should blink, indicating a physical connection.
  • Wireless Connection: Connect the router's AC adapter to power, connect the modem to the router's WAN port, power on the modem, and install an IEEE 802.11a/b/g/n WLAN adapter on the computer.
  • Web GUI Access: Log in via a web browser using the default IP address (192.168.1.1) or http://router.asus.com with the default username/password (admin/admin). The Quick Internet Setup (QIS) page launches automatically for first-time users.
  • Quick Internet Setup (QIS) with Auto-detection: Guides users through setting up their Internet connection. It automatically detects ISP connection types (Dynamic IP, PPPoE, PPTP, L2TP) and prompts for necessary information. Users can assign an SSID and security key for the 2.4GHz wireless connection.

Configuring General Settings:

  • Network Map: Provides an overview to configure security settings, manage clients, and monitor USB devices.
  • Wireless Security Settings: Allows users to set up SSID, security level, and encryption settings for the 2.4GHz band. Supported authentication methods include Open System, Shared Key, WPA/WPA2 Personal/Auto-Personal, WPA/WPA2 Enterprise/Auto-Enterprise, and Radius with 802.1x.
  • Managing Network Clients: Users can view client information and block clients from accessing the network via the Client Status icon on the Network Map.
  • Guest Network: Supports up to three SSIDs, allowing temporary visitors Internet access without accessing the private network. Users can enable, name, set authentication/encryption methods, specify access time, and control intranet access for guest networks.
  • Traffic Manager (QoS): Enables setting bandwidth priority and managing network traffic. Users can enable QoS, define upload/download bandwidth, and set user-defined QoS rules or priority for specific applications and services.
  • Monitoring Traffic: Provides access to bandwidth usage and speed for Internet, wired, and wireless networks, even on a daily basis.
  • Parental Control: Allows users to control Internet access time for specific clients. Users can enable Parental Control, select clients (by name or MAC address), and drag-and-drop time zones on a Time Management map to set allowed usage times.

Configuring Advanced Settings:

  • Wireless Settings (General Tab): Configure basic wireless settings, including selecting the frequency band (2.4GHz), assigning a unique SSID, hiding the SSID, choosing wireless modes (Auto, Legacy, N only), and selecting an operating channel (Auto recommended).
  • WPS (Wi-Fi Protected Setup): A wireless security standard for easy device connection. Can be configured via PIN code or WPS button.
  • Wireless MAC Filter: Controls packets transmitted to specified MAC addresses. Users can set the filter mode to Accept (allow listed devices) or Reject (prevent listed devices) and add MAC addresses to the list.
  • RADIUS Setting: Provides an extra layer of security for WPA-Enterprise, WPA2-Enterprise, or Radius with 802.1x authentication modes. Users configure the RADIUS server IP address and connection secret.
  • Professional Wireless Settings: Offers advanced configuration options like enabling/disabling wireless radio, setting a wireless scheduler, enabling AP isolation (prevents wireless devices from communicating with each other), enabling IGMP Snooping (optimizes multicast traffic), setting multicast rate, preamble type, RTS threshold, DTIM interval, beacon interval, TX Bursting, and WMM APSD.
  • LAN IP: Modify the router's LAN IP address and Subnet Mask.
  • DHCP Server: Assigns IP addresses automatically to network clients. Users can enable the DHCP server, set a domain name, define IP pool start/end addresses, specify lease time, and manually assign IP addresses to specific MAC addresses (up to 32).
  • Route: Configure a routing table for networks with multiple wireless routers to share Internet service. Users can enable static routes and add/remove devices from the Static Route List.
  • WAN (Internet Connection): Configure settings for various WAN connection types (Automatic IP, PPPoE, PPTP, L2TP, Fixed IP). Features include enabling/disabling WAN access, NAT, UPnP, automatic DNS server connection, authentication settings, and host name. Users can also clone or change the MAC address of the router.
  • Port Trigger: Opens a predetermined incoming port for a limited time when a client makes an outgoing connection to a specified port. Useful for applications requiring specific incoming ports different from outgoing ones. Users can enable Port Trigger, select well-known applications, and define trigger ports and protocols.
  • Virtual Server/Port Forwarding: Directs network traffic from the Internet to a specific port or range of ports on a local device. Users enable Port Forwarding, select famous server/game lists, enter service names, port ranges, local IP addresses, and protocols.
  • DMZ (Demilitarized Zone): Exposes one client to the Internet, allowing it to receive all inbound packets directed to the Local Area Network. Useful for hosting domain, web, or e-mail servers. Users specify the IP address of the exposed station.
  • DDNS (Dynamic DNS): Allows access to the router from outside the network using a DNS name instead of a WAN IP address. Users can enable the DDNS client, choose ASUS DDNS or another service, and enter host name, username, and password/key.
  • NAT Passthrough: Allows VPN connections (PPTP, L2TP, IPsec, RTSP) to pass through the router to network clients.
  • IPv6: Supports IPv6 addressing. Users configure connection type, IPv6 LAN, and DNS settings.
  • VPN Server: Provides secure communication to a remote computer or network. Users enable PPTP VPN Server, configure advanced settings (broadcast support, authentication, MPPE Encryption, Client IP address range), enable Network Place (Samba) Support, and enter username/password for VPN server access.
  • Firewall: Serves as a hardware firewall. Features include enabling/disabling the firewall, DoS protection, and monitoring logged packets (Dropped, Accepted, Both).
  • URL Filter: Blocks access to specific URLs by keywords or web addresses.
  • Keyword Filter: Blocks access to webpages containing specified keywords.
  • Network Services Filter: Blocks LAN to WAN packet exchanges and restricts network clients from accessing specific web services (e.g., Telnet, FTP). Users can set filter table type (Black List or White List), specify active days/times, and define Source IP, Destination IP, Port Range, and Protocol.

Maintenance Features:

  • System Log: Contains recorded network activities, including General Log, DHCP Leases, Wireless Log, Port Forwarding, and Routing Table. The log resets when the router is rebooted or powered off.
  • Firmware Upgrade: Allows users to upgrade the router's firmware to the latest version downloaded from the ASUS website.
  • Firmware Restoration: A utility used to recover the router if firmware upgrading fails. Users unplug the router, hold the Reset button while replugging, and release when the Power LED flashes slowly to enter rescue mode, then use the utility to upload firmware.
  • Restore/Save/Upload Setting:
    • Restore: Resets the router to default factory settings.
    • Save: Saves current system settings to a file.
    • Upload: Restores settings from a previously saved file.

Troubleshooting:

  • Basic Troubleshooting: Includes restarting the network components (modem, router, computers), checking Ethernet cable connections and LED statuses, and verifying wireless settings (SSID, encryption, password).
  • Cannot Access Router GUI: Check wired connection, correct login information (admin/admin), disabled Caps Lock, clear browser cookies/files, disable proxy server, cancel dial-up connection, set TCP/IP to obtain IP automatically, and ensure CAT5e/CAT6 Ethernet cables are used.
  • Client Cannot Establish Wireless Connection: Check if the device is out of range, adjust router antennas, ensure DHCP server is enabled, verify SSID is not hidden, check wireless channel conformity, and consider resetting the router to factory defaults.
  • Internet Not Accessible: Check WAN IP address via Network Map, restart network components, and verify if the device is blocked by Parental Control.
  • Forgot SSID/Network Password: Set up a new SSID/encryption key via wired connection or reset the router to default settings.
  • Firmware Upgrade Failed: Use the Firmware Restoration utility.

Asus RT-N600RU Specifications

General IconGeneral
BrandAsus
ModelRT-N600RU
CategoryNetwork Router
LanguageEnglish

Related product manuals