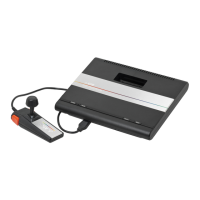
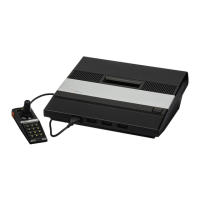
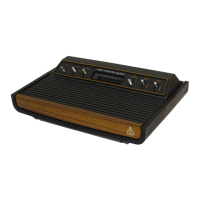
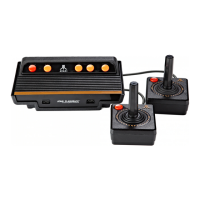
The ATARI 7800 ProSystem is a state-of-the-art video game system designed for superior graphics and challenging gameplay. It features a modern, sleek design and comes with two Pro-Line precision game controllers. The system is also home computer expandable.
Function Description:
The ATARI 7800 ProSystem allows users to play a wide variety of video games. It is backward compatible, meaning it can play all ATARI 2600™ cartridges without a separate adapter. It also supports all controllers compatible with the ATARI 2600 VCS™ console. The system includes a convenient pause control feature.
Important Technical Specifications:
The manual does not explicitly list detailed technical specifications like processor speed, RAM, or specific graphics capabilities. However, it highlights "superior graphics" as a key feature. The system operates with a 120-volt AC electrical wall outlet using the provided Power Adapter. The TV/Game Switch Box is designed to connect to televisions with various antenna configurations, including those with four screws, U-shaped sliders, slide switches, short round cables, or cable TV connections. The system broadcasts on either Channel 2 or Channel 3, selectable via a switch on the console.
Usage Features:
Setting Up the Console:
- Channel Selection: Before connecting, check the channel selector switch on the back of the console. It should be set to the appropriate position (either Channel 2 or Channel 3, depending on local broadcasting). If Channel 3 is broadcasting in your area, set the TV to Channel 2 and the console switch to the Channel 2 position.
- Power Connection: Plug the Power Adapter cable into the POWER connector at the back of the console, then plug the Power Adapter into a convenient 120-volt AC electrical wall outlet. It is crucial to use only the Power Adapter packed with your ATARI 7800, as using any other power supply could damage the console.
- TV Connection: Attach the TV Connector Cable to the console and the TV/Game Switch Box.
- TV Settings: Turn on your television and set the volume to a comfortable level.
- Powering On: Press the POWER ON/OFF button on the front left side of the console to ON. A red LED will glow when the power is on.
- Fine-Tuning: If your television has an automatic fine-tuning control, turn it off and manually fine-tune for the best picture. However, if your TV only receives color with automatic fine-tuning on, leave it on. Always turn the POWER OFF when the game is not in use.
Installing the TV/Game Switch Box:
The TV/Game Switch Box allows seamless switching between television viewing and video game play. It's easy to install by matching your TV's antenna connection type to the provided instructions.
- Four Screws Only: Disconnect the twin-lead wire from your TV and attach it to the ANTENNA screw terminals on the TV/GAME Switch Box. Then, connect the twin-lead wire from the TV/GAME Switch Box to the VHF antenna terminals on your TV. If you don't have a flat twin-lead antenna wire, you may need an impedance-matching transformer (balun coil), available at nominal cost from TV and stereo stores.
- U-Shaped Slider or Slide Switch: Move the U-shaped slider to connect the two screws, or push the slide switch to the "300 ohm" or "300 Ω" side.
- Round Antenna Cable: Disconnect the cable from your TV, screw it into an impedance-matching transformer, and attach the transformer to the ANTENNA screw terminals on the TV/GAME Switch Box.
- Flat Twin-Lead Antenna Wire: Disconnect it from the TV and attach it to the ANTENNA screw terminals on the TV/GAME Switch Box.
- Finally, connect the short twin-lead wire from the TV/GAME Switch Box to the VHF antenna terminals on your TV.
- Short Round Cable: Attach the TV's short loose-hanging cable to the connector next to it on your TV.
- Round Antenna Cable: Disconnect the cable from your TV, screw it into an impedance-matching transformer, and attach the transformer to the ANTENNA screw terminals on the TV/GAME Switch Box.
- Flat Twin-Lead Antenna Wire: Disconnect it from the TV and attach it to the ANTENNA screw terminals on the TV/GAME Switch Box.
- Finally, connect the twin-lead wire from the TV/GAME Switch Box to the VHF antenna terminals on your TV.
- Cable TV Connection: Disconnect the Cable TV Antenna from your TV and connect it to the TV/GAME Switch Box using the appropriate method. The TV/GAME Switch Box can remain attached to your television antenna without affecting television program reception. Your Cable TV company may have already provided an impedance-matching transformer. To permanently attach the switch box to your TV, peel off the protective paper on its back and press the exposed sticky surface onto a clear area near the antenna terminals.
Inserting a Game Cartridge:
- Turn the console power OFF before inserting or removing a cartridge.
- Hold the cartridge with the label facing away from you and the title reading right-side-up.
- Insert the cartridge firmly into the slot at the center of the console. Do not force it in.
- Turn the console POWER ON. An ATARI logo, playfield, or title screen should appear on your television set.
Using the 7800 Pro-Line Controllers:
The system includes two advanced controllers designed for comfortable and responsive gameplay, providing eight directions of control.
- Connecting Controllers: Plug the controllers into the jacks at the front of the console. Use the left jack for one-player games and both jacks for two-player games. Each jack is designed to fit the controller only one way; ensure a firm connection without forcing it.
- Fire Buttons: Each controller has two fire buttons. For most games, both buttons perform the same functions, allowing you to use whichever is most comfortable. For more realistic play in some games, these buttons may have independent functions. Consult the game manual for specific instructions.
Starting Play:
- After inserting a game cartridge and turning the console POWER ON, the game title screen will appear, often with an example of gameplay.
- Press any fire button on the left joystick to start the game at the current game option.
- Changing Game Options: While the title screen is up, push the joystick in the following directions to change game options:
- Joystick Right: Increase Difficulty
- Joystick Left: Decrease Difficulty
- Joystick Up: Increase Number of Players
- Joystick Down: Decrease Number of Players
- Alternatively, press SELECT on the console while the menu is displayed to rotate through game options.
- Note: This joystick technique applies only to ATARI 7800 ProSystem games and controllers. For other games, consult their specific manuals.
- Starting a New Game: During gameplay, press RESET on the console to start a new game. Press SELECT to display the menu.
- Pause Control: Press PAUSE on the console to stop all game action. After 15 to 30 minutes, the screen will go blank to preserve your television. Press PAUSE again to resume gameplay.
- ATARI 2600 VCS Games: Some ATARI 2600 VCS games use the LEFT and RIGHT DIFFICULTY switches. Moving a difficulty switch to the left makes the game more difficult. Some ATARI game cartridges use these switches for other functions, while many games do not use them at all.
Returning Your TV Set to Television Program Viewing:
- Press the console POWER switch OFF.
- Change the TV/Game Switch on the Switch Box to TV.
- Turn on the automatic fine-tuning if you had turned it off.
Maintenance Features:
To ensure many years of enjoyment and good working condition for your ATARI 7800 ProSystem, observe the following:
- Power Off: Always turn the POWER switch OFF when the ATARI 7800 ProSystem is not in use.
- Cartridge Insertion: Do not force a game cartridge into the cartridge slot.
- Liquid Spills: Do not spill liquids on your console, cartridges, or controllers.
- Handling: Do not lift your 7800 console or controllers by the connecting wires, as this can bend or crimp the wires and break the internal insulation.
- Dropping: Be careful not to drop the console, controllers, or game cartridges.
- Extreme Heat: Do not expose the console, controllers, or game cartridges to extreme heat.
- Disassembly: Do not disassemble or alter the console, controllers, or cartridges. There are no user-serviceable parts.
- Power Adapter: Use only the Power Adapter packed with your ATARI 7800 ProSystem. Using any other power adapter could damage the electrical components in the console.
- Unplugging: Unplug the Power Adapter from the electrical outlet when not in use.
- TV Switch Box: Do not use any TV switch box other than the TV/Game Switch Box packed with your ATARI 7800 ProSystem, as this could damage the electronic components.
- Cleaning: Clean the exterior surface of the console with a soft and slightly damp cloth (use water only).
Compliance with FCC Regulations:
The ATARI 7800 ProSystem is engineered to eliminate phosphor memory or "burn-in" on television screens. However, it is recommended to turn down the contrast of your television set and turn the ATARI 7800 OFF when not in use.
To comply with Federal Communications Commission (FCC) regulations and prevent interference with television reception, observe these guidelines:
- Antenna Cable Length: Do not install a longer antenna cable from the TV/Game Switch Box to the television antenna connection. The supplied cable complies with FCC regulations.
- Direct Connection: Do not connect the antenna output cable on your TV/Game Switch Box directly to any television antenna or Cable TV outlet.
- Loose Wires: Do not attach loose wires to your television antenna terminals when using the ATARI 7800.
- Interference: This equipment generates and uses radio frequency energy. If not installed properly, it may cause interference. It has been type-tested and found to comply with Class B computing device limits. If interference occurs, try reorienting the receiving antenna, relocating the computer, or plugging the computer into a different branch circuit. Consult the dealer or an experienced radio/television technician for further assistance. The booklet "How to Identify and Resolve Radio-TV Interference Problems" from the U.S. Government Printing Office may be helpful.
- Peripherals: Only peripherals certified to comply with Class B limits may be attached to this computer. Operation with non-certified peripherals may cause interference.
- Shielded Cable: If a cable is attached to the expansion interface connector, it must be a shielded cable (Atari part number C025465-001) to ensure FCC compliance. Using a non-shielded cable will void FCC certification.