2. Find the letter for your ATEN Video Extender in the table. Aligning the front of the video extender with
the letter on the mounting plate will position the holes needed to screw the video extender to the
mounting plate. The table’s top row shows how many units can be installed in one VE-RMK1U Frame.
Mounting Plate
Video Extender Rack Mount Kit
VE-RMK1U
Installation:
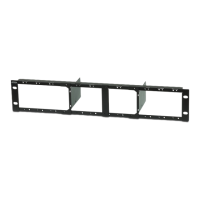
1. Position the VE-RMK1U Frame on the front of the rack and align the holes in the mounting brackets
with the holes in the rack, then screw the mounting brackets to the rack. Rack screws are not provided.
The VE-RMK1U kit provides a mounting frame and acces-
sories to install up to 4 ATEN Video Extenders in 1U of
rack space.
Package Contents:
User Instructions
1 VE-RMK1U Frame
4 1U Mounting Plates
5 Plastic Captive Screws
6 Hexagon Head Screws
12 Countersunk Head Screws
Mounting Positions on Frame
CE100 VB802 CE250A UC4854 CE350 CE750
VE560 VE150A CE700A VE802 CE370 CE750 A
VE600A VE170 CS72D VE812 CE600 CE770
VE601 VE172R CS72E VE814 CE602
VE602 UC2322 VE882 CE604 CE800B
VE800A UC2324 VE892 CE610A CN8000
VE801 UC4852 VS182A CE624 CS74D
VE810
VE1812
VE2812T
VE8900
VE8950
VS182B
KE6900ST
VS192
VS194
VE814A
VE901
VE811
CN8000A
CS724KM
VE883
VE816R
VS481C
VS184B
VE1832
VS481A
VS481B
CS74E
VC880