FIG 13
PAGE 5
STARTING & STOPPING INSTRUCTIONS
EDGING INSTRUCTIONS
1. The Atom Edger is very easy
and simple to use. You will
soon become an expert after
a few edgings.
2. Thoroughly inspect the area
where the edger is to be
used and remove all stones,
sticks, wires and other
foreign objects.
3. Adjust blade height (Fig.15)
and with new blade, try
No.2 position.
4. Use both arms
extended downwards,
as in Fig. 16, hold both
handle grips firmly. Switch
motor on by pushing down
safety interlock with thumb
and pulling trigger (Fig. 11).
Do not overload motor, allow
it to run freely. To stop blades
rotating, release trigger.
5. If blade is not deep
enough, or if digging too
deep, adjust blade height,
to suit depth required
(Fig.15). It is always
more comfortable
and relaxed to have
arms fully extended
downwards as shown in
Fig.16 and on front cover
illustration.
6. Do not lift handles by
excessive bending of elbows
(Fig.17).
7. As cutting action begins,
move the lawn edger
forward so that the blade
can cut the edge as you
move forward (Fig 16 & 18).
8. Continue at a moderate pace
until you are familiar with the
controls and the handling of
the Atom Edger.
11. Edging along concrete edge: For
position of blade, align edge guide
(at front of blade cover) with edge of
concrete. If blade hits concrete, lower
handles and re-position blade at side
of concrete.
! WARNING
9. Blade rotating speed should be fast
under load. If blade rotates slowly,
jams or stops in the ground (Fig.19),
lower handles pull unit back and
recommence (Fig. 18).
10. Clutch: The Atom Edger is equiped with
a safety clutch. DO NOT run edger if
blade is jammed, as clutch shoes will
prematurely wear and cause damage if
cutting blades do not rotate (Fig. 19).
! NOTE
A built in automatic centrifugal clutch disengages the
blade from rotating at engine idle speed. The clutch
engages the blade when the engine speed is increased.
12. Even with the grass growing
over the concrete and you
cannot see the edge, you can
feel the edge of the concrete
with the rotating blades by
slightly sideways tilting the
handles of the edger away
from the concrete so that
the blades tilt towards the
concrete and skim below the
concrete edge which acts
as a guide (Fig. 20). Edger
blades are made from high
tensile hardened spring steel
and will last a long time.
Once the edge is established
the second and subsequent
times around are very fast.
13. Sideways Tilting: Lower either
left or right handle to achieve
angle cutting (Fig. 21).
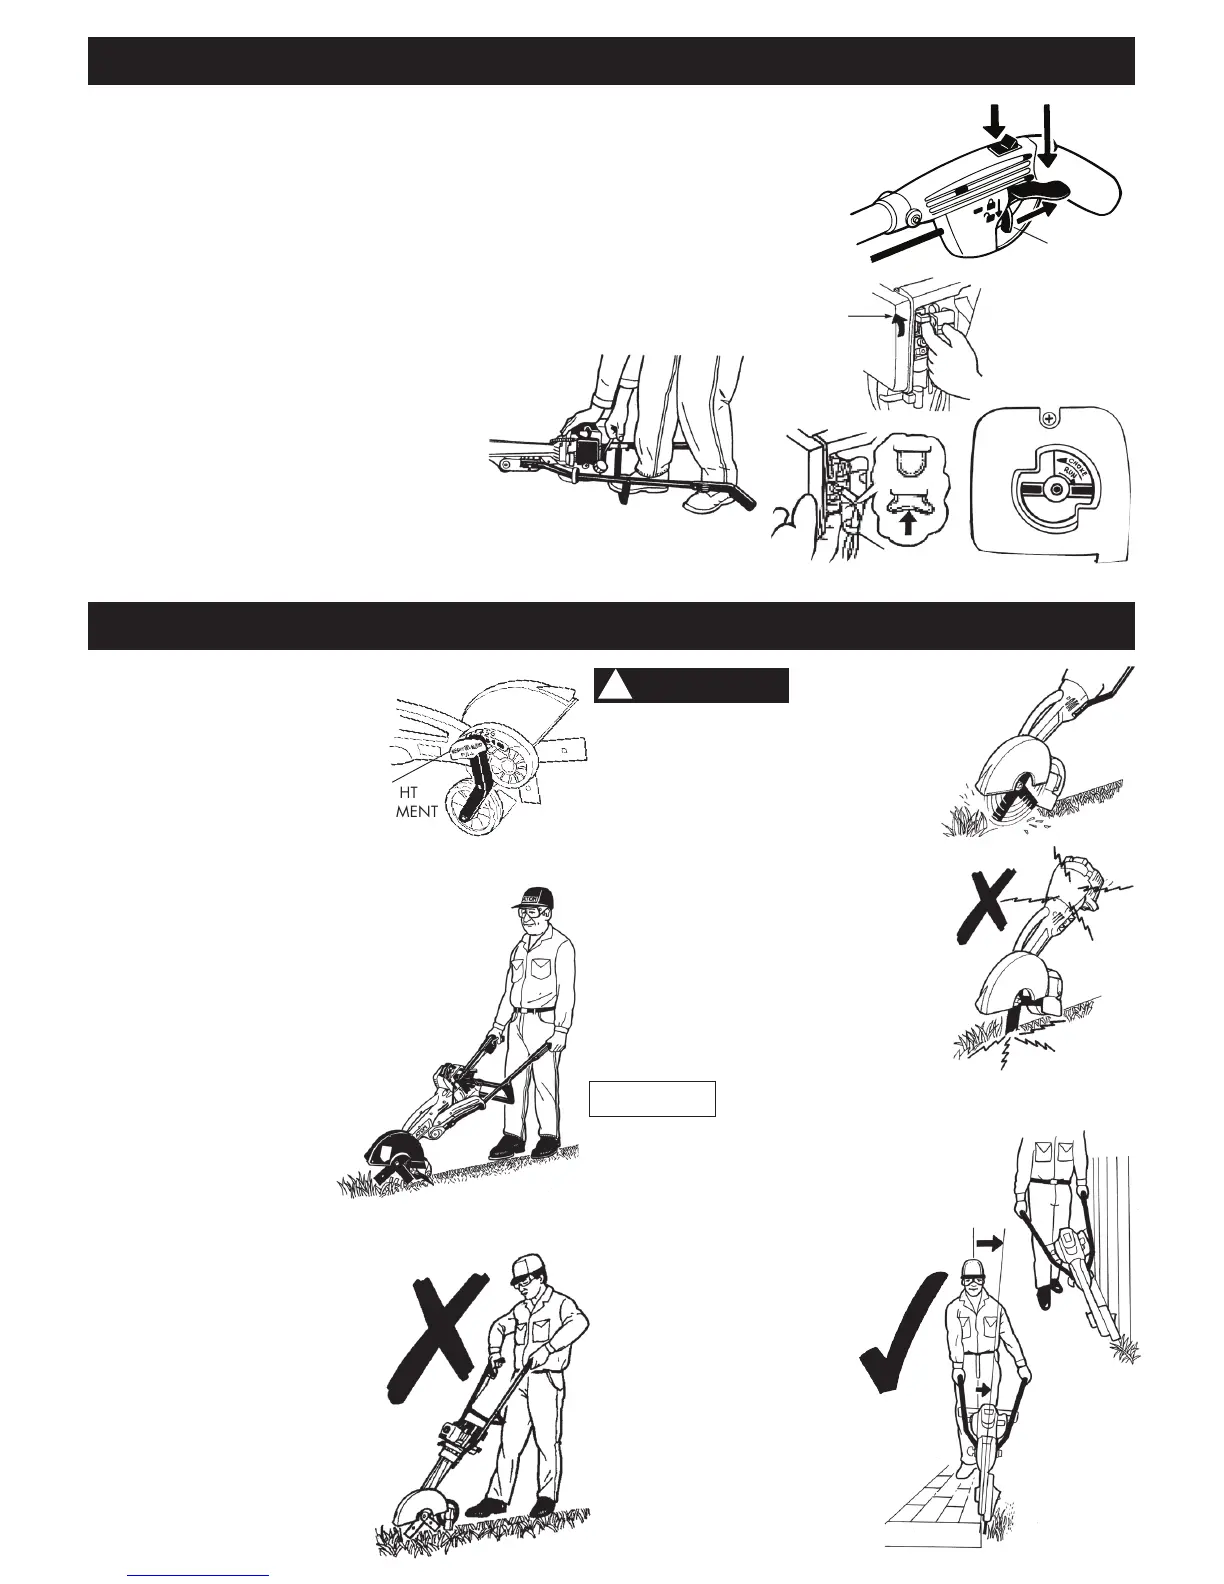
FIG 11
SWITCH
ON
SAFETY
INTERLOCK
THROTTLE
TRIGGER
CHOKE ON
POSITION
(Choke lever up)
FIG 15
HEIGHT
ADJUSTMENT
FIG 20
FIG 21
FIG 18
FIG 19
FIG 16
FIG 17
Place edger on ground in horizontal position. See Fig. 14 below.
COLD START
1. Switch engine on (Fig. 11). Engine starts on idle.
2. Move choke lever up to full choke ON position (Honda engine)(Fig. 12), or rotate lever
counterclockwise to choke position – Mitsubishi engine (Fig.12A).
3. Press and release the primer bulb 10 times (cold) or 4 times (hot) (Fig.13), on new
engine 20 times, to pump air out of fuel lines.
4. Make sure you have a firm footing. With one foot on cross brace, hold down motor with
left hand. With right hand pull the starter grip slowly until you feel it engage – and then
give it a quick pull (Fig. 14).
5. When engine starts to run allow it to run on half choke for a few seconds to warm up,
then push choke off (down) to run position. (Fig.12) or anticlockwise (Fig.12A).
6. Throttle Trigger (engine accelerator control) is operated by pushing
down interlock with thumb and pulling on trigger (Fig.11).
HOT OR WARM START
7. Switch ignition on and follow instruction 3&4.
FLOODED ENGINE
8. Ignition ON, choke lever OFF in run position.
9. Pull starter rope up to 10 times to clear excess fuel.
10. If engine has excesive fuel that cannot be cleared,
remove spark plug from engine and from spark plug terminal, crank engine to
clear excess fuel, wipe and dry spark plug of all fuel, re-install spark plug terminal,
and retsart as above. Otherwise allow to stand for 30 minutes before restarting.
FIG 14
FIG 12
HONDA
FIG 12A
Only operate unit
when moving
forward. DO NOT operate walking backwards,
as you may trip, fall and injure yourself.