Do you have a question about the Atomberg RENESA and is the answer not in the manual?
Control fan speed by toggling the main switch, indicated by LED status.
Solutions for fan failure to initiate operation, checking fuse or wiring.
Troubleshooting steps for unusual operational sounds, including loose connections or bearing issues.
Addresses fan instability due to blade balance, loose fittings, or incorrect installation.
Issues related to inconsistent fan speed or unexpected restarts, often due to regulator bypass.
Guidelines for periodic cleaning using soft cloths; avoid water and abrasive agents.
Lists all parts included in the fan package, such as motor, blades, and remote.
Detailed steps for assembling the fan components before mounting.
Guidance on safely connecting the fan's wires to the power supply.
Ensures adequate space around the fan for optimal performance and to prevent injury.
Warning about potential damage or injury from incorrect installation practices.
Essential safety advice for handling and operating the fan to prevent accidents.
Safety measures to follow before performing maintenance or cleaning the fan.
Ensures optimal performance by bypassing regulators for speed control.
Recommendation to switch off the fan using the panel switch for long durations.
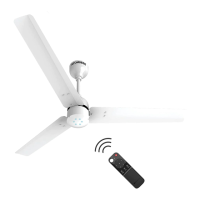
Introduction to the ergonomically designed remote and its soft controls.
This document describes the Atomberg RENESA Ceiling Fan, a super-efficient ceiling fan designed for optimal performance and energy savings.
The Atomberg RENESA Ceiling Fan is a smart, energy-efficient appliance that utilizes BLDC motor technology to consume significantly less power compared to ordinary induction fans. It offers various functionalities to enhance user comfort and convenience, including speed control, sleep mode, and a timer.
Speed Control: The fan offers five distinct speed settings (Speed 1 to Speed 5) and a Boost mode. These speeds can be controlled via a smart remote or, in the absence of a remote, by toggling the main switch OFF and ON a specific number of times. Each speed setting is indicated by a corresponding number of LED glows or blinks on the fan. For instance, Speed 1 is indicated by one LED glow, while Boost mode is indicated by six LEDs glowing.
Sleep Mode: This feature adds "smart comfort" by automatically reducing the fan's speed over a 4-hour period. The speed is reduced by one level every two hours. This function is designed to auto-reduce the speed as the temperature drops overnight, contributing to energy savings. If sleep mode is already active and the sleep key is pressed again, it will disable the sleep mode. Sleep mode will not work if the fan is off.
Timer Mode: The timer function allows users to set the fan to automatically switch OFF or ON after a specified number of hours (1, 2, 3, or 6 hours). The number of LEDs blinking indicates the set duration. This feature helps save energy by ensuring the fan operates only when needed. Pressing the Timer key five times, or once after a 6-hour timer indication, disables the timer.
LED Control: The fan includes an LED ON/OFF function, allowing users to turn the LEDs on or off as desired.
Boost Mode: This mode sets the fan to its highest speed, providing maximum air delivery.
The Atomberg RENESA Ceiling Fan is designed for ease of use and optimal performance with several user-friendly features.
Remote Control: The primary method of control is a smart remote, which is ergonomically designed with soft controls for durability. The remote allows for seamless adjustment of speed, activation of sleep mode, setting the timer, and controlling the LED light. Each remote key press is accompanied by specific LED indications on the fan, providing clear feedback to the user. For example, pressing the "Speed 1" key makes one LED glow for 1 second, while pressing the "Timer 1" key makes one LED blink twice.
Manual Speed Control (Without Remote): In situations where the remote is unavailable, the fan's speed can be controlled by repeatedly toggling the main switch OFF and ON. A delay of approximately 1 second between toggles is crucial for this function to work correctly. The number of toggles corresponds to a specific speed setting:
Installation Guidelines: The manual provides detailed instructions for assembly and installation. A mandatory step is to bypass or eliminate the regulator from the connection before installing the fan for optimal performance, as the fan is operated using a remote and a regulator can affect its performance. The installation process involves securely attaching the shackle to the hanger or ceiling hook, fastening the blades to the motor, and ensuring all screws and nuts are tightened with washers and R-pins to prevent slipping and wobbling. Proper blade seating and balance are emphasized to prevent accidents and ensure the fan's longevity.
Electrical Wiring: Clear instructions are provided for making correct wire connections. It is crucial to securely seal all wire connections with electrical insulation tape to prevent electric shock or fire hazards. Pinching of wires between the shackle kit, down rod, and ceiling hook assembly should be avoided.
Safety Instructions: Users are advised to turn off the main power to the ceiling fan before any servicing or cleaning. Hands or other objects should be kept away from the fan blades while it is running. Modifying the blade design is discouraged. The fan must be hung with at least 1 foot of clearance from the ceiling and 7 feet from the floor for optimal performance and safety. Any object near the fan must be at least 2 feet away from the tip of the fan blade.
Energy Efficiency: The Atomberg RENESA Ceiling Fan is highlighted for its significant energy savings, consuming only about 1/3rd of the power of ordinary induction fans (28 watts at full speed compared to 75 watts). This makes it suitable for households, hospitals, colleges, schools, and commercial spaces. It runs three times longer on an inverter, has consistent speed even at low voltages, and features a smart sensorless algorithm for greater reliability.
Durability Features: The fan is built with a full copper motor and double ball-bearings for better stability and longer life. It features an aluminum body and blades for zero rust, zinc-plated parts and accessories for rust-free life, and protective coating over electronics for better resistance against moisture. All fans undergo testing in extreme conditions to ensure durability.
The Atomberg RENESA Ceiling Fan requires minimal maintenance, primarily focusing on periodic cleaning to ensure its longevity and optimal performance.
Periodic Cleaning: The only maintenance needed is periodic cleaning. Users should use a soft, lint-free cloth or brush to clean the fan, avoiding abrasive cleaning agents to prevent scratching the smooth paint finish. A moist cloth can be used for stains, but direct water contact should be avoided.
Important Cleaning Warnings:
Troubleshooting Guidelines: The manual provides a troubleshooting section to address common issues:
For any problems that cannot be resolved using the guidelines, users are advised to contact a local electrician or service engineer.
Warranty: The warranty terms cover damages caused by incorrect installation or wrong practices. Users are advised to check the warranty terms in detail. The product is designed to be used only with parts or accessories supplied by Atomberg or specifically designed for use with their products; using other parts may void the warranty and cause personal injury or property damage.
| Sweep | 1200 mm |
|---|---|
| Speed | 340 RPM |
| Remote Control | Yes |
| Warranty | 2 Years |
| Motor Type | BLDC |
| Speed Settings | 5 |
| Timer | Yes |
| Sleep Mode | Yes |
| Color | White |
| Blade Material | Aluminum |