Introduction
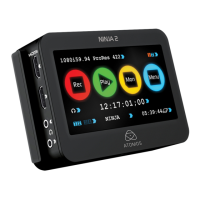
Thank you for purchasing the Atomos Ninja. Experience
unmatched exibility thanks to its expansion port, the built-in
HDMI 2.0 I/O, and its extensive recording capabilities in various
industry-standard codecs. The daylight-viewable 1000 Nit screen
allows you to condently monitor your shots while showcasing the
redesigned Atomos 11 interface in all its glory. Combining Ninja
with the optional Atomos Connect accessory allows you to access
a range of advanced cloud-based workows, while AtomX CAST
turns it into a compact 4-input HDMI switcher. Please take the time
to read through this Quick Start Guide and register your product
for free updates.
What’s in the box
1 x Ninja
1 x Battery Eliminator
1 x USB-C PD to DC Adapter Cable
1 x Master Caddy III
1 x Quick Start Guide
You will also need (sold separately)
HDMI Cable
Atomos have a range of HDMI cables with die cast connectors
and coiled cables in a range of lengths and connections
(sold separately).
Einführung
Vielen Dank, dass Sie sich für den Atomos Ninja entschieden
haben. Erleben Sie unübertroffene Flexibilität dank integriertem
Erweiterungsport, HDMI 2.0 Ein-/Ausgängen und umfangreichen
Aufnahmemöglichkeiten in professionellen Aufnahmeformaten.
Das 1000 Nit helle Display ermöglicht eine zuverlässige Kontrolle
der Aufnahmen und stellt die neu gestaltete Bedienoberäche von
Atomos 11 brillant dar. In Kombination mit dem optional erhältlichen
Atomos Connect Zubehör erhalten Sie Zugang zu fortschrittlichen
Cloud-basierten Workows, während AtomX CAST das Gerät in
einen kompakten HDMI Switcher mit vier Eingängen verwandelt.
Bitte nehmen Sie sich die Zeit diese Schnellstartanleitung zu lesen
und registrieren Sie Ihr Produkt für kostenlose Updates.
Lieferumfang
1 x Ninja
1 x Akku Eliminator
1 x USB-C PD zu DC Adapterkabel
1 x Master Caddy III
1 x Schnellstartanleitung
Sie benötigen auch (separat erhältlich)
HDMI Kabel
Atomos bietet eine Reihe von HDMI-Kabeln mit Druckguss-
Steckern und Spiralkabeln in verschiedenen Längen und mit
unterschiedlichen Anschlüssen an (separat erhältlich).
Connect and power-up
Battery
The Ninja has a single battery slot. To connect a compatible
battery, place the battery in front of the retaining lug, align with
the connectors and slide the battery into the lock position.
We recommend using Atomos NP-F series batteries.
To connect the supplied Battery Eliminator, follow the same
procedure and lock it into position. Once the Battery Eliminator
is in place, attach the supplied USB-C PD to DC Adapter cable
to it via the DC Barrel connector and plug the USB-C connector
into a compatible USB PD power adapter or power bank (Output:
30W minimum).
Alternatively, the Ninja can also be powered from a compatible
D-Tap power source by using the optional D-Tap battery cable
(ATOMDTPCB1).
Touching the battery icon in the top right of your screen will allow
you to accurately see remaining battery life. Refer to the User
Manual for more information.
Expansion Port
The Ninja features a built in Expansion Port that provides added
functionality when paired with the optional Atomos Connect,
AtomX CAST, AtomX SDI, and AtomX SYNC accessories.
Anschließen und Einschalten
Akku
Der Ninja besitzt einen Akkuschacht. Um den Akku anzuschließen,
setzen Sie ihn vor die Haltelasche, richten Sie ihn an den
Anschlüssen aus und schieben Sie ihn in die Verriegelungsposition.
Wir empfehlen Atomos Akkus der NP-F Serie.
Um den mitgelieferten Akku-Eliminator anzuschließen, gehen Sie
genauso vor und setzen ihn in die Verriegelungsposition. Sobald der
Akku-Eliminator angeschlossen ist, verbinden Sie das mitgelieferte
USB-C PD zu DC Adapterkabel mit dem Schraubanschluss
des Eliminators und schließen Sie den USB-C Anschluss an
ein kompatibles USB PD Netzeil oder eine Powerbank an
(Ausgangsleistung: mindestens 30W).
Alternativ kann der Ninja auch von einem D-Tap Akku mittels des
optionalen D-Tap Adapterkabels (ATOMDTPCB1) betrieben werden.
Nach Berührung des Akkusymbols oben rechts auf dem
Bildschirm, sehen Sie die verbleibende Akkulaufzeit. Das
Benutzerhandbuch enthält hierzu weitere Informationen.
Erweiterungsanschluss
Der Ninja besitzt einen integrierten Erweiterungsanschluss,
welcher in Kombination mit den Atomos Connect, AtomX
CAST, AtomX SDI und AtomX SYNC Accessoires diverse
Zusatzfunktionen bietet.
Hardware Features
A. On/Off and Screen Lock
To turn the Ninja on, press the power button on the side of the unit. To
shut down, hold the button for at least 4 seconds (until unit turns off).
B. Remote Control/LANC and Calibration
The Ninja screen can be calibrated using the X-Rite i1Display
Pro. To connect you will need a USB to serial cable serial cable
(ATOMCAB004). The remote port can also be used for remote
camera control of Z Cam E2 cameras via the optional USB-C to
serial cable (ATOMCAB018).
C. HDMI In/Out
The HDMI input connection used to record to the Ninja supports
up to 4Kp60 video and 6Kp30 RAW inputs. The HDMI Output
connection provides a live loop out or play-out when in Playback
mode up to 4Kp60 video.
D. Battery Release Button
Press and slide the battery away from unit to remove.
E. Tally Light
The Red Tally Light on the rear of the unit indicates active
recording. The Tally Light can be turned off in the menu options.
F. Disk Slot
Compatible with Master Caddy II & III media and AtomX SSDmini.
G. Screw Mounts + Locking Pin Holes (Arri)
3/8” screw hole with 1/4” adapter. Top and bottom.
H. Expansion Port
Provides added functionality when paired with the optional Atomos
Connect, AtomX CAST, AtomX SDI, and AtomX SYNC accessories.
Hardware Merkmale
A. Ein-/Ausschalten und Bildschirmsperre
Um den Ninja einzuschalten, drücken Sie die Netztaste an der Seite
des Geräts. Zum Ausschalten drücken Sie die Taste mindestens 4
Sekunden lang (bis sich das Gerät ausschaltet).
B. Fernsteuerung/LANC und Kalibrierung
Der Ninja Bildschirm kann mit dem X-Rite i1Display Pro kalibriert
werden. Für den Anschluss benötigen Sie ein USB-zu-Serial-
Kabel (ATOMCAB004). Der Remote-Anschluss kann auch zur
Fernsteuerung von Z Cam E2-Kameras über das optionale USB-
C-zu-Seriell-Kabel (ATOMCAB018) verwendet werden.
C. HDMI-Eingang/-Ausgang
Der HDMI-Eingang für die Aufzeichnung auf dem Ninja unterstützt
bis zu 4Kp60-Video- und 6Kp30-RAW-Eingänge. Der HDMI-Ausgang
ermöglicht eine Live-Schleife oder Wiedergabe im Wiedergabemodus
mit bis zu 4Kp60 Video.
D. Akkuentriegelungstaste
Drücken Sie die Taste und entnehmen Sie den Akku aus dem Gerät.
E. Signalleuchte
Die Rote Die Signalleuchte auf Rückseite leuchtet während der
Aufnahme. Die Signalleuchte kann im Menü ausgeschaltet werden.
F. Laufwerksschacht
Kompatibel mit Master Caddy II & III-Medien und AtomX SSDmini.
G. Schraubgewinde + Sicherungsstiftlöcher (Arri)
3/8”-Schraubgewinde mit 1/4”-Adapter. Oben und unten.
H. Erweiterungsanschluss
Ermöglicht in Kombination mit den Atomos Connect, AtomX CAST,
AtomX SDI und AtomX SYNC Accessoires diverse Zusatzfunktionen.
Hardware Features / Hardware Merkmale
A
On/Off and Screen Lock
Ein/Aus + Bildschirmsperre
B
Remote
Fernbedienung
H
G
G
Back ViewSide View
G
C
D
B
C
A
G
G
G
D E
F
C
HDMI In/Out
HDMI Eingang
D
Battery Release
Akkuentriegelung
E
Tally Light
Signalleuchte
F
Disk Slot
Laufwerksschacht
G
3/8” Screw hole + 1/4” Adapter
3/8” Schraubgewinde + 1/4” Adapter
H
Expansion Port
Erweiterungsanschluss
© Atomos 2023. TM ® All trademarks and registered trademarks are the property of their respective owners.
Device Management
Activate codecs/features for registered products,
learn from tutorials and download user manuals and
firmware updates.
my.Atomos.com/account
Support
If you experience any issues using Ninja, or have an
unanswered question don’t hesitate to reach out.
Atomos.com/support
User Manual
Scanning the QR code takes you to the FAQ page on
our website where you can read up on the products
documentation.
support.Atomos.com/hc/en-us
Geräteverwaltung
Aktivieren Sie Codecs/Zusatzfunktionen auf
registrierten Produkten, sehen Sie sich Tutorials an,
oder laden Sie Anleitungen & Updates herunter.
my.Atomos.com/account
Kundenservice
Sollte es ein Problem mit Ihrem Ninja, oder eine Frage
zum Produkt geben, zögern Sie bitte nicht uns zu
kontaktieren.
Atomos.com/support
Bedienundsanleitung
Durch Scannen des QR Codes gelangen Sie zum FAQ
Bereich unserer Website, wo sie die Anleitung des
Produkts lesen können.
support.Atomos.com/hc/en-us
Scan QR code for
User Manual
NINJA-QSG-2023_5pp_120mmx170mm_FA.indd 6-10NINJA-QSG-2023_5pp_120mmx170mm_FA.indd 6-10 19/7/23 3:17 pm19/7/23 3:17 pm
 Loading...