4
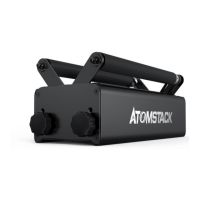
The roller has two connecting wires, the black plug and the white plug, please note that their wiring sequence is dierent and you need to connect carefully.
The 4PIN white plug wire is used to connect ATOMSTACK laser engraving machine.
The 4PIN black plug wire is used to connect the third-pay laser engraving machine.
The roller kit suppos ATOMSTACK and third-pay laser cutters and engravers. You need to connect it to the device and use the corresponding software to operate it. If it
cannot be connected, please change the order of the wires, and the change process is shown in Figure 1.1-1.2.
Installation Guide
Step 4: Wiring Instructions
Connection socket
White plug wire
Black plug wire
1.1 Connection sequence of white plug wire 1.2 Connection sequence of black plug wire
Y-axis motor cable plug
Chuck motor plug
Y-axis motor cable plug
Chuck motor plug