16
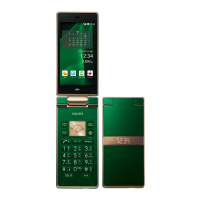
Lock Screen
When the display turns on, the lock screen appears.
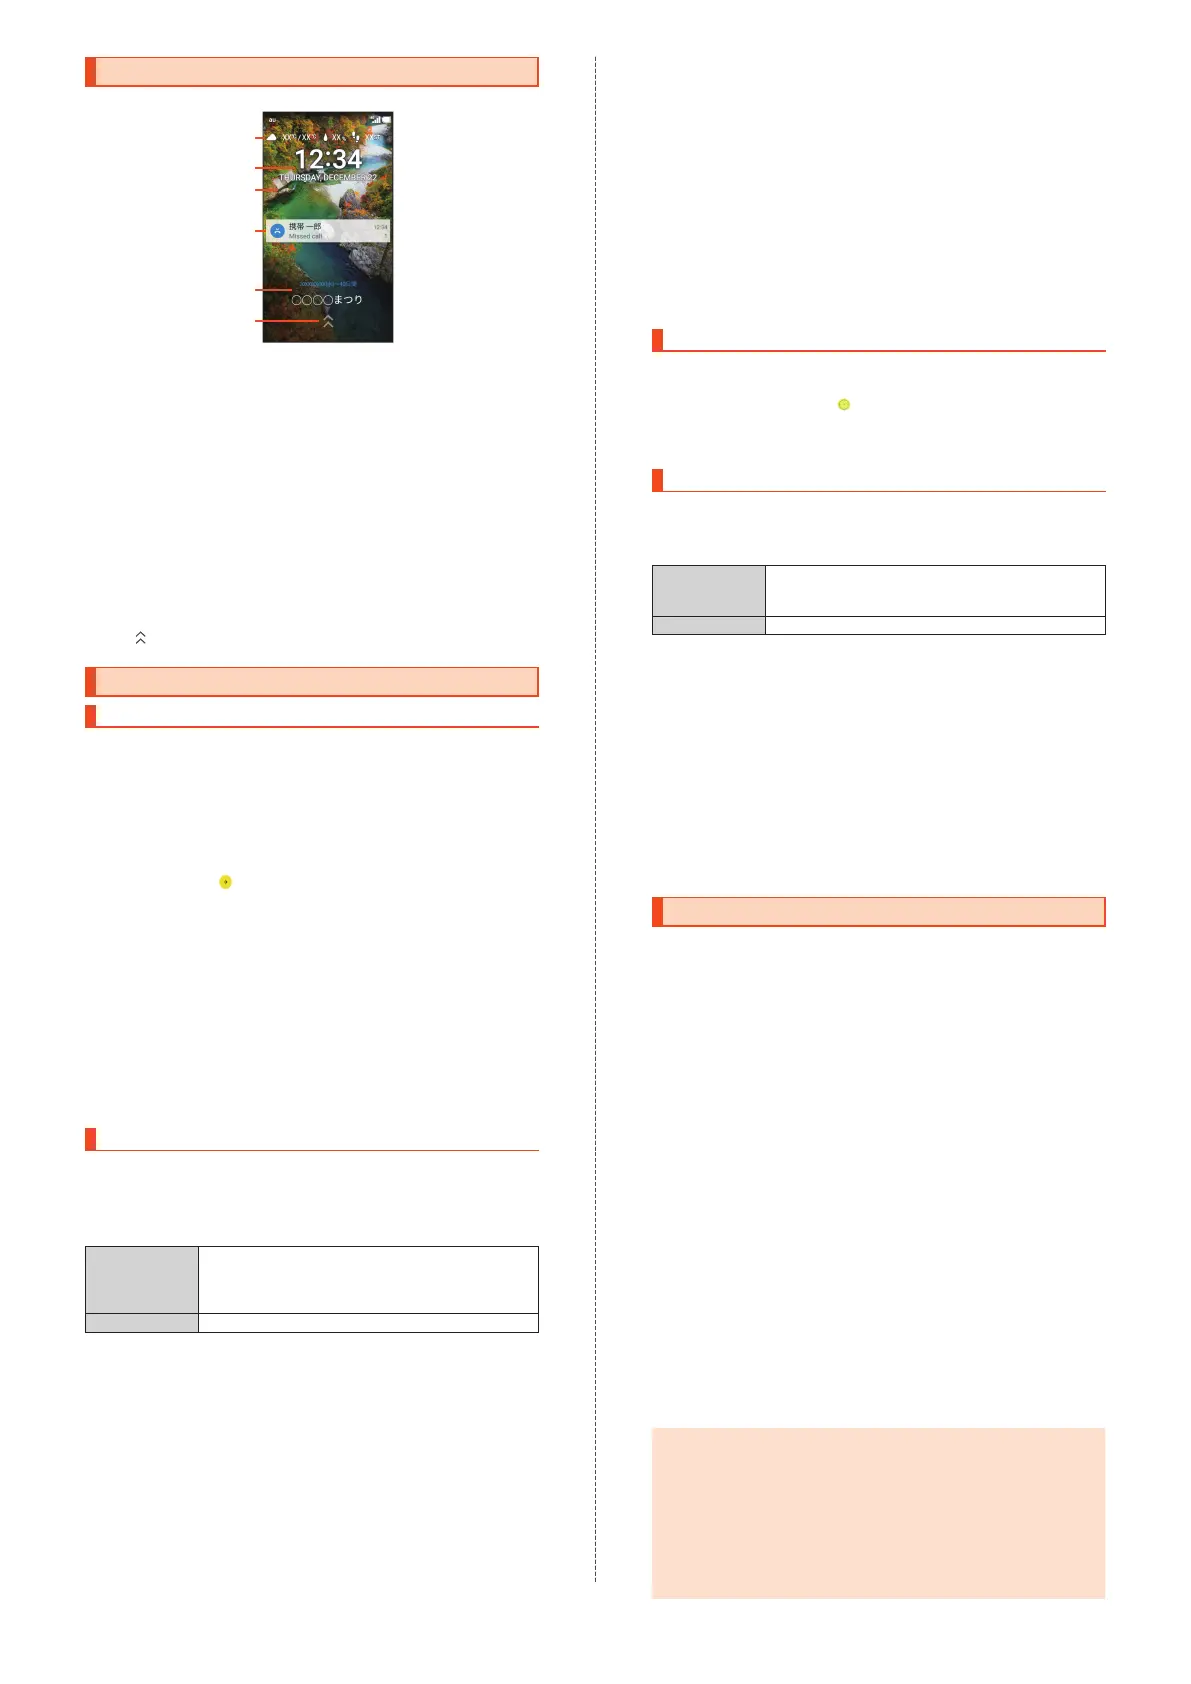
《Lock Screen》
②
①
④
⑤
⑥
③
Weather and step count
Date and time
Wallpaper
Notifications area
Notifications for missed calls, new E-mail, new SMS, etc. pop up
here. Double-tap a notification for the corresponding screen.
Drag the notifications area down for a list of notifications. Tap a
notification for the corresponding screen.
Info area
When "
エモパー
(emopa)" is set to ON, a variety of information from
emopa appears here.
•
Flick to the left/right to switch the information.
•
Double-tap information for the related information or details (may
not be available depending on the information).
Screen lock
Slide
up to unlock the screen.
Making Initial Settings
Setting Up Language and Wi-Fi
®
The Google initial settings screen appears automatically when you turn
the product on for the first time. Follow the on-screen instructions to
set each function.
•
In the following steps, you will skip Wi-Fi
®
connection settings and
"Got another device?" settings. The "Got another device?" settings
let you copy your Google Accounts, applications and data from a Tap
&
Go compatible Android device to the product.
1
Select the language ([
日本語
] (Japanese)
→
[English])
→
[ ]
To change the language after initial setup: Home screen
→
[
設定
]
(Settings) under "
ショートカット
" (Shortcuts)
→
[All settings menu]
→
[Language & input]
→
[Language].
2
[SKIP]
→
[SKIP ANYWAY]
→
[No thanks]
To set up Wi-Fi
®
connection after initial setup: Home screen
→
[
設
定
] (Settings) under "
ショートカット
" (Shortcuts)
→
[All settings
menu]
→
[Wi-Fi].
To use Tap & Go: [SKIP]
→
[SKIP ANYWAY]
→
[Copy your Google
Accounts, apps, and data from your other device], and then follow
the on-screen instructions.
3
[NEXT]
Next, set up a Google Account.
Refer to "Setting Up a Google Account" (
▶
P. 16).
Setting Up a Google Account
Set up a Google Account to use applications provided by Google Inc.
such as Play Store and Hangouts™. A Google Account may also be
required to use some other applications. (The product can be used
without setting up a Google Account.)
The main setting items are as follows.
Username Register a set of characters to use as your user ID
and e-mail address for your Google Account. You
cannot use a username that is already used by
another user.
Password Set up a password for your Google Account.
•
The Google Account setup screen also appears when you first
activate an application that requires a Google Account.
•
Steps may differ depending on some conditions. In such cases,
follow the on-screen instructions.
1
[Or create a new account]
If you already have a Google Account, enter the e-mail address.
2
Enter your "First name" and "Last name"
→
[NEXT]
→
Enter your username
→
[NEXT]
→
Enter the
password
→
[NEXT]
→
Enter the password again
→
[NEXT]
3
Check the phone number for recovery
→
[NEXT]
→
Check the phone number
→
[VERIFY]
→
Read the
contents
→
[I AGREE]
→
[NEXT]
4
Read the description of Google services
→
[NEXT]
5
[No thanks]
→
[CONTINUE]
To set up payment information for use with Google Play, follow the
on-screen instructions.
6
[Not now]
→
[NEXT]
To use an e-mail address other than the one for the Google
Account or E-mail (@ezweb.ne.jp), follow the on-screen
instructions.
7
Uncheck the checkbox
→
[SKIP]
To set up screen lock, check the checkbox and then follow the
on-screen instructions.
8
[SKIP ANYWAY]
Next, calibrate the touch panel.
Refer to "Calibrating Touch Panel" (
▶
P. 16).
Calibrating Touch Panel
Calibrate the touch panel for improved accuracy. Hold the product
normally during calibration.
1
Tap the six circles ( )
Calibration is complete when all the six circles have turned white.
Next, perform au Easy Setting.
Refer to "au Easy Setting" (
▶
P. 16).
au Easy Setting
Set up an au ID to use various services provided by au, such as au
ス
マートパス
(au Smart Pass) and au
かんたん決済
(au Simple Payment
Service; a payment option for purchasing applications from Google
Play).
au ID Register your au phone number or a set of
characters as your au ID. You cannot create an au
ID that is already used by another user.
au ID password Register a password to use your au ID.
•
To set the au ID after initial setup: Home screen
→
[
設定
] (Settings)
under "
ショートカット
" (Shortcuts)
→
[au Settings Menu]
→
[au Easy
Setting].
1
[Next]
→
[Register "au ID"]
→
[Next]
→
[au ID
の設定・
保存
] (Set/Save au ID)
2
Enter the security code
→
[OK]
The default security code is the four-digit number you wrote in the
application form.
3
Enter the password
→
[
設定
] (Settings)
→
[
終了
]
(Finish)
au ID registration is complete.
4
Follow the on-screen instructions
Setting Permissions for Applications
When you first activate an application/function that accesses the
product's functions and information, First things first confirmation
screen appears.
Example: When activating
(Album)
1
First things first screen
→
[Next]
2
[Deny]/[Allow]
Normally, tap "Allow" to allow use of the function.
Repeat step 2 for other functions, if any.
Other Methods for Setting Permissions for
Applications
Permissions for applications can also be set as follows.
Setting Functions to Use by Application
1
Home screen
→
[
設定
] (Settings) under "
ショートカッ
ト
" (Shortcuts)
→
[All settings menu]
→
[Apps]
2
Select the application
→
[Permissions]
3
Select the function
Setting Applications to Allow Use by Function
1
Home screen
→
[
設定
] (Settings) under "
ショートカッ
ト
" (Shortcuts)
→
[All settings menu]
→
[Apps]
→
[Menu]
→
[Advanced]
→
[App permissions]
2
Select the function
3
Select the application
◎
If you do not allow an application/function to use the related
functions, the application/function may not be activated or use of
functions may be restricted.
◎
A screen that explains the permissions may appear for some
applications/functions. In addition, multiple confirmation screens
may appear in a row or the contents may differ between
applications/functions. Read the contents carefully, and
then follow
the on-screen instructions.
◎
In this manual, descriptions about confirmation screens may be
omitted.
 Loading...