1
+
-
4
SSR
AUBER INSTRUMENTS
WWW.AUBERINS.COM
Instruction Manual
system, the built-in artificial intelligence program will calculate and set the PID
parameters for the controller. If your system has a very slow response, the
auto-tuning could take a long time.
AT start
AT calculation
AT end
ON
OFF ON
OFF
ON/OFF PID
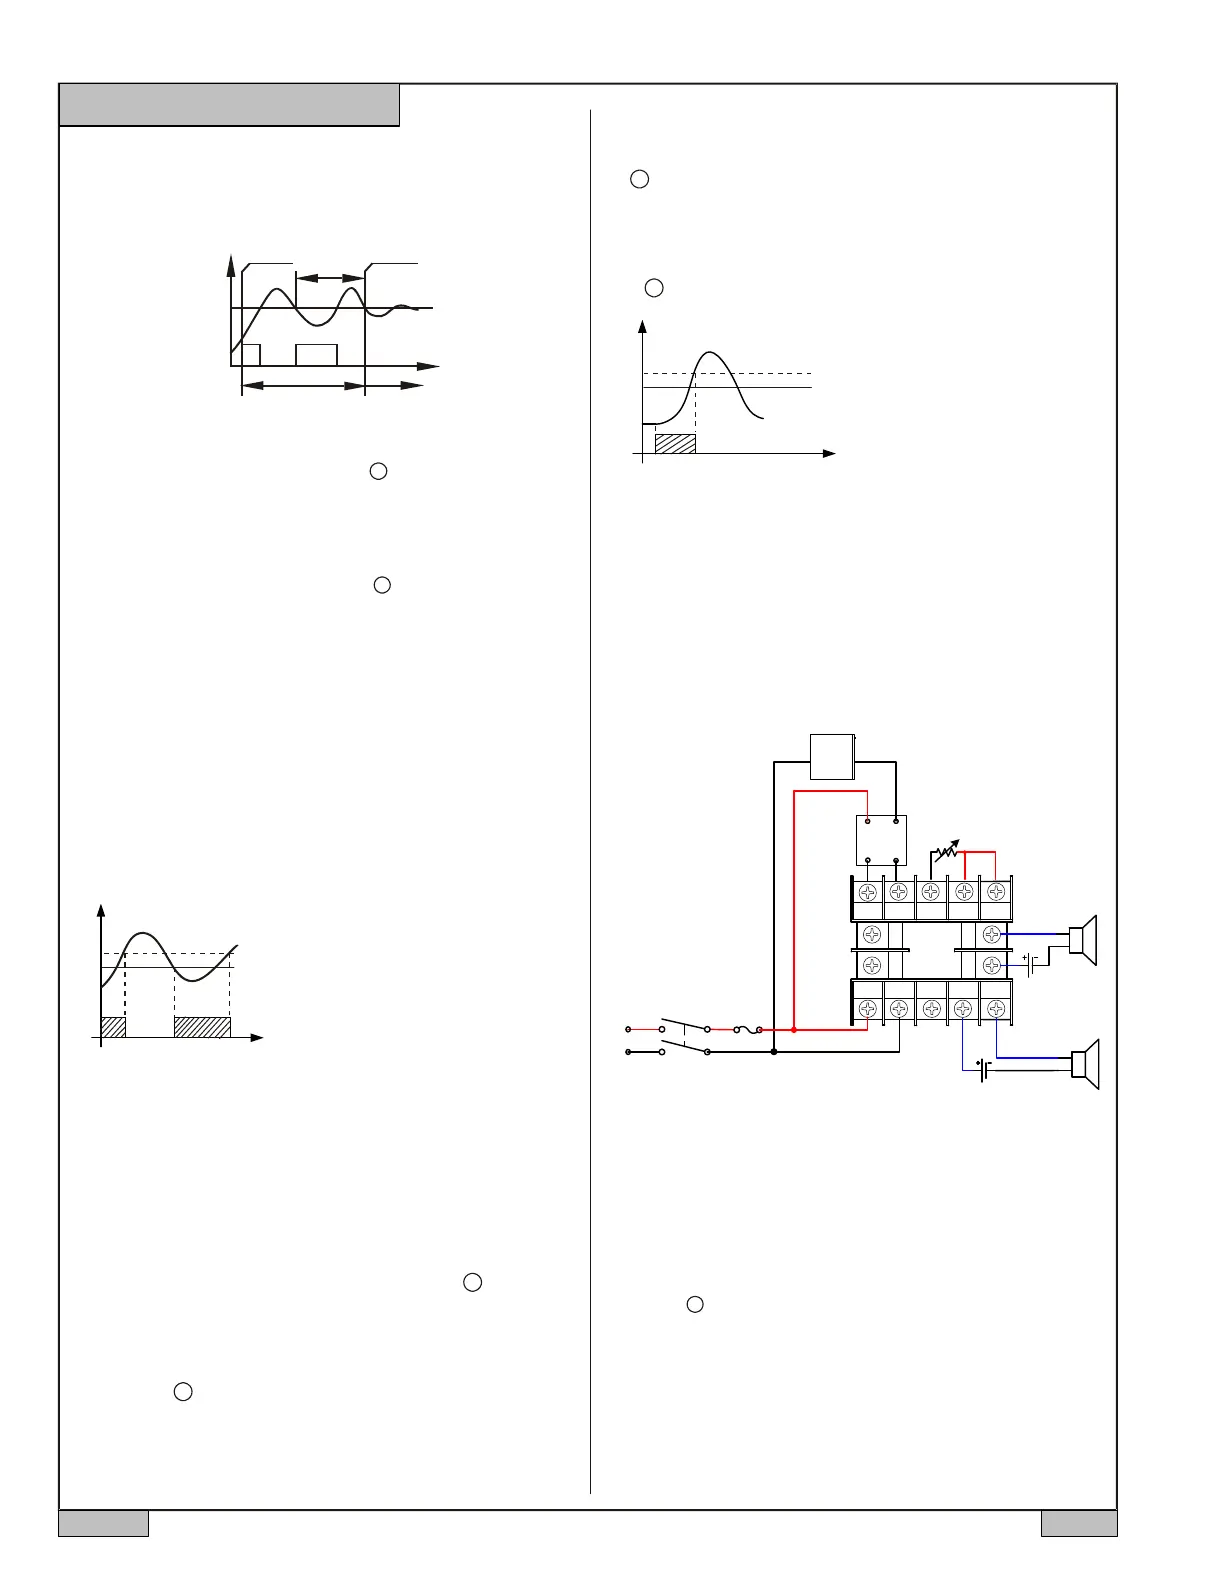
Figure 7. Auto-tuning
SV
PV
6.1 To activate Auto-tuning, press and hold key until the “AT” indicator
starts to blink, which indicates auto-tuning is in progress. When “AT” stops
blinking, the auto-tuning is finished. Now, newly calculated PID parameters
are set to be used for the system. Please note that Auto-tuning is only for PID
control mode (when “outy” is set at 1 or 2).
>
6.2 To stop the Auto-tuning, press and hold key until “AT” indicator
stops blinking. Then, the previous PID parameters value are resumed.
>
10. Application Example
10.1 A thermoelectric cooler (TEC) needs to be controlled at 45 °F. If
temperature is over 46 °F, the alarm1 will turn on to warn the operator and
turn off when dropped to below 45.5 °F. If temperature is below 44 °F, the
alarm2 will turn on to warn the operator and turn off when dropped to below
44.5 °F. The system consists of a 90W 24V DC TEC, a Pt100 RTD sensor, a
10A DC SSR, and two 5V DC buzzers.
a. Wiring diagram
7. On/off control mode
On/off control mode is not as precise as PID control mode, however it is
necessary for inductive load such as motors, compressors, or solenoid valves
that do not like to take pulsed power. It works like a mechanical thermostat.
When the temperature passes the set point, the heater (or cooler) will be
turned off. When the temperature drops back to below the hysteresis band
(dead band) the heater will turn on again.
To use the On/off mode, set outy to 3 or 4 depending on the output device to
be used. Then, set the Hy to the desired range based on control precision
requirements. Smaller Hy values result in tighter temperature control, but also
cause the on/off action to occur more frequently. In the PID parameters menu
(code 0036), only ot and FILt are used. P, I, D and SouF are not meaningful.
6
7
8
910
11
12
13
14
1
2
3
45
J1
J2
Figure 10. Typical wiring set up for TEC cooler. For incubator control, the
TEC cooler should be change to heater. Rd=0 for heating.
Fuse
_
+
5V DC
5V DC
RTD
RR
W
8. Manual mode
Manual mode allows the user to control the output as a percentage of the total
heater power. It is like a stove dial. The output is independent of the
temperature sensor reading. One application example is controlling the
strength of boiling during beer brewing. You can use the manual mode to
control the boiling so that it will not boil over to make a mess. The manual
mode can be switched from PID mode but not from On/off mode. To switch
from the PID to the manual mode, press and hold the key until the
“AT/M” indicator turned on (about 5 seconds). In the manual mode, the top
display is for the process temperature. The bottom right is the percentage of
power output. The bottom left display show an “M” for user to easily identify
the controller is in manual mode. To switch from manual to PID mode,
SET
24V DC
press and hold key until the “AT/M” indicator turned off. This controller
offers “bumpless” switch from the PID to manual mode. If the controller
outputs 75% of power at PID mode, the controller will stay at 75% when it is
switched to the manual mode, until it is adjusted manually.
SET
9. Limit control mode.
The Limit control mode will shut the heater off when SV is reached. The
heater will not be turned on again until the controller is reset manually (press
the key for 5 seconds). When powered on, it will not start the heating
until reset button is pressed. The controller can’t be reset when the
temperature is within Hysteresis Band (Hy).
To use the Limit control mode, set outy to 5 or 6. Then, set the Hy to the
range that you want reset to be blocked. To start the heating or cooling,
press key for 5 second or until the out indicator is on.
SET
SET
>
b. Parameter setting. These are the parameters that need to be changed from
the initial value: Rd=1 for cooling mode. Inty=P10.0 for Pt100 RTD sensor
with 0.1° resolution input, SV=45 °F, AH1=46 °F, AL1=45.5 °F, AH2=44 °F,
AL2=44.5 °F.
Auto-tune is used to set the PID parameters. Power up the controller. Press
and hold the key until “AT” starts to blink. The controller starts the Auto-
tuning. When the “AT” stops blinking, the new PID parameters are generated
for the system. The controller is in normal operation mode. The TEC will be
maintained at 45 °F.
Please note that you don’t not have to wire or set the alarm to control
the temperature.
2
3
PV
SV
SV-Hy
100
97
Relay On
When heating, and outy=3 or 4,
If PV≤(SV-Hy), relay on
If PV≥SV, relay off
(SV=100, Hy=3)
Figure 8. On/off control mode
2018.07 P4/5
Alarm1
Alarm2
Relay on
Start
outy=5, SV=100, Hy=3. The
heating stops after it reached 100
degree.
Figure 9. Limit control mode
PV
SV
SV-Hy
100
97
+
-
TEC
 Loading...