Do you have a question about the AUDAC DW5066/B and is the answer not in the manual?
The AUDAC DW5066 is a versatile digital all-in-one wall panel designed for seamless integration with AUDAC digital matrix systems. This sophisticated wall panel offers comprehensive control over various audio parameters across multiple zones or outputs within a system, supporting up to eight zones. Its primary function is to provide a user-friendly interface for managing audio routing, volume levels, bass and treble adjustments, and muting capabilities. Beyond its control functions, the DW5066 also serves as an audio input hub, featuring connections for both a microphone and a stereo line input source, making it a truly all-in-one solution for localized audio management.
The wall panel is engineered for robust connectivity, requiring a UTP/FTP Cat6 (or better) cable for connection to the matrix system. This ensures reliable data and audio transfer over distances, with a maximum recommended cable length of 300 meters. The design emphasizes ease of use and installation, making it suitable for a wide range of professional audio environments.
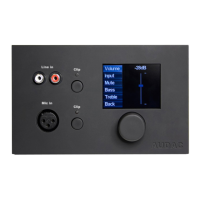
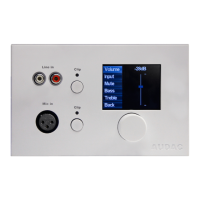
The DW5066 boasts a 2.5" graphic color LCD display that provides a clear and intuitive overview of all functions and settings. This graphical interface is central to its user experience, allowing for easy navigation and parameter adjustment.
For input, the front panel includes an unbalanced stereo line input, connected via RCA connectors. This allows for the integration of local stereo audio sources, expanding the system's flexibility. Additionally, a balanced microphone input is provided through an XLR connector, enabling announcements or other microphone-based audio inputs from the wall panel's location. Each input is equipped with a push-lock gain control potentiometer, allowing users to adjust the sensitivity of the line and microphone inputs. These potentiometers feature a push-lock mechanism, enabling them to be recessed when not in use, contributing to a clean and unobtrusive aesthetic. Above each potentiometer, a clipping indicator LED is present, which illuminates when the input signal is distorted. This visual feedback is crucial for preventing audio clipping and ensuring optimal sound quality, prompting users to reduce the input level if the LED is lit. The sensitivity for both line and microphone inputs can be adjusted within a range of 0dB to -∞dB. For condenser microphones, the balanced microphone input offers the convenience of +15V phantom power, which can be software-selected and enabled/disabled through the wall panel's settings menu.
The core interaction with the DW5066 is facilitated by a large, rotatable function selection push dial located below the LCD display. This dial simplifies control by allowing users to perform three primary actions: rotate left, rotate right, and push. These actions enable a wide array of functions, such as browsing between different zones, adjusting volume levels, selecting audio sources, confirming selections, canceling operations, toggling between settings, and navigating through menus. Pushing the dial typically confirms a selection or proceeds to the next menu, while rotating it allows for scrolling or value adjustment.
When the DW5066 is operational, its standard screen displays an overview of all configured outputs (zones) that can be controlled. These output names correspond to the settings defined in the matrix system's user interface. Users can scroll through the available zones by rotating the selection dial, with the selected zone name illuminating for clarity. Pushing the dial when a desired zone is highlighted leads to that zone's specific settings menu. The display can show up to five zone names simultaneously, along with a "Settings" option. If more than five zones are configured, users can scroll further down to access them. The "Settings" button provides access to the wall panel's internal configuration options.
Within a zone's settings menu, users can adjust volume, select inputs, mute the zone, and control bass and treble. When "Volume" is selected, the display shows a fader, and rotating the dial adjusts the volume level. Similarly, selecting "Input" redirects to an input selection window, displaying all configured input channels. Users can scroll through these inputs and select the desired one by pushing the dial. The input names shown correspond to those configured in the matrix settings. For muting, users can navigate to the "Mute" option and push the dial to toggle between "Mute" and "Unmute." Tone control is also available, with "Bass" and "Treble" options. Selecting either of these activates a fader, allowing users to increase or decrease high and low tones by rotating the dial, with adjustments possible between +9dB and -9dB. A "Back" button is always available to return to the main zone selection screen.
The wall panel's "Settings" menu offers further customization. Here, users can enable or disable the 15V DC phantom power for the microphone input ("Mic Phantom" option). The "Backlight" option allows for adjustment of the LCD display's intensity. A "Screensaver" option enables users to select a desired screensaver and set the delay before it activates. Finally, an "Info" option provides details about the wall panel and its current software version.
An advanced feature of the DW5066 is its ability to function as a local audio output. This allows a direct output signal from the system controller to be copied and made available on the wall panel, which can be useful for monitoring, recording, or other purposes. However, implementing this feature requires a small internal modification, which means one of the existing audio inputs (RCA or XLR) will be repurposed and thus lost.
The DW5066 is designed for straightforward installation and configuration. For physical installation, two types of flush mount installation boxes are available: a plastic version (WB5065/FG) for gypsum, wooden, or plate walls (7-25 mm thickness), and a steel version (WB5065/FS) for mortar in brick or stone walls. Proper installation requires cutting an opening of 135 x 75 mm and ensuring the installation box is upright.
Connecting the DW5066 to the matrix system involves an 8-pin Euro Terminal Block connector on the rear panel. The twisted pair CAT6 cable must be wired "straight" according to the provided pinout diagram, connecting the wall panel's pins to the corresponding pins of the RJ45 connector on the matrix system's Peripheral Interface (PI) port. It's crucial to connect the DW5066 to PI ports 1-8 on the matrix, as these support digital audio inputs, unlike PI9 and PI10 which are for control devices only.
For system configuration, the DW5066 requires an address to be assigned and available inputs to be defined through the matrix system's web-based interface. In the "System configuration" menu, under "DW5066" settings, users can select an address (W001 to W008). After selecting an address and clicking "Set Address," the wall panel will blink, and pressing its function selection dial confirms the assignment. The user interface also allows selection of outputs to be controlled and inputs to be made available on the wall panel, with options to add or remove them from listboxes. Various presets and restrictions can also be applied. Once settings are made, they are uploaded to the wall panel by clicking "Save to Wall panel." Existing settings can be retrieved from the wall panel using the "Load from Wallpanel" button, allowing for review and modification.
The modification to enable the local audio output feature is a maintenance task that must be performed by qualified service personnel. It involves carefully removing the back cover of the DW5066 by untightening four screws. Once the PCB is visible, the wire connected to either the RCA or XLR input connector (depending on which input is to be sacrificed) must be disconnected. This unplugged wire is then re-routed and plugged into the dedicated "Line Output connector" on the left side of the PCB. This physical alteration transforms the chosen input into a local audio output. After this modification, the wall panel is reassembled and reconnected to the system, and the new output function is configured in the system controller's user interface. The pin configuration for the Cinch (RCA) and XLR connectors is detailed in the manual for reference during wiring or modification.
| Type | Wall panel controller |
|---|---|
| Connectivity | Wired |
| Technology | Digital |
| Connectors | RJ45 |
| Current Consumption | 100 mA |
| Material | ABS |
| Color | Black |
| Storage Temperature | -20°C to +60°C |
| Protection Rating | IP20 |
| Compatibility | AUDAC MTX series |
| Power Supply | PoE (Power over Ethernet) |
| Voltage | 48 V DC |
| Weight | 110 g |
| Operating Temperature | 0°C ~ 40°C |
| Relative Humidity | < 95% |