ATW-T1006 and ATW-T1007 Installation and Operation
4
Transmitter Operation
Press and hold the Power switch on the bottom of the transmitter. (The
electronics in the transmitter take up to 30 seconds to stabilize after
power is applied.)
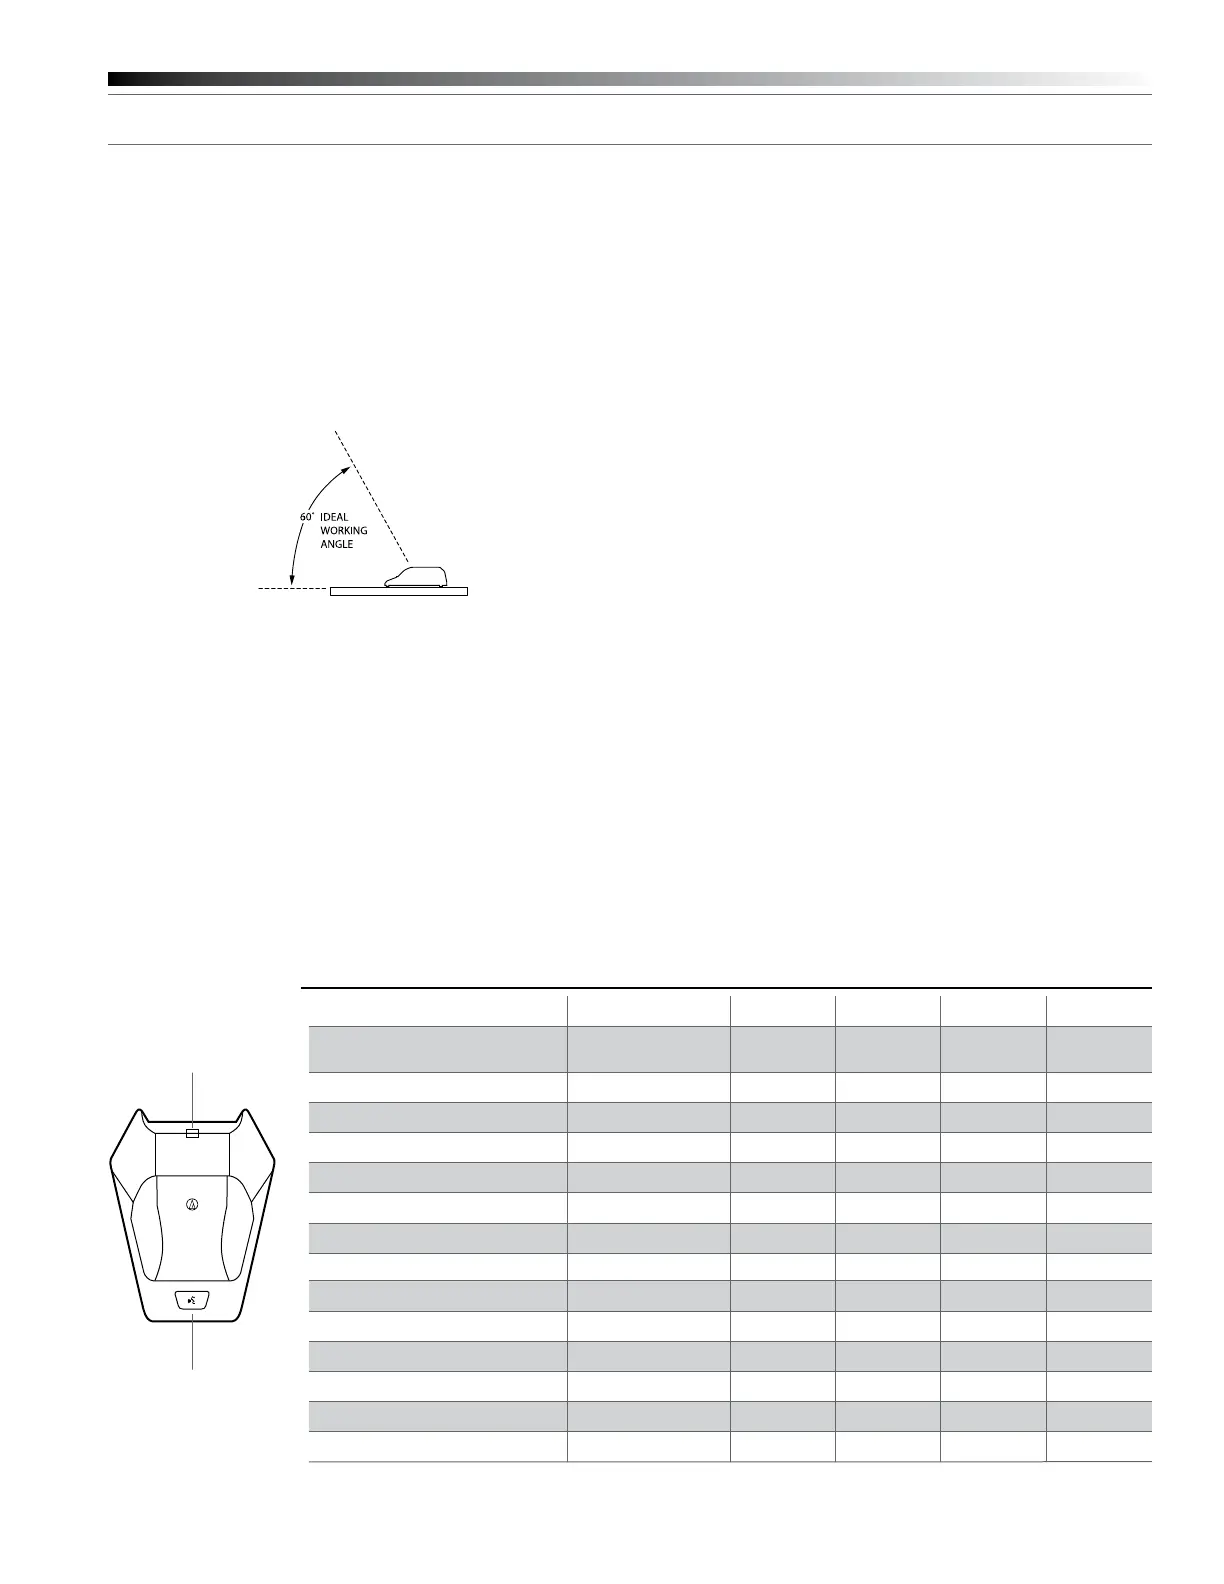
Both the ATW-T1006 boundary microphone transmitter and the
ATW-T1007 microphone desk stand transmitter should be placed
on a at, unobstructed mounting surface. The ATW-T1006 should be
positioned so the front of the microphone faces the sound source. The
sound source should not be below, or higher than 60° above, the plane
of the mounting surface.
Figure C—LED Function
The boundary and desk stand transmitters both feature a touch-
sensitive user switch and two red/green LED status indicators – one
integrated into the user switch on the front on the unit, the other bent
in an L-shape to display on both the top and rear of the unit. This dual
LED conguration allows the transmitter status to be viewed by the
user and by those seated opposite the user.
The boundary and desk stand transmitters operate in two different
modes: Standard and Conference. In Standard mode, which is
the default, both LEDs will illuminate green when the transmitter
microphone is on and will illuminate red when the microphone is
muted. In Conference mode, both LEDs will illuminate red when
the transmitter microphone is on and will not illuminate at all when
the microphone is muted. (An exception for both modes is when
the transmitter power is off and charging cable is plugged into the
transmitter. In this case LED 1 will not illuminate, while LED 2 will
illuminate red while the battery is charging and illuminate green once
the battery is fully charged.)
To switch between Standard and Conference modes, press and hold
the recessed Switch Function button and, while continuing to hold it,
press and hold the Power button. After a few seconds, the mode will
change and the system ID will briey display A for Standard mode and
C for Conference mode.
Locking the Mute Function
1. Turn the transmitter off.
2. Press and hold the recessed Pair button and, while continuing to
hold it, press and hold the Power button until the transmitter powers
on. The dot that usually appears next to the System ID will not be lit,
indicating that the mute lock has been activated. The LED below the
Switch Function button will also not light when the mute lock is on.
3. To deactivate the mute lock, turn the transmitter off again, then
press and hold the Pair and Power buttons as before until the
transmitter powers on. The dot will once again display next to the
System ID and the Switch Function LED will light, indicating that the
mute lock has been deactivated.
Adjusting Settings
The settings for the user switch, input gain level and low-cut lter can
all be adjusted by pressing the appropriate recessed button on the
bottom of the transmitter.
Figure C
LED 2
LED 1
Standard Mode Conference Mode
Condition Transmitter Power
LED 1 LED 2 LED 1 LED 2
Not linked with Receiver On Red/Green
Alternate
Green/Red
Alternate
Red/Green
Alternate
Green/Red
Alternate
Initialize/Toggle Mode On
Green Green Red Red
Initialize/Press to Talk On
Red Red Off Off
Initialize/Press to Mute On
Green Green Red Red
Mic Mute On
Red Red Off Off
Mic Talk On
Green Green Red Red
Charging/Mic Mute On
Red Red Off Off
Charging/Mic Talk On Green Green Red Red
Fully Charged/Mic Mute On
Red Red Off Off
Fully Charged/Mic Talk On
Green Green Red Red
Low Battery/Mic Mute On
Red Blink Red Blink Off Red Blink
Low Battery/Mic Talk On
Green Blink Green Blink Red Blink Red Blink
Charging Off
Off Red Off Red
Fully Charged Off
Off Green Off Green

 Loading...