EasyManua.ls Logo

Aumuller M-COM - User Manual

Aumuller M-COM
4 pages
Print Icon
To Next Page IconTo Next Page
Loading...
!
!
M-COM (Main control unit) 24V
By using the M-COM 6 single actuators (drives or
locks) are linked together in a multi-drive system.
Whithin seconds, the M-COM links and programmes
the synchronized driverunnint mode and one sequentce
control, if additional locks are involved.
When using 2 locking drives, these run parallel.
There is no more factory set programmation required.
All opening and locking drives in the multi-drive system
are blind supplied. Drives do not have speci c markings,
such as Master, Slave 1 , Slave 2, etc.
To allow assembly and installation work, each drive may
be run individually - i. e. one locking drive in test run
Con guration of the multi-drive system will be perfor-
med only after the drive installation has been completed.
Commissioning of the multi-drive system may only be
carried out when the drives have been correctly installed
and the M-COM has been connected; these are im-
portant prerequisites in order to minimize possible
damages / injuries caused by improper installation.
A Reset of the con gured multi-drive system may be
performed at any time using „UniPC“. Once the Reset
has been performed, single operation of the drives is
again possible.
M-COM allows a smooth exchange of drives in need of
repair within the multi-drive system.
Warranty claims require proper and profes-
sional assembly, installation and maintenance
in accordance with national regulations and
manufacturer‘s instructions as to drives.
The safety of the supplied product docu-
mentation are to be observed.
Strictly observe the information given in this
and in the instructions for installation of
drives when mounting the M-COM.
Details can be found on our website
www.aumueller-gmbh.de
Keep this instruction over the lifetime of the
product.
Assembly and Commissioning Instructions
M-COM
Rated voltage: 24V DC +/- 20%, (max. 2 Vss)
Current consumption: <12 mA
Control type: S12
Protection rating: IP30 rubber envelope
Ambient temperature range: min. - 5 °C ... + 70 °C
Dimensions: 45 x 17 x 6 mm
Connection wire: 3 wire 0,5 mm
2
x 50 mm
Feature / Equipment: Printed circuit board with components and con-
nection wires to be installed in connection box to
be supplied on site.
Part.-No.: 524177
Application: Communication module for automatic con guration and
surveillance of max. 4 opening and 2 locking drives version S12 / S3 (software
version SW-V2) in synchronised multi-drive systems.
Question and Answer IconNeed help?

Do you have a question about the Aumuller M-COM and is the answer not in the manual?

Aumuller M-COM Specifications

General IconGeneral
BrandAumuller
ModelM-COM
CategoryControl Unit
LanguageEnglish

Summary

M-COM Product Overview and Specifications

M-COM Technical Details

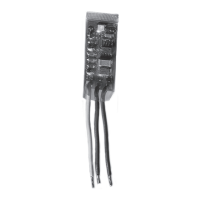
Provides technical specifications including part number, application, voltage, current, protection rating, dimensions, and connection wire details for the M-COM unit.

M-COM System Features

Highlights features like multi-drive system linking, automatic programming, parallel locking drive operation, and easy drive exchange, emphasizing no factory pre-programming.

Important Safety and Warranty Notes

Emphasizes observing instructions, professional assembly, warranty claims, and the importance of following manufacturer guidelines for safe operation.

Installation Step 1: Installation

Drive Mounting and System Connection

Instructions for mounting drives and connecting the multi-drive system to the M-COM and supply line, including notes on SHEV cases and wire connections.

Pre-Installation Safety Checks

Crucial safety warning to ensure no voltage is applied to the supply line before commencing installation work.

Installation Step 2: First Commissioning

M-COM Commissioning Procedure

Details the steps for first commissioning, including switching on voltage, observing LED reactions, and verifying the number of identified participants.

LED Display Interpretation

Explains the meaning of various LED display patterns (red, green, blinking) during commissioning to indicate system status and errors.

Installation Step 3: Test Run and Troubleshooting

Performing Test Runs

Guides on conducting test runs after installation, observing LED status for system operability and identifying potential faults.

Troubleshooting Common Issues

Addresses mis-identified participants, system faults, and advises on checking wiring, eliminating faults, and resetting the M-COM.

Troubleshooting Procedures

Exchanging Faulty Drives

Outlines the process for replacing a faulty drive in the multi-drive system, including connection, power cycling, and LED verification.

Troubleshooting with UniPC

Explains how to use UniPC for diagnostics, identifying faulty drives, disconnecting wires, and re-establishing system operation.