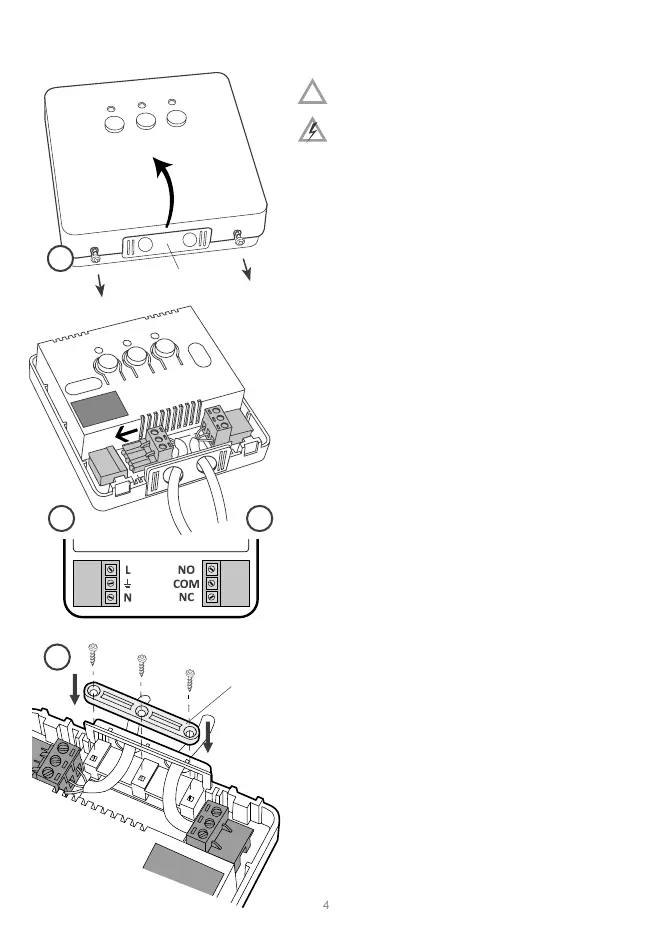
Installation of the AURATON RT receiver
CAUTION! The cables delivered in a set
together with the controller are suitable
for maximum loads equal to 2.5 A.
If devices with higher power are
connected, the cables should be replaced with
ones of appropriate cross-secons.
NOTE: When installing an AURATON RT receiver,
make sure that the power supply is switched o.
The receiver should be installed by a professional.
cable e
clamp
mounng plug
NOTE: In the permanent system of the building
there must be a switch and an overcurrent
protecon.
NOTE: In order to facilitate installaon, the
terminals are ed with extendable clamps.
Before cable connecons are made, they can be
disconnected from the controllers. The cables
may be routed from the boom of the receiver
by breaking out holes in the mounng cover or
from the back of the receiver if the cables are
extended from the wall. In order to connect the
cables from the back, the cover must be broken
out.
1. Take o the cover of the front part of the
AURATON RT receiver by unscrewing the
screws half way out.
2. Connect the heang device to the terminals
of the control connecon of the AURATON
RT receiver. Follow the service instrucon of
the heang device. The COM (common) and
NO (normally opened) terminals are used the
most oen.
3. Connect the power supply cables to the
terminals of the power supply connecon of
the AURATON RT receiver, in observance of
safety rules.
4. Aer the cables are connected, they must
be xed with the “cable fastening holder”
and the covers must be screwed back to the
AURATON RT receiver.
!
1
23
4
 Loading...