Do you have a question about the AVer CAM570 and is the answer not in the manual?
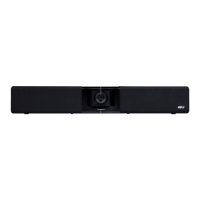
The camera unit itself included in the product package.
The remote control and AAA batteries provided with the camera.
The power adapter and its associated power cord.
Includes USB 3.0, RS232 adapter, and HDMI cables for connectivity.
Contains wall mount kit, screws, tripod screw, and drilling paper.
Lists additional optional accessories like USB cables, mounts, and extenders.
Details main components: optical zoom lens, IR sensor, LED, AI lens, microphone, and lock.
Explains PoE, audio, HDMI, USB, RS232, power, and Kensington lock ports.
Explains the meaning of different LED colors and patterns for camera status.
Details how to activate and use gesture control features.
Step-by-step guide to connect the camera to a power outlet.
Instructions for connecting essential cables to the camera.
Guide for connecting the camera to a computer or laptop via USB.
Instructions for connecting Ethernet for IP streaming and remote control.
Guide for connecting an HDMI cable to a monitor for live video output.
Controls RTMP streaming and forces the camera into sleep mode.
How to select and control multiple AVer USB cameras with one remote.
Covers switching SmartFrame modes and setting preset points for camera positions.
Instructions for saving and loading specific camera positions.
Enables or disables the Wide Dynamic Range (WDR) function.
Steps for drilling holes in the wall using the provided paper.
Guide to assembling L-mount brackets and attaching them to the wall.
Final step to secure the camera onto the installed L-mount brackets.
Open and select a video collaboration application for use.
Set the CAM570 as the primary camera device in the application.
Ready to make a video call after configuration.
Confirm the CAM570 has an active internet connection.
Start the PTZApp 2 software and connect the camera via USB.
Configure the camera's IP address for network access.
Launch the camera's web page via a browser for settings.
Download and use the AVer IP Finder for device discovery.
Links to download centers for software, firmware, and user manuals.
Contact information for AVer's headquarters and regional offices.
| Megapixel | - MP |
|---|---|
| Camera type | Dual camera |
| Sensor type | Exmor |
| Digital zoom | 3 x |
| Optical zoom | 12 x |
| Combined zoom | 36 x |
| Zoom capability | Yes |
| Focal length range | 3.4 - 40.3 mm |
| Aperture range (F-F) | 1.8 - 3.6 |
| Vertical field of view | 52 ° |
| Horizontal field of view | 78 ° |
| Closest focusing distance | 1.5 m |
| Field of view (FOV) angle | 95 ° |
| Storage temperature (T-T) | -20 - 60 °C |
| Operating temperature (T-T) | 0 - 40 °C |
| Operating relative humidity (H-H) | 20 - 80 % |
| AC input voltage | 100 - 240 V |
| Operating current | 2 A |
| Operating voltage | 12 V |
| Power source type | AC, PoE |
| AC input frequency | 50 - 60 Hz |
| Minimum RAM | 4096 MB |
| Minimum processor | Intel Core i5-4460 |
| Minimum processor speed | 3.2 GHz |
| Other operating systems supported | ChromeOS |
| Windows operating systems supported | Windows 10, Windows 11, Windows 7 |
| Maximum frame rate | 60 fps |
| Supported video modes | 360p, 480p, 540p, 720p, 900p, 1080p |
| Maximum video resolution | 3840 x 2160 pixels |
| Resolution at capture speed | 3840x2160@30fps |
| Pan range | -170 - 170 ° |
| Product color | Black |
| Tilt angle range | -30 - 90 ° |
| Cable lock slot type | Kensington |
| Package type | Box |
| Package width | 253 mm |
| Package height | 271 mm |
| Package weight | 4800 g |
| Depth | 173 mm |
|---|---|
| Width | 170.8 mm |
| Height | 190.5 mm |
| Weight | 2100 g |