The stop delay time is counted down from the time the indoor lights are switched o or from the time the separate switch to which the device is connected is turned o.
Movement (part index letter 'M'). Connect the air exhaust fan with the microwave motion sensor and timer as shown in the electrical wiring diagram, see Fig. 4.
The fan starts when the motion sensor detects someone in the room. The fan is equipped with stop delay which is counted from the moment of the last detection of
motion in the room. The stop delay time and the sensitivity of the sensor can be set with a potentiometer knob on the electronic module. The adjustment range of the
delay is 3 -30 min. Minimum delay time value and the sensor sensitivity is achieved by turning the potentiometer knob counter-clockwise. The stop delay time is
adjusted in innite increments. The sensing zone of the motion sensor is shown in Fig. 7.
NOTE: The microwave sensor has the widest range when used with a front panel made entirely of plastic. The controller does not work properly with panels
containing metal elements, and when used with glass panels its sensitivity decreases by about 20%.
INSTALLATION
The fan shall only be installed, connected to electrical mains and commissioned
for use by qualified personnel in accordance with applicable laws!
Installation process
•
Precise where the fan will be installed.
•
Prepare the power cord. Use NYM-O 2x1,5 mm² (H07V-K 2x1,5mm²) or NYM-O 3x1,5 mm² (H07V-K 3x1,5mm²), a maximum outside diameter of 7.5 mm,
depending on the optional accessories provided.
NOTE: Before starting work, make sure that the power cord is not live.
•
Measure and drill the holes for the fan and for the ø6 mm wall bolt plugs included with the product.
•
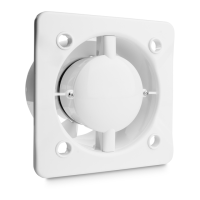
Remove the front clip-on frame (2) of the fan.
•
Remove the controller’s cover (1) which is secured with the screws (6).
•
Run the power cable in double insulation through the grommet (4). Enough of the power cable must enter the fan to facilitate connection of the cores to the power
input terminals.
Before fastening the fan to the installation substructure: remove all foreign objects from the inside of the fan; check that the fan rotor turns freely by hand;
16
EN
 Loading...