Page 1
Axon Dock Quick Start Guide
English
Read, understand, and follow all warnings and instruc-
tions before using this product. The most up-to-date
warnings and instructions are available at www.axon.
com.
Introduction
The Axon Dock uploads videos from Axon Flex systems, Axon
Flex 2 systems, Axon Body cameras, Axon Body 2 cameras,
and Axon Fleet cameras to the Evidence.com cloud comput-
ing website. While your information is transferred securely
to your organization’s account, the dock also recharges the
battery in your Axon devices.
The Axon Dock has 2 major parts. One is the core, which
connects to the Internet and transfers your information
to Evidence.com. The other is the bay module, which has
docking ports for Axon cameras and controllers. The sys-
tem is modular, and up to 5 individual bay modules can be
connected to 1 core.
There is another type of bay, called the 6-bay module, which
has ports for 6 Axon systems.
There are 3 types of individual bays. One can accommodate
an Axon Body camera, or an Axon Flex camera and control-
ler. Another type of individual bay can accommodate an
Axon Body 2 camera or Axon Fleet camera. The third individ-
ual bay accomodates Axon Flex 2 cameras and controllers.
There also are 3 types of 6-bay modules; one that works with
Axon Body and Axon Flex devices, another other designed
for Axon Body 2 and Axon Fleet cameras, and a third for
Axon Flex 2 systems.
There is only one type of core module. It can be used with
any of the bays.
For instructions on attaching cores and bays, and setting up
the Axon Dock, see the Axon Dock Installation Manual.
Part 1: Conrm Setup
Ensure the Axon Dock is registered to your agency.
Consult with your system administrator for your dock’s
registration status.
Axon Flex and Axon Body cameras must be assigned
to an end user before being inserted into the dock. If
the camera is not assigned before it is inserted into the
dock, the videos will not upload. For information about
setting up end user accounts and assigning Axon cam-
eras, visit academy.axon.com. Unassigned Axon Body
2, Axon Flex 2, and Axon Fleet cameras will be auto-
matically assigned to the agency when inserted into
the dock.
When an Axon camera is in oine mode, the dock will
automatically register the camera to the agency and
upload the video to Evidence.com services. For infor-
mation on downloading videos in the oine mode,
visit academy.axon.com.
Part 2: Uploading Videos and Re-
charging Axon Devices
Insert the Axon camera and controller (if applicable) into the bay.
Left to right: Axon Body 2 camera; Axon Flex camera and control-
ler; Axon Fleet camera.
DO NOT unplug the power supply from the Axon Dock while Axon devices are inserted in the bays.
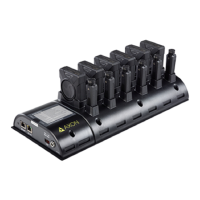
Core with 6-bay designed for the Axon Flex 2 camera
and controller
Core with 2 individual bays designed for the Axon
Flex camera and controller (shown) or the Axon Body
camera
Core with two individual bays designed for
the Axon Body 2 camera (shown) and Axon
Fleet camera
Core with 6-bay designed for the Axon Body
2 camera (shown) and Axon Fleet camera