Do you have a question about the Axon TASER 7 and is the answer not in the manual?
Verify firmware, agency setup, and insert battery pack until it clicks.
Learn to safely turn the Conducted Energy Weapon (CEW) on and off.
Understand the color codes for Live, HALT Training, and Inert Training cartridges.
Disassemble, reassemble, and load cartridges into the CEW securely.
Verify the CEW recognizes loaded cartridges by checking the CID.
Safely unload cartridges from the CEW using the release button.
Procedure for removing and recharging the battery pack in its dock.
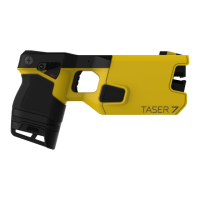
The TASER 7 is a Conducted Energy Weapon (CEW) designed for temporary incapacitation. It is crucial to complete training before using the device to ensure safe and effective operation.
The TASER 7 is a non-lethal weapon that delivers an electrical pulse to temporarily incapacitate a target. It is used in law enforcement and security contexts to control individuals without resorting to lethal force. The device is designed to be user-friendly, with clear indicators and safety mechanisms to prevent accidental discharge. Its primary function is to provide a safe and effective means of de-escalation and control in various situations.
Before using the TASER 7, it's essential to confirm its readiness. This involves checking with an armorer to ensure the firmware is up to date, the CEW is correctly set up for your agency, and the weapon, cartridges, and battery packs are properly assigned to you.
To insert the battery, align it with the weapon and press firmly until both latches "click." A new battery pack will synchronize the weapon's logs and may automatically update the CEW firmware. It's important not to remove the battery pack until the hourglass icon disappears from the Critical Information Display (CID), indicating the synchronization is complete.
To turn on the CEW, point it in a safe direction and shift the safety switch to the up (ARMED) position. To turn it off, shift the safety switch to the down (SAFE) position.
When working with cartridges, always point the CEW in a safe direction and ensure the safety is in the down (SAFE) position. Never place your hands in front of the cartridges. Cartridges are removed from a safety clip before use.
When loading cartridges, never place your hands, fingers, or any other body parts in front of the cartridge, as this can lead to serious injury. Always hold the cartridge by its sides. Ensure the cartridges are loaded right side up, with the text on the top. Push the cartridges into the cartridge bay until you hear a "click," then give them a slight tug to ensure they are securely locked in place.
To unload cartridges, point the CEW in a safe direction with the safety in the down (SAFE) position. Press the cartridge release button on top of the CEW, then pull the cartridges up and out.
After loading, point the CEW in a safe direction and shift the safety switch to the up (ARMED) position. Confirm that the CID displays both cartridges. Then, shift the safety back to the down (SAFE) position.
The device includes a safety switch that must be in the down (SAFE) position when not in use or when handling cartridges. The CID provides visual feedback on the device's status, including battery charge and cartridge recognition. A fully charged battery pack will show a specific icon on the CID.
To recharge the battery, first shift the safety switch to the down (SAFE) position and confirm the CID is blank. Press the two buttons on each side of the battery pack and pull it out of the CEW. Press the battery pack into the dock until you hear a click, indicating it's properly seated. Once the battery is fully recharged and all information is uploaded to Axon Evidence (Evidence.com) services, the light on the dock next to the battery pack will turn solid green.
Cartridges can be disassembled by pulling them apart from each other. To reassemble, align the attachment tabs and press the cartridges together. This feature allows for proper handling and storage of cartridges.
The TASER 7's firmware can be updated automatically when a new battery pack is inserted, ensuring the device operates with the latest software and functionalities. This helps maintain optimal performance and security.
Inserting a new battery pack synchronizes the weapon's logs to the battery pack, ensuring that all operational data is recorded and maintained. This is crucial for accountability and post-incident analysis.
The TASER 7 is designed to be a reliable and effective tool when used in accordance with training and guidelines. Adherence to all warnings, instructions, and laws, as well as compliance with current training materials and requirements, is paramount for safe operation.
| Model | TASER 7 |
|---|---|
| Category | Conducted Electrical Weapon (CEW) |
| Cartridge Type | Smart Cartridge |
| Operating Temperature | -4°F to 122°F (-20°C to 50°C) |
| Pulse Rate | 19 pulses per second |
| Laser Sight | Yes |
| Flashlight | Yes |
| Power Source | Rechargeable battery |
| Connectivity | Bluetooth |
| Safety | Safety switch |
| Battery | Rechargeable Battery Pack (RBP) |
| Battery Life | Approximately 500 firings per charge |
| Storage Temperature | -4°F to 122°F (-20°C to 50°C) |
| Humidity | Up to 95% non-condensing |
| Output Voltage | 50, 000 volts |
| Warranty | 1 year |
| Cartridge | Smart Cartridge |
| Safety Features | Automatic shut-off, safety switch |