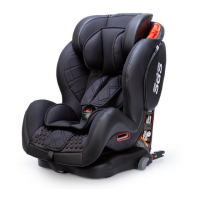
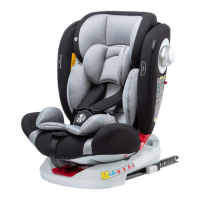
This document describes the Isofix Reclining Car Seat, a child restraint system designed for various age and weight groups, offering multiple recline positions and a 5-point harness system.
Function Description:
The Isofix Reclining Car Seat is a semi-universal child restraint system designed to safely transport children in vehicles. It is suitable for different weight and age groups, specifically Group I (9-18 kg), Group II (15-25 kg), and Group III (22-36 kg), or for children aged 9 months to 12 years. The car seat can be installed using ISOFIX anchorages, a 3-point automatic safety belt, and a top tether, ensuring a secure fit in compatible vehicles. It features a reclining function with four different positions, allowing for adjustment from an upright seated position to a more reclined one for comfort. The 5-point harness system provides secure restraint for younger children, with adjustable shoulder strap height to accommodate growth. For older children in Group 2-3, the 5-point harness can be removed, and the child can be secured using the vehicle's 3-point seat belt.
Important Technical Specifications:
- Weight Groups: Group I (9-18 kg), Group II (15-25 kg), Group III (22-36 kg)
- Age Groups: 9 months to 12 years
- Installation: ISOFIX anchorages + 3-point automatic safety belt + top tether
- Recline Positions: 4 different positions (from seated to reclined)
- Harness System: 5-point harness (removable for Group 2-3)
- Compatibility: Only fit for vehicles approved to regulation GB14166 or ECE R16 with 3-point retractor safety-belts.
- Installation Positions (Vehicle):
- Front Seat: Not Allowed
- Rear Seat (Side Parts): Allowed
- Rear Seat (Middle Parts): Not Allowed
- Main Loading Point to Support Point Distance: Must be more than 150 mm.
Usage Features:
- Adjustable Recline: The car seat offers four recline positions. To adjust, pull the reclining adjusting handle located under the shell and move the shell forwards or backwards. Release the handle when a distinct click is heard, indicating the desired position is locked.
- Adjustable Harness Height (5-point harness):
- Pull the reclining adjusting handle to the most reclined position (position 4).
- Release the installation bar lock on the top left side of the seat shell and remove the long axis. Pull and hold the shell forward.
- Unhook the shoulder pad straps from their connectors and the shoulder harness straps from the yoke.
- Pull out the shoulder straps and harness, then re-insert them at a suitable height. Hook the connector and yoke back into place.
- Return the shell to its original position, re-insert the long axis, and lock it.
- Recommendation: For children weighing 9-13 kg, the shoulder strap should be below the shoulder strap bar. For children over 13 kg, it should be above the shoulder strap bar.
- Fastening the 5-point harness:
- Match the two halves of the harness buckles together.
- Insert the matched halves into the crotch buckle until a click is heard, ensuring the buckle is secured. Pull the two halves to check for a secure fit.
- To release the harness, press the red buckle button.
- Important: The two halves will only insert into the crotch buckle if they are correctly matched.
- Adjusting the 5-point harness tightness:
- Place the child in the car seat, match the two halves of the harness buckle, and insert them into the crotch buckle.
- Press the harness adjusting button and pull forward on the shoulder straps to loosen them.
- Press the harness adjusting button again and pull forward on the harness adjusting strap to tighten the straps. The harness should be snug, allowing only one finger width (1 cm) of space at the top of the shoulders.
- Removing the 5-point harness system:
- Pull the reclining adjusting handle to the most reclined position (position 4).
- Release the installation bar lock on the top left side of the shell and remove the installation bar. Pull and hold the shell forward.
- Unhook the shoulder pad straps from their connectors and the shoulder harness straps from the yoke.
- Pull out the shoulder straps and harness.
- Carefully remove the metal retainer buckles near the belt guide hole from the front of the shell (a slight tilt can make this easier).
- Unlock the 5-point harness buckle, hold it, and then remove the other metal retainer buckle through the inner slots on the back of the shell and then out through the outer slots to fully remove the harness.
- Note: Ensure metal retainer buckles pass through inner slots 1 first, then outer slots 2, and are well fixed when re-installing.
- ISOFIX + 3-point retractor safety belts + top tether installation:
- Ensure the car seat is as close as possible to the vehicle seat backrest.
- Remove the vehicle headrest if it obstructs proper installation; refit it when the car seat is removed.
- Place the car seat on the vehicle seat.
- Rotate the ISOFIX adjuster button anti-clockwise and pull the ISOFIX anchors outwards as far as they go, ensuring they cannot be pushed back.
- Push the car seat towards the back of the vehicle seat. Match the ISOFIX anchors to the vehicle's anchoring point until a "click" is heard.
- Rotate the adjuster button anti-clockwise and push the car seat as far back as possible.
- Hook up the top tether and pull it as tight as possible.
- Verify that the top tether is not twisted, loose, or knotted, and that both ISOFIX and the top tether are correctly fixed.
- Installation for Group 1 (9-18 kg):
- Requires ISOFIX, top tether, and the vehicle's 3-point retractor seat belts simultaneously.
- After ISOFIX is fixed, adjust the seat to the most reclined position (position 4).
- Unhook the installation bar lock and pull out the long axis.
- Push the seat forward and pull out the vehicle's 3-point safety belts to the nearest buckle. Thread one belt through the red buckle and lock it. Thread another belt through the lap belt hook for Group 1 and fasten the seat belt buckle.
- Ensure the safety belt is not twisted, loose, or knotted. Return the seat to its original position, insert the long axis, and secure the installation bar lock.
- Loosen shoulder straps and unlock the 5-point harness buckle. Pull forward on the shoulder straps to the side parts to loosen them.
- Place the child in the car seat, insert the two halves of the harness buckle into the crotch buckle.
- Ensure shoulder straps fit the child by pulling the adjuster belt.
- Converting for Group 2-3 (15-36 kg):
- Remove the 5-point harness system.
- Place the child car seat in a vehicle seat without an active airbag. Install the car seat using ISOFIX + 3-point retractor safety belts + top tether, ensuring all restraints are correctly installed, not twisted, loose, or knotted.
- Place the child in the car seat.
- Thread the vehicle's seat belt shoulder strap through the appropriate Group 2 or Group 3 belt guide slot.
- Place the lap belt over the child's lap and thread it through the belt guide hole on the child's side nearest the buckle.
- Fasten the seat belt buckle.
- Note: Ensure the seat belt is not twisted, loose, or knotted, and routed through the most suitable belt guide hole. Never fasten the lap belt on the child's belly. Double-check that the car seat is well fixed and attached to the seat; if loose, tighten the seat belt or refit.
Maintenance Features:
- General Safety Advice:
- Never use on a seat with an active airbag.
- Never leave the child unattended in the car seat.
- It is recommended that one child uses their own car seat for safety reasons.
- Regularly check the car seat and adjust seat belt tightness according to the child's body and clothing.
- Never let the child play with the 5-point harness buckle.
- Before each trip, ensure the car seat is well attached and installed.
- Avoid prolonged direct sunlight exposure to prevent overheating of metal/plastic parts and fabric fading. Cover the seat with a sheet when not in use if not in use for a long time.
- Store the car seat in a safe, dry place away from heat and humidity if not used for a long time.
- Stop the car at regular intervals to check that the child restraint system is in the correct position and that all belts are fastened and latched.
- Ensure no dangerous objects are in the car, especially on the back seat.
- Keep the car seat away from corrosive substances.
- Do not leave loose/unsecured objects on the back seat or parcel shelf, as they can be dangerous during sudden braking.
- Ensure the buckle is not semi-locked, allowing for emergency release.
- Replace the car seat if it has been involved in an accident.
- Do not repair or modify the car seat yourself, as this will affect safety and function.
- Cleaning Instructions:
- Remove the fabric cover and hand wash it with a pH-neutral soap.
- Do not use solvents, do not iron, do not centrifuge, and dry flat in the air.
- The plastic parts of the child restraint system can be wiped clean with a damp cloth.
- Washing Symbols:
- Handwash
- Do not dry-clean
- Do not bleach
- Do not tumble dry
- Iron with low temperature