Do you have a question about the Bacharach Parasense 3300RM2 and is the answer not in the manual?
Provides a diagram of the monitor's internal components and their layout.
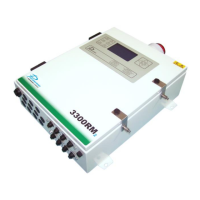
Details the physical measurements of the 3300RM2 monitor enclosure.
Instructions on how to physically mount the monitor to a surface.
Specifies the types of nuts, screws, and washers used for installation.
Outlines the necessary AC mains supply voltage, VA rating, and fuse requirements.
Explains the volt-free changeover relays and pilot relays on the monitor.
Describes the RJ45 Ethernet socket for network connectivity.
Guides on configuring a PC's network settings to communicate with the 3300RM2.
How to view the monitor's current status via a web browser.
Guidelines for installing the sampling pipework (freeway) for air sampling.
Lists recommended practices and prohibited actions for freeway installation.
Diagram showing connections for the network module.
Instructions for connecting additional remote beacon/sounder units.
Describes the initial screen and how to access the main menu options.
Explains how to view and interpret the list of SAMM channels and their status.
Overview of how to access alarms, faults, and events logs.
Details fault abbreviations and how to interpret event log entries.
Procedure for running a system test to verify monitor and relay operation.
How to enter the management menu and access various configuration settings.
Adjusting units and sample interval for the monitor.
Setting up individual SAMM channels, including gas type and alarm levels.
Setting the trigger source and type for each relay.
Setting the IP address, netmask, server, and gateway for network connection.
Adjusting the system's date, time, and daylight saving preferences.
Procedures for rebooting the monitor and changing the access passcode.
Covers powering up, keypad usage, and adjusting display contrast.
Explains the meaning of the traffic light status indicators for alarms and faults.
Describes how relays behave during power loss, alarm, or fault conditions.
Lists the default network, SAMM, relay, and general settings.
Steps for identifying and troubleshooting system faults using LEDs and logs.
Explains common fault messages like 'Overrange' and their implications.
Step-by-step guide for removing and refitting the monitor's enclosure door.
Instructions for replacing the network module assembly.
Procedure for removing and installing a SAMM module.
Guide for removing and fitting the Styx module.
Steps for replacing the monitor's power supply module.
Instructions for replacing the power input module.
Overview of tests available through the Parasense service kit.
Procedure for verifying the integrity of the Styx module using calibration gas.
How to perform a system test after installation or maintenance.
Method for checking the airflow of SAMM channels using a gauge.
Lists the technical parameters of the 3300RM2 monitor.
Diagram illustrating the overall physical layout of the 3300RM2 components.
Detailed wiring diagrams for the 3300RM2 monitor.
Specifications and instructions for mounting the 3300RM2 unit in a panel.
| Sampling Method | Continuous |
|---|---|
| Mounting | Rack Mount |
| Measurement Range | 0-1000 ppm |
| Resolution | 1 ppm |
| Refrigerant Compatibility | CFC, HCFC, HFC, HFO |
| Operating Temperature | 50°C (32° to 122°F) |
| Response Time | <60 seconds to 90% of reading |
| Output | 4-20 mA |