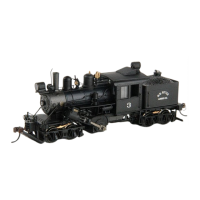
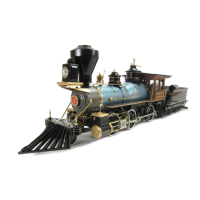
PLEASE READ BEFORE COMMENCING CONSTRUCTION
The instructions have been supplemented with photographs taken at the time of construction of the test
etches and although the test etch photographs may show some minor variations they do show the
construction of the model. One difference you may find is in the pony truck; in the design stage we
thought that the use of a standard Gibson 2mm axle may be of some benefit. However after building
both the Gibson and sprung wire version it was felt that the sprung wire version is easier to fit and there
was no benefit using the Gibson bearing. Modellers may wish to use the Gibson system and the
photographs are included in the instructions, but the bearings are not supplied and will have to be
sourced separately.
The test model was built to 18.83 standards. If more free play is needed in 18.83 then the model will
have to be built with a reduced thickness of plasticard or use the thin boss side of the Brassmasters
bearing. Again in 18.83 standards the front crankpin needs to be reduced in thickness; in preference it
should be a recessed type as produced by Ultrascale.
Pony Truck
All the parts needed to complete the pony truck are contained together on the sheet containing the
coupling rods and valve gear. The pony truck is as near to scale as is possible and represents as near
as possible all the component parts. However dependent on scale and modifications made to the
chassis it may need to have some of the upper parts filed away in order to obtain the swing between
the chassis.
Whilst it may seem a bit awkward, due to the fragile nature of the frame try and retain the pony truck
frame (1) in the complete etch for as long as possible and only release the parts as required.
Fold the bearing hornguides (2) and check for fit if using the Gibson bearing, locate the hornguide into
the recessed space at each edge of the frame. Note: the edge nearest the half-etch groove is to the
inside of the frame. Holes are in place for the Gibson round nuts and it may be necessary at a later
stage to remove the bottom part of the frame to give more spring movement. Fold up the spring guides
(ears) locating the spring holding plates (6) into the holes at the bottom of the guides, these are not
fixed yet and should be free to move. (See photo-bearing in place and ears turned back)
If not using bearings it is possible to solder small pieces of scrap etch or wire along the elongated slot
to give some additional support to the axle. (See photo-non bearing with packing)
Fold up the side wings for the frame, check the fit against the hornguide it does locate just inside the
hornguide and fix in place. (See photo-fitted with commercial bearings).
For non bearing assembly make and form the long springs
Long springs
There are holes in the etch to facilitate fitting of the springs. Another reference for the springs is
http://www.clag.org.uk/comet-pony.html - and here thanks must be given to Dave Holt whose idea it
was in the first place.
Fold up top plate (5) fold the front and back down, the channel at either ends fold back to form the
channel. Check fit of top plate it rests on top of the shoulders of the spring guides, when satisfied fix in
place.
 Loading...