Page 2
Step 1: Carefully unpack and identify all parts packed in
the carton against the parts list. Remove all
protective materials. If you are missing any parts
or are unsure how to proceed with assembly, call
our customer service center immediately at
1-800-416-3511. Do not attempt to assemble
glider if any parts are missing or damaged.
Assemble furniture on a smooth, non-abrasive
surface.
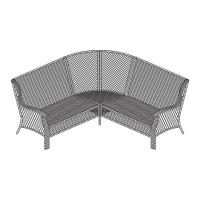
Step 2:
Attach the to the by usingback frame seat frame three
1/4" bolt and washer as shown in .x35mm s s F1igure
Guide bolt through hole in intothe s the s the seat frame
pre-drilled hole in thethe s back frame. Hand tighten
only .2-3 turns
Step 3: Attach the to the by usingback frame left arm two
1/4" bolt and washer as shown in .x40mm s s F2igure
Guide bolt through hole in intothe s the s the back frame
pre-drilled hole in thethe s left arm. Hand tighten
only .2-3 turns Attach the to theseat frame left arm
by using 1/4" bolt and washer as showntwo x30mm s s
in . Guide bolt through hole inthe s the s theF2igure
seat frame the s left arm.into pre-drilled hole in the
Hand tighten only . Repeat for the other2-3 turns
arm.
Figure 1
Figure 2
PARTS LIST
BOLT COVER
HW0105
HEX BOLT DRIVER
HW0006
11
11
1
A
B
C
D
E
F
G
H
I
J
3
Ø6.5 X 1.0 MM WASHER HW0004
1/4" X 35 MM BOLT
HW0142
DESCRIPTION ORDER PART #
QTY
* NOTE: PARTS SHOWN ON PARTS LIST ARE NOT TO SCALE
4
1/4" X 30 MM BOLT
HW0038
FOOT CAP
FACTORY ASSEMBLY
FC0612
4
1/4" X MM BOLT40
HW0086
1
1
1
LEFT ARM
RIGHT ARM
SEAT FRAME
BACK FRAME
E
I
H
G
I
H
FOOT CAP
D
C
BGR00705K02
Step 4: Using hex bolt driver , tighten allthe provided
bolts. Do not over tighten bolts.
Cover all bolts
boltwith covers.
IMPORTANT NOTE: Damage to welds or frames
resulting from over tightened bolts or improper
assembly is not covered under our warranty. Please
read all instructions carefully before assembly. If
you have any questions regarding your assembly,
call our Customer Service Center at 1-800-416-3511.
B
A
F
I
H
SK1672
SK1673
SK1674
SK1675
1