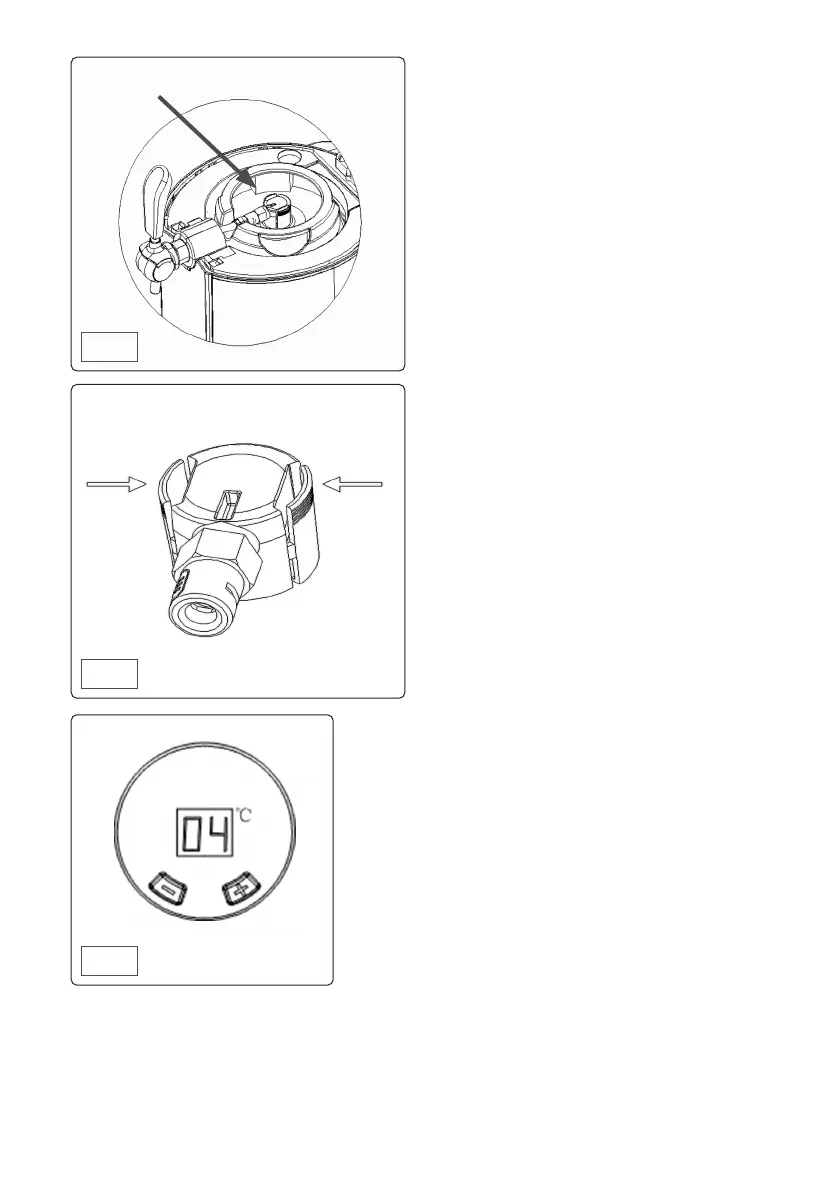
• LED INTERFACE
• When the unit has been switched on, the LED
is activated.
• The interface will show the current beer
temperature.
• NOTE: To cool a beer keg to 4
o
C may take up
Squeeze tabs when removing
connector from keg
to 20 hours depending on initial beer temp
and ambient temp.
• The unit has a temperature setting range of
between 4
o
C and 12
o
C.
• To set a required beer temperature use the ‘+’
or ‘-’ key to set the value.
• To display the current set value press the ‘-’
button for one second. The display will return
to the current beer temperature after three
seconds.
• NOTE: The unit has a memory function that
uses the last selected temperature.
• OPERATIONAL MAINTENANCE
• Remove the power plug from the supply when
performing cleaning or maintenance.
• It is recommended to replace the water inside
the unit once each week.
• Before draining the water, ensure that the drip
tray is properly engaged in the unit to avoid
spillage.
• When the drip tray is properly engaged, lower
the drain ap (g.1) to allow water to ow out
of the unit.
• NOTE: The drip tray only has a volume of
approximately 400 ml while the unit has a
volume of approximately 800 ml. Hence
attention will need to be paid to the draining
process to avoid spillage.
• Cleaning the internals of the unit is imperative
to meet hygiene requirements. Clean before
rst use or long periods of non-use.
• Clean all internals ONLY with warm, clean
water.
• Cleaning the unit when changing kegs of
dierent beers is also recommended to
improve your drinking experience.
• Disconnect the tap feed hose from the
dispensing unit and hold the tap in the open
position. Using the water bulb lled with
clean, warm water, force water through the
tube and out through the tap. Repeat until
satised that the unit is clean.
• Withdraw the beer tube from the keg and
using the water bulb ush the unit through.
Repeat until satised that the unit is clean.
• MAINTENANCE
• Remove the power plug from the supply when
performing cleaning or maintenance.
• DO NOT use abrasive or chemical cleaning
materials on any surface of the unit.
• Wipe interior and exterior surfaces with a
Fig.9
Fig.8
Fig.10
Heineken adaptor tted
 Loading...