EasyManua.ls Logo

Barska Point 'n View - User Manual

Barska Point 'n View
3 pages
Print Icon
To Next Page IconTo Next Page
Loading...
Binoculars
*SBARSKAN
Point
‘n
View
Binocular
&
Digital
Camera
with
built
in
VGA
Digital
Camera
©2010
BARSKA®
|
La
Verne,
CA
91750
|
USA
www.barska.com
“BARSKA
BARSKA’s
Point
’n
View
is
a
state-of-the-art integration
of
a
high
quality
roof
prism
binocular
and
digital
camera
that
is
equally
at
home
on
a
nature
outing,
sporting
event,
or
on
vacation.
Instead
of
packing
a
separate
binocular
and
digital
camera,
Point
‘n
View
gives
you
the
convenience
of
both
in
one
compact
device.
See,
save,
and
share
your
special
moments
with
friends
and
family,
simply
look
through
the
binoculars
and
capture
or
record
the
scene
with
the
digital
camera.
It’s
that
simple.
Once
the
image
is
recorded,
you
can
download
it
to
your
PC,
and
print
it
or
e-mail
it
to
family
and
friends.
You
can
even
record
video!
Visit
BARSKA’s
website
www.barska.com
to
see
our
full
line
of
binoculars,
riflescopes,
spotting
scopes,
telescopes
and
more.
WARNINGS
Cautions
e
Never
immerse
digital
camera
binocular
into
any
fluid
or
liquid.
Remove
dust
or
stains
with
a
soft
cloth
dampened
with
water
or
neutral
detergent.
Keep
in
a
dry
cool
dust-free
environment
or
a
container
when
it
is
not
in
use.
e
Avoid
dropping
the
digital
caméra
binocular.
Do
not
disassemble
digital
camera
binocular.
Usage
of
the
battery
-
Please
always
use
Alkaline
Battery
(AAA
Alkaline
Battery)
-
Please
remove
batteries
when
not
using
your
digital
camera
binocular
for
long
periods
of
time.
About
usage
-
To
avoid
damage
do
not
use
the
digital
camera
binocular
under
the
following
conditions.
1.Places
in
temperature
higher
that
100°
F.(35°C)
2.Damp
or
dusty_places.
3.Places
with
strong
electromagnetic
field.
-
Please
do
not
disassemble
or
repair
the
product
to
avoid
malfunction.
-
Please
do
not
drop
the
product
on
the
ground
to
avoid
malfunction.
Parts
of
the
Binocular
1.
Diopter
Knob(on
underside)
2.
Center
Focus
Knob
3.
Objective
Lens
4.
Power/Mode
Button
5.
Shutter/Set
Button
Accessories
Included
1.
USB
Cable
2.
Carrying
Case
S$
B/ARSI
6.
USB
Port
7.
Eyepiece
8.
Camera
Lens
9.
LCD
Screen
10.
Battery
Compartment
Lid
11.
Barrel
3.
Neck
Strap
4.
PC
Sofware
CD
NN
©
BARSKA
WARNING
!
Never
use
digital
camera
binocular
to
look
at
the
sun
!
Looking
at
or
near
the
sun
will
cause
instant
and
irreversible
damage
to
your
eye.
Eye
damage
is
often
painless,
so
there
is
no
warning
to
the
observer
that
damage
has
occurred
until
it
is
too
late.
Do
not
point
the
binocular
at
or
near
the
sun.
Children
should
always
have
adult
supervision
while
observing.
Adjustment
of
eye-relief
for
eyeglass
wearers
Fold
down
the
rubber
eyecups
and
place
them
against
your
glasses
to
get
the
best
viewing
result.
Adjusting
the
eyepieces
The
distance
between
your
eyes
is
called
inter
pupillary
distance.
The
inter
pupillary
distance
is
different
from
one
person
to
another.
Itis
important
to
adjust
to
your
inter
pupillary
distance
before
using
your
digital
camera
binocular:
-
Hold
digital
camera
binocular
firmly
in
the
normal
viewing
position.
-
Adjust
the
barrels
by
pushing
together
or
pulling
apart
until
you
see
a
single
circle
field
with
both
of
your
eyes.
Focusing
the
Binocular
These
binoculars
have
individual
focus
system
which
means
the
focusing
knob
is
located
individually
in
each
eyepiece.
Focus
the
left
eyepiece
to
your
left
eye
and
the
right
eyepiece
to
your
right
eye.
-
Look
at
something
in
the
distance.
Close
the
right
eye
(or
cover
the
front
of
the
right
binocular),
and
focus
the
left
eyepiece
to
your
left
eye
until
the
image
is
clear.
-
Close
the
left
eye
(or
cover
the
front
of
the
left
binocular),
and
focus
the
right
eyepiece
to
your
right
eye
until
the
image
is
clear.
-
Adjust
each
eyepiece
as
necessary.
-
When
looking
at
a
different
image
you
need
to
repeat
this
process.
Question and Answer IconNeed help?

Do you have a question about the Barska Point 'n View and is the answer not in the manual?

Summary

Introduction to Barska Point n View Binocular

Barska Binocular Safety Warnings

Cautions

General cautions for handling the digital camera binocular, including fluid immersion, cleaning, storage, and avoiding drops.

Usage of the battery

Instructions for using AAA alkaline batteries and removing them when the device is not in use.

About usage

Conditions to avoid for usage, such as high temperatures, damp/dusty places, and electromagnetic fields.

Parts of the Binocular Identification

Binocular Usage Basics

WARNING! Eye Safety

Critical warning against looking at the sun due to irreversible eye damage.

Eye-Relief Adjustment for Eyeglass Wearers

Guide for eyeglass wearers to adjust eyecups for optimal viewing.

Adjusting the Eyepieces

Instructions on adjusting the interpupillary distance for a single, clear field of view.

Focusing the Binocular

Step-by-step guide to focusing the left and right eyepieces individually for clear images.

Camera Basic Operations

Battery Handling Notes

Important notes on battery removal, memory retention, and device shutdown before battery changes.

Inserting Batteries

Instructions for inserting two AAA size alkaline batteries into the compartment.

Taking Pictures with the Camera

Turn on the Power

Procedure to turn on the camera power, including automatic power-off after idling.

Photo Taking Process

How to take a picture, confirmation beeps, and indication of full camera capacity.

Camera Modes and Settings

Power Off Mode

Steps to turn off the camera using the menu and shutter button.

Self-Timer Mode

Instructions to activate the self-timer for automatic photo capture after a countdown.

Continuous Shot Mode

How to use continuous shot mode (AVI video clips) and its limitations.

Continuous Still Shot Mode

Instructions for capturing three continuous still shots that are downloaded individually.

Camera Operation Instructions

Delete Last Photo

How to delete the last photo taken and update the photo counter.

Delete All Photos

Procedure to delete all photos from the camera and reset the photo counter.

Photo Resolution and Compression Settings

How to select photo resolution (Hi/Lo) and compression (Hd/Ld) and their impact on storage.

Frequency Setting (50;60 Hz)

Setting the camera frequency to 50Hz or 60Hz for correct operation in different regions.

Software Installation Guide

Driver Installation (Windows)

Step-by-step guide for installing the Dual mode camera driver software on Windows.

Important Installation Notes

Crucial advice to avoid installation failures, including not connecting hardware prematurely.

Uploading Images from Camera

Uploading Images via USB

Connecting the camera via USB and downloading photos using the 'Dual mode camera' software.

Viewing and Saving Photos

Instructions for viewing, enlarging, and saving individual or all photos from the camera.

Uploading Video from Camera

Uploading Video Files

Steps to upload video files (AVI) from the camera to the computer.

Playing Saved Video

Instructions on how to open and play saved AVI video files using Windows Media Player.

PC Camera Functionality

Using Camera as PC Camera

Connecting the camera and launching the PCCam software for live video streaming.

Video Capture Settings

Guide to setting video capture filters, file names, and capture file size.

Starting and Stopping Capture

Instructions on how to start, continue, and stop video capture using the PC Cam software.

Overview

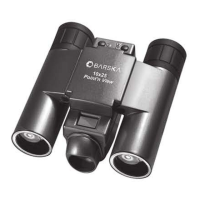
The BARSKA Point 'n View is a state-of-the-art integration of a high-quality roof prism binocular and a digital camera, designed for versatile use in nature outings, sporting events, or vacations. This compact device eliminates the need to carry separate binoculars and digital cameras, offering the convenience of both in one unit. Users can observe, capture, and record special moments with friends and family, then download images or video to a PC for printing or emailing. The device also supports video recording.

Function Description:

The primary function of the BARSKA Point 'n View is to provide both optical magnification through its 8x22 binoculars and digital image/video capture capabilities. Users can look through the binoculars to view distant scenes and simultaneously capture still photos or record videos with the built-in VGA digital camera. The captured media can then be transferred to a computer for storage, sharing, or printing.

Important Technical Specifications:

  • Binocular Magnification: 8x
  • Objective Lens Diameter: 22mm
  • Digital Camera Resolution: VGA (Video Graphics Array)
  • Battery Type: AAA Alkaline Batteries (requires two)
  • Memory Retention: Pictures can be retained for 30 seconds without batteries, allowing for quick battery changes.
  • Photo Compression Options: High Density (Hd) and Low Density (Ld)
  • Photo Resolution Options: High Resolution (Hi) and Low Resolution (Lo)
  • Number of Photos (approximate, based on settings):
    • HI + Ld: 26 photos
    • HI + Hd: 78 photos
    • Lo + Ld: 104 photos
    • Lo + Hd: About 312 photos
  • Frequency Settings: 50HZ (Asia and Europe) and 60HZ (U.S. and Japan)
  • Connectivity: USB (for PC connection)
  • Operating System Compatibility for Driver: Windows 2000/XP/Vista/7

Usage Features:

  • Power On/Off: Press the menu button for two seconds to turn on. The device has an automatic power-off feature after 30 seconds of idling to conserve battery. To turn off, select the "OF" icon and press the shutter button.
  • Photo Taking: Adjust the binocular for clear images, then press the shutter button. A single beep indicates a successful photo capture, and the LCD counter increases. Two beeps indicate full memory.
  • Self-Timer Mode (St): Allows for a 10-second countdown before a photo is automatically taken.
  • Continuous Shot Mode (DB - video): Hold the shutter button down to continuously shoot, saving files as video clips (AVI). May be affected by poor lighting.
  • Continuous Still Shot Mode (CS): Takes 3 continuous shots with a single press of the shutter button. These photos are downloaded individually.
  • Deleting Photos:
    • Delete Last Photo (CL): Select the "CL" icon and press the shutter button within 5 seconds to delete the last taken photo.
    • Delete All (CA): Select the "CA" icon, and the photo counter will flash. Press the shutter button again within 5 seconds to delete all photos and reset the counter.
  • Adjusting Resolution and Compression: Users can select between High (Hi) or Low (Lo) resolution and High Density (Hd) or Low Density (Ld) compression via the menu button and shutter button. These settings impact the number of photos that can be stored.
  • Frequency Setting: Allows users to set the camera's frequency to 50HZ or 60HZ depending on their region.
  • Energy Save Mode: The camera automatically switches off if not used within 30 seconds to conserve battery power.
  • Binocular Adjustment:
    • Eye-relief for Eyeglass Wearers: Fold down the rubber eyecups for optimal viewing with glasses.
    • Adjusting Eyepieces (Interpupillary Distance): Adjust the barrels by pushing together or pulling apart until a single circular field of view is achieved.
    • Focusing: The binoculars feature an individual focus system. Close one eye (or cover the binocular) and focus the other eyepiece until the image is clear. Repeat for the other eye. Adjust as necessary for different images.
  • Uploading Images/Video: Connect the camera to a PC using the enclosed USB cable. The computer should automatically detect new hardware. Open the "Dual mode camera" folder on the desktop, then "My DSC" to access photos. Images can be viewed, enlarged, saved individually (as Jpeg or Bmp), or all at once. Video files (AVI) can also be downloaded and played using Windows Media Player.
  • PC Camera Function: The device can function as a PC camera. Connect via USB, open the "PCCam shortcut," select "preview" under the "Option" menu to stream live video. Users can set video capture filters, file names, and capture file sizes.

Maintenance Features:

  • Cleaning: Remove dust or stains with a soft cloth dampened with water or a neutral detergent.
  • Storage: Keep the device in a dry, cool, dust-free environment or container when not in use.
  • Battery Management: Always use AAA Alkaline Batteries. Remove batteries when the device is not in use for long periods to prevent damage. When changing batteries, ensure the digital camera binocular is OFF. Memory of pictures can be maintained for 30 seconds during battery changes, so replace batteries within this timeframe to avoid losing pictures.
  • Driver Installation: Install the provided CD driver for Windows 2000/XP/Vista/7. Crucially, do not connect the camera or USB cable to the computer until the entire installation process is complete to avoid installation failure. If reinstalling, a "Confirmed file deletion" dialog may appear.

Warnings and Cautions:

  • Never immerse the digital camera binocular into any fluid or liquid.
  • Avoid dropping the device.
  • Do not disassemble or repair the product to avoid malfunction.
  • Do not use the device in temperatures higher than 100°F (35°C), in damp or dusty places, or in places with strong electromagnetic fields.
  • Eye Safety: Never use the digital camera binocular to look at the sun or near it, as this will cause instant and irreversible eye damage. Eye damage is often painless, so there is no warning until it's too late. Children should always have adult supervision when observing.

Barska Point 'n View Specifications

General IconGeneral
BrandBarska
ModelPoint 'n View
CategoryBinoculars
LanguageEnglish

Related product manuals