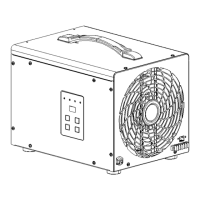
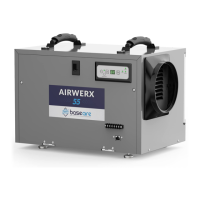
The BaseAire AirWerx 35P is a dehumidifier designed for drying crawl spaces and basements. It is an electrical appliance that requires a grounded connection (115V, 60Hz AC, single phase) with a 3-hole GFCI outlet and a 15-amp circuit protector. The unit operates by reading the relative humidity in a room. When the detected humidity exceeds the setpoint, the dehumidifier automatically turns on. Air passes through an evaporator coil, where moisture condenses out, and is then reheated by a condenser coil before being distributed back into the room.
Important Safety Notes:
- Always use a grounded electrical connection. Using a non-grounded wire voids the warranty.
- Maintenance and repairs should only be performed by a qualified technician.
- The unit is intended for operation only when standing and horizontal to prevent water from flooding electrical components.
- Always unplug the dehumidifier before moving it.
- If water threatens to flood the unit, turn it off and unplug it immediately.
- Ensure the air inlet and outlet are at least 6 feet away from walls or obstructions for proper operation.
- Do not insert fingers or objects into the inlet or outlet holes.
- Turn off and unplug the dehumidifier before performing maintenance or repairs.
- Do not use water to clean the exterior; wipe with a damp cloth after unplugging.
- Do not stand on the machine or use it for hanging clothes.
- Do not install in corrosive environments or where liquid vapor barriers are drying by "solvent evaporation" unless the barrier is completely dry.
Installation:
- Level Surface: Place the dehumidifier on a level surface, preferably on a block or paver, not directly on a vapor barrier.
- Post-Delivery Wait: Allow at least 12 hours after delivery before turning on the dehumidifier.
- Drain Line Setup:
- For the pump drain system, remove the nut from the drain nozzle before connecting the drain hose.
- For the gravity drain system, locate the other drain nozzle on the side of the unit, remove the drain plug, and connect a drain hose with a larger inner diameter.
- Power Connection: Plug the unit into a 15-amp ground circuit.
Key Functions (Control Panel):
- "ON/OFF" Button: Turns the dehumidifier on or off. When turning off, there is a 120-second fan delay; do not unplug until the fan stops.
- "SET" Button: Changes the humidity setpoint from 25% to 80% in 5% increments. Can also be set to "CO" (Continuous Operation) mode.
- "Drain" Button: Hold for at least 3 seconds to switch between pump drain and gravity drain systems.
- Water Pump Drainage Mode: "Pump" light is ON. The gravity drain nozzle must be blocked. Pressing once forces the pump to drain the water tray for 14 seconds. If a high water level is detected after 14 seconds, an "E4" error code will display.
- Gravity Drainage Mode: "Pump" light is OFF. The Water Tray Plug should be removed. If a high water level is detected by the float switch for 14 seconds, an "E4" error code will display, and the dehumidifier will stop to prevent leaks.
- Note: When moving the machine, wait at least 10 minutes after turning off to allow moisture to drip down. Tilt the dehumidifier towards the drain hole to remove collected water completely.
- "GPP" Button: Changes the humidity reading from RH% (Relative Humidity) to GPP (Grains per Pound). GPP setpoint can be from 25 to 200.
- "SET + Drain" Key Combination: Press and hold for 3 seconds to display the temperature of the temperature sensor.
- "SET + GPP" Key Combination: Press and hold for 3 seconds to display the temperature of the coil in Celsius.
Indicator Lights:
- Humidity Display Screen:
- Default: Displays the Relative Humidity level.
- During setpoint adjustment: Displays the current setpoint, then returns to RH after 2-3 seconds.
- Operation Indicator (Power): Solid green when ON. Flashing green indicates the desired humidity setpoint has been reached.
- Continuous Mode Light (Continue): Solid green when in continuous operation mode. Off in other states.
- Water Pump Drainage (Pump): ON in water pump mode, OFF in gravity drainage mode (factory default).
- GPP Mode Indicator (GPP): ON when the compressor is in GPP mode, OFF in regular mode.
Remote Control Instructions (Optional Wired Remote Accessory):
The AirWerx 35P can be controlled by an optional wired remote connected via a 25-inch CAT5 cable. The remote has an integrated sensor for temperature and humidity.
- On/Off Power (Button): Starts/stops the machine.
- Up Button / Down Button: Adjusts the humidity level.
- Mode M: Switches between dehumidification and ducted application.
- A circle symbol on the display indicates the remote control's sensor is being used.
- A diamond symbol on the display indicates the dehumidifier's sensor is being used.
- Temperature T: Displays current temperature. Toggles between °C / °F.
- Continuous C: Switches the unit to continuous mode; "cont" appears on the display.
- Drain Pump P: Drains or pumps collected moisture. This symbol only appears when the dehumidifier is powered on. "Draining" appears on the screen during drainage.
Maintenance:
- Cleaning the Body: Use a soft, damp cloth to clean the exterior. Do not use soap or solvent.
- Coil Maintenance: Clean coils once a year with an approved self-cleaning, foaming coil cleaner (e.g., WEB® Coil Cleaner).
- WARNING: Always unplug the power before performing any maintenance.
Dehumidifier Storage:
If storing for an extended period:
- Turn off the unit and allow it to dry.
- Pack and secure the power cord.
- Cover the filter.
- Store in a clean, dry place.
Troubleshooting (Common Issues):
- Machine Won't Run:
- Cause: No power supply. Solution: Verify outlet power and plug installation.
- Cause: Room temperature exceeds 105°F (HI displayed) or is below 33°F (LO displayed). Solution: Modify room conditions to be between 33°F and 105°F. (Machine set humidity must be less than ambient humidity).
- Low Air Flow:
- Cause: Air filter is clogged. Solution: Clean the filter.
- Cause: Air inlet or outlet is clogged. Solution: Clear blockages.
- Loud Noise:
- Cause: Machine is not level. Solution: Move to a flat surface.
- Cause: Filter is clogged. Solution: Clean the filter.
- Trouble Code E: 1:
- Cause: Humidity sensor issues. Solution: Check wire connections. If no visible problems, the sensor may be faulty.
- Trouble Code E: 4:
- Cause: Water pump failure. Solution: Confirm pump malfunction. Unplug for two minutes and restart. Check float switch and motherboard chip.
- Trouble Code: HI or LO:
- Cause: Room temperature exceeds 105°F (HI displayed) or below 33°F (LO displayed). Solution: Modify room conditions to be between 33°F and 105°F. If conditions are within range, replace the sensor.
- Trouble Code E: 5:
- Cause: Coil temperature failure or compressor lack of fluorine. Solution: Check coil temperature connector or coil temperature failure, compressor lack of fluorine.
Pump Alarm Trouble Code E4 (Specific Steps):
- Reset the unit by disconnecting and reconnecting the power cord. (Unit will not work until the error code is cleared).
- Manually check pump operation by pressing the drain button. Verify power and water drainage.
- Check the discharge line for obstructions and the balance of the pump system if not recently cleaned.
- If maintenance is insufficient, hoses and/or pumps may need replacement.
Water Pump Fault Judgment and Maintenance Methods (for E4 code):
- Drainage hose is blocked, bent, or deformed.
- Drainage height exceeds the standard (max 19.6ft for pump drainage).
- Water level switch failure.
- Water pump malfunctioning or expired service life.
- Internal water pump hose is blocked, bent, or deformed.
Water Pump Repair Method:
- Unscrew screws on the water pump panel to access the pump.
- Unscrew the pump fixing bracket screw.
- Pull out the hose from the water reservoir and remove the water pump for replacement.
- Install the new water pump by reversing the above steps.
Gravity Drainage vs. Pump Drainage:
- Gravity Drainage: If using gravity drainage, elevate the unit from the ground (e.g., hang on floor joist or place on a level object) to ensure it is higher than the drain pipe. Failure to do so will result in water leaks.
- Pump Drainage: The pump can discharge water up to 19.6 feet vertically.
- Six (6) months: Parts and labor, including shipment of replacement parts/equipment.
- One (1) year: Parts and labor (excluding shipping defective product back for repair/replacement).
- Three (3) years: Parts and labor on refrigeration system (compressor, condenser, evaporator), excluding transportation costs.
- Five (5) years: Parts only on refrigeration system (compressor, condenser, evaporator), excluding shipping costs.
- Applies only to units purchased from the manufacturer or an authorized BaseAire dealer, used according to the User's Guide.
- BaseAire does not provide home service; shipping costs to the manufacturer for service may be the buyer's responsibility.
- To obtain service, contact BaseAire at 888-641-8862 or sales@baseaire.com. Proof of purchase/order number is required.
- Product will be repaired or replaced at BaseAire's sole discretion.
Limited Warranty Exclusions:
- Damage from unintended use.
- Damage from unauthorized modification or alteration.
- Cosmetic damage (scratches, dents, chips, finish damage).
- Damage from abuse, misuse, pests, accidents, fire, floods, or other acts of nature.
- Damage from incorrect line currents, voltages, fluctuations, and surges.
- Damage from failure to properly maintain the product.
- Use of the product in a SPA or a room with an outdoor pool invalidates the warranty.
Spare Parts (AirWerx 35P Models-Parts):
- S-100: Remote Control Kit (cable + remote control)
- S-108: Main Control Board
- S-109: Display Board
- S-110: Temperature and Humidity Sensor
- S-601: Blower Motor
- S-602: Air Duct Set
- S-603: Fan Capacitor
- S-604: Compressor
- S-605: Compressor Capacitor
- S-606: Coil Assemblies
- S-607: Humidity Sensor Wiring
- S-608: Display Board Wiring
- S-609: A1-A6 Plug-in Cable Set
- S-610: Adjustable Foot Pad
- S-611: Water Pump Assembly
- S-612: MERV-1 Filter (AirWerx 35P Filter)