Do you have a question about the Bauer 1918E-B and is the answer not in the manual?
Indicates a hazardous situation which, if not avoided, will result in death or serious injury.
Indicates a hazardous situation which, if not avoided, could result in death or serious injury.
Indicates a hazardous situation which, if not avoided, could result in minor or moderate injury.
Addresses practices not related to personal injury.
Read all safety warnings, instructions, illustrations and specifications provided with this power tool.
Ensure power tool plugs match the outlet and avoid using adapter plugs with earthed power tools.
Avoid contact with earthed surfaces and do not expose power tools to rain or wet conditions.
Do not abuse the cord; keep it away from heat, oil, sharp edges, or moving parts.
Use extension cords suitable for outdoor use and GFCI-protected supply in damp locations.
Stay alert, use common sense, and do not use the tool when tired or under the influence.
Always wear eye protection and use other appropriate protective equipment for conditions.
Ensure switch is off before connecting power and remove adjusting keys before turning on.
Keep proper footing and balance at all times for better control of the power tool.
Do not wear loose clothing or jewelry; keep hair and clothing away from moving parts.
Ensure dust extraction facilities are connected and properly used to reduce hazards.
Do not let familiarity lead to complacency; ignore safety principles can cause severe injury.
Only use safety equipment approved by an appropriate standards agency for specific hazards.
Prepare to begin work before turning on; do not lay the tool down until it has come to a complete stop.
Maintain a firm grip with both hands to resist starting torque when using handheld tools.
Do not leave the tool unattended when plugged in; turn off and unplug before leaving.
People with pacemakers should consult physician; avoid operating alone and trigger lock.
Do not force the tool; use the correct tool for your application. Repair if switch does not work.
Disconnect plug or battery before making adjustments, changing accessories, or storing the tool.
Store idle tools out of children's reach; do not allow untrained persons to operate.
Maintain tools and accessories; check for misalignment, binding, or breakage before use.
Keep cutting tools sharp and clean for easier control and less binding.
Use tool, accessories, and bits per instructions, considering working conditions and intended operations.
Keep handles and grasping surfaces dry, clean, and free from oil and grease for safe handling.
Consult a doctor for regular check-ups if using vibrating tools regularly or for extended periods.
Do not smoke during use as nicotine reduces blood supply to hands, increasing injury risk.
Wear suitable gloves, use lowest vibration tools, include vibration-free periods, and grip lightly.
Check grounding with a qualified electrician; do not modify plug or remove grounding prong.
Connect three-prong plug to a properly grounded outlet for low resistance path to carry electricity.
Double insulated tools do not require grounding and satisfy OSHA requirements.
Grounded tools need three-wire cords; use heavier gauge cords for longer distances to prevent voltage drop.
When using multiple cords, ensure each meets minimum wire size requirements.
Explanation of symbols for Double Insulated, Volts, Amperes, and Alternating Current.
Icons representing risks of eye injury, fire, and electric shock with corresponding precautions.
Details electrical rating (120VAC/60Hz/7.5A) and no load speed (2000-4600/min).
Specifies the maximum accessory diameter supported by the tool as 6" (150mm).
Read the ENTIRE IMPORTANT SAFETY INFORMATION section before setup or use of this product.
The tool requires a 120VAC, 60Hz, 15A Circuit for proper operation.
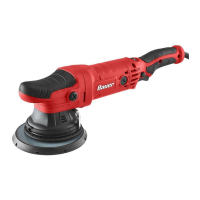
Identifies key components of the polisher: Auxiliary Handle, Handle, Speed Switch, Trigger, Trigger Lock, Backing Pad.
Prepare workpiece and work area by ensuring cleanliness, proper lighting, and securing workpieces.
Route power cord safely to reach the work area without creating tripping hazards or damage.
Press Polishing Pad onto hook and loop on Backing Pad; to remove, pull off.
Ensure pad is mounted, plug in tool, set speed, and test run for 30 seconds.
If abnormal noise or vibration occurs, have the problem corrected before further use.
Wash work surface thoroughly, ensuring it is free of dust, dirt, oil, and grease.
Place clean pad securely, apply wax evenly; do not apply wax directly to the vehicle surface.
Use slower speeds for polishing to avoid damage to the paint being polished.
Start and stop tool while held firmly against the surface to prevent pad from being thrown.
Position unit, use both hands, keep light contact, and use broad, sweeping strokes in a crisscross pattern.
Add wax as needed, avoid using too much wax, which can make application difficult and reduce pad life.
Turn off tool, unplug, apply wax to hard-to-reach areas, allow wax to dry.
Place clean bonnet securely, buff off dried wax, and use bonnet for hard-to-reach areas.
Turn off, unplug tool, allow to stop completely before setting down, clean, and store indoors.
Inspect tool condition before each use, checking for loose hardware, binding, damage, or wear.
Wipe external surfaces of the tool with a clean cloth after use.
Remove pad when not in use to dry; pads may be machine-washed and machine-dried.
Periodically blow dust and grit out of motor vents using dry compressed air with safety goggles.
If plug or supply cord is damaged, it must be replaced by a qualified service technician.
Use a hex wrench to turn Spindle Bolt counterclockwise to remove the Backing Pad.
To access Spindle Lock, remove two screws and slide Auxiliary Handle off.
Check cord connection, power at outlet, thermal reset breaker, or internal damage.
Avoid forcing the tool or using an extension cord that is too long or too small in diameter.
Replace carbon brushes if worn or damaged; have technician service for internal damage.
Check for worn brushes, bearings, strained motor, or blocked vents; use proper extension cords.