Page 10 For technical questions, please call 1-888-866-5797. Item 56367
SAFETY OPERATION MAINTENANCESETUP
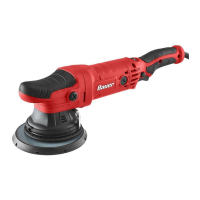
General Instructions for Use
1. Wash the work surface thoroughly, and
make sure it is free of dust, dirt, oil, grease, etc.
2. Place a clean Polishing Pad (sold separately)
securely onto the Backing Pad.
2. Apply about two tablespoons of wax
(not included) evenly on the clean Foam Pad.
NOTICE: Do not apply the wax directly to the surface
of the vehicle. The amount of wax needed will vary
according to the size of the vehicle being waxed.
3. Set Speed Switch.
NOTICE: Only use slower speeds for polishing.
Otherwise, damage may occur to the paint
being polished. Harbor Freight Tools is not
responsible for damage to the vehicle’s
finish due to improper use of this tool.
4. Make sure that the Trigger is in the
off-position, then plug in the tool.
WARNING! To prevent electric shock, keep
electrical connections off ground.
CAUTION! Start and stop the tool only while it
is held firmly against the surface of the vehicle.
Failure to do so may result in the Foam Pad or
Polishing Pad being thrown from the Polishing Pad.
5. To start, position the unit on the area to be
polished. Place one hand on the Handle and
the other hand on the Auxiliary Handle.
6. Press Trigger
NOTE: When first applying wax to the object, start
the tool at its lowest speed to avoid throwing wax off
the Foam Pad. Then increase the speed as needed.
7. Keep pressure off of the tool when operating.
The Foam Pad should LIGHTLY
contact the polishing surface.
NOTICE: To prevent damage to the Foam Pad,
Polishing Pad, and vehicle finish:
Only apply the pad/bonnet flat against
the surface, see below.
8. Begin using the tool to apply wax to the vehicle.
Apply the wax to all flat surfaces with broad,
sweeping strokes in a crisscross pattern.
Apply the wax evenly over the surface of the vehicle.