EasyManua.ls Logo

Bauer 20106E-B - User Manual

Bauer 20106E-B
16 pages
Print Icon
To Next Page IconTo Next Page
Loading...
!"#"$%&'(%)*+#"$*%,$-%.$$/-00)))1.,(+&(2(*"3.$14&5
65,"7%&'(%$*4.8"4,7%#'//&($%,$-%/(&9'4$#'//&($:.,(+&(2(*"3.$14&5
Owners Manual & Safety Instructions
Save This Manual Keep this manual for the safety warnings and precautions, assembly,
operating, inspection, maintenance and cleaning procedures. Write the product’s serial number in the
back of the manual near the assembly diagram (or month and year of purchase if product has no number).
Keep this manual and the receipt in a safe and dry place for future reference. 21c
When unpacking, make sure that the product is intact
and undamaged. If any parts are missing or broken,
please call 1-888-866-5797 as soon as possible.
Copyright
©
2021 by Harbor Freight Tools
®
. All rights reserved.
No portion of this manual or any artwork contained herein may be reproduced in
any shape or form without the express written consent of Harbor Freight Tools.
Diagrams within this manual may not be drawn proportionally. Due to continuing
improvements, actual product may differ slightly from the product described herein.
Tools required for assembly an d se rv ic e may n ot b e in cl uded.
Read this material before using this product.
Failure to do so can result in serious injury.
SAVE THIS MANUAL.
Question and Answer IconNeed help?

Do you have a question about the Bauer 20106E-B and is the answer not in the manual?

Summary

Owners Manual & Safety Instructions

Save This Manual

Instructions on keeping the manual for future reference and recording serial number.

Safety Information

Warning Symbols and Definitions

Explains the meaning of safety alert symbols like DANGER, WARNING, CAUTION, NOTICE.

General Tool Safety Warnings

Provides essential safety precautions for operating power tools to prevent injury.

Grounding and Sander Safety

Grounding Instructions

Details correct grounding procedures for electrical safety to prevent shock.

Sander Safety Warnings

Specific safety advice for operating the belt and disc sander safely.

Additional Safety Precautions

Vibration Safety

Advises on reducing risks associated with prolonged exposure to tool vibration.

Specifications and Setup

Specifications

Lists the electrical rating, belt size, disc size, and maximum speed of the sander.

Setup - Before Use

Crucial pre-operation steps and safety warnings before setting up the tool.

Functions

Identifies and labels the main parts and controls of the sander.

Assembly and Mounting

Mounting Sander

Steps for securely mounting the sander to a workbench or stable surface.

Sanding Disc and Guard Installation

Instructions for attaching the sanding disc and positioning the disc guard.

Work Table and Fence Mounting

Guidance on attaching and adjusting the work table and fence for sanding.

Operating Instructions

Tool Set Up

Safety warnings and initial setup steps before operating the sander.

Installing Sanding Belt

Procedure for properly fitting and tensioning the sanding belt.

Adjusting Sanding Belt Tracking

How to align the sanding belt to run correctly on the drums.

Operational Adjustments and Setup

Changing Belt Support Assembly Position

Instructions for adjusting the sanding belt assembly to horizontal, vertical, or angled positions.

Leveling the Work Table

Steps to ensure the work table is square to the sanding disc for accurate work.

Dust Collection Setup

Guidance on connecting a dust collection system to the sander.

Work Area and Operation

Work Area Set Up

Recommendations for preparing a safe and well-lit work environment.

General Operating Instructions

Basic steps and safety rules for operating the sander.

Maintenance and Servicing

Cleaning, Maintenance, and Lubrication

Routine checks, cleaning procedures, and lubrication requirements for the tool.

Sanding Disc Replacement

Step-by-step guide for safely removing and installing a new sanding disc.

Component Replacement

Sanding Belt Replacement

Instructions for replacing the sanding belt on the sander.

Drive Belt Replacement;Tensioning

How to replace and adjust the tension of the drive belt.

Troubleshooting

Common Problems and Solutions

Lists common issues and their corresponding solutions for the belt/disc sander.

Parts Information

Parts List Details

A detailed list of all parts included with the sander, with quantities.

Assembly Visuals

Assembly Diagram Visual

A visual representation showing how the parts of the sander are assembled.

Warranty Information

Limited 90 Day Warranty

Details the warranty terms, coverage, and limitations for the product.

Overview

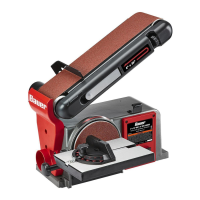
The Bauer 4" x 36" 6" Belt/Disc Sander (model 20106E-B) is a versatile power tool designed for sanding various materials. This manual provides comprehensive instructions for its safe operation, setup, maintenance, and troubleshooting.

Function Description:

The Bauer Belt/Disc Sander combines a 4-inch wide by 36-inch long sanding belt with a 6-inch sanding disc, offering dual functionality for a wide range of sanding tasks. The sanding belt is ideal for shaping, smoothing, and removing material from larger workpieces, while the sanding disc provides precision for smaller items, intricate curves, and edge finishing. The tool is equipped with a work table that can be used with both the belt and disc, providing support and stability for the workpiece. A miter gauge is included for accurate angle sanding. The belt support assembly can be adjusted from a horizontal to a vertical position, or any angle in between, to accommodate different sanding needs. A dust collection port allows for connection to a shop vacuum or dust collection system, helping to minimize airborne dust and maintain a cleaner work environment. Safety features include a safety key that must be inserted for operation and guards to protect against moving parts.

Important Technical Specifications:

  • Electrical Rating: 120VAC / 60Hz / 4.3A
  • Belt Size: 4" W x 36" L
  • Disc Size: 6"
  • Maximum Speed (Disc): 3565 RPM
  • Maximum Speed (Belt): 1800 FPM

Usage Features:

  • Work Area Setup: Before operation, it is crucial to designate a clean, well-lit work area free from distractions and hazards. The power cord should be routed safely to prevent tripping and allow for free movement.
  • Safety Switch: The sander features a safety key that must be inserted into the switch for the tool to operate. This key should be removed when the tool is not in use, unattended, or in storage to prevent accidental startup.
  • Workpiece Support: The work table and miter gauge are essential for supporting workpieces and ensuring accurate sanding. The work table's clearance from the sanding belt or disc should be maintained at a maximum of 1/16 inch.
  • Sanding Direction: When using the disc sander, only the left side (as you face it) should be used for sanding, as the disc rotates counterclockwise. Using the right side could cause kickback. For the belt, feed work into the belt against the direction of rotation.
  • Belt Support Assembly Adjustment: The belt support assembly can be adjusted to various angles, including horizontal and vertical positions, by loosening and tightening the belt support locking screw. This flexibility allows for diverse sanding applications.
  • Sanding Belt Tracking: Proper belt tracking is critical for safe and effective operation. The belt alignment knob is used to center the sanding belt on the front and rear drums. Adjustments are made by turning the knob slightly counterclockwise if the belt moves towards the front, or clockwise if it moves towards the rear.
  • Dust Collection: The integrated dust collection port allows for connection to an external dust collection system, which is highly recommended to reduce dust exposure. Wearing a dust mask or respirator is also advised.
  • Extension Cords: When using an extension cord, it must be in good condition and of an adequate gauge to carry the tool's current without voltage drop or overheating. A table is provided in the manual to guide users on the recommended minimum wire gauge based on cord length and nameplate amperes.
  • Personal Protective Equipment (PPE): Always wear safety glasses and, if the operation is dusty, a face or dust mask. Loose clothing, gloves, neckties, rings, bracelets, or other jewelry should be avoided as they can get caught in moving parts. Nonslip footwear and protective hair covering are also recommended.
  • Workpiece Securing: Use clamps or a vise to hold workpieces when practical, as this is safer than using hands and frees both hands to operate the tool.
  • Avoiding Overreach: Maintain proper footing and balance at all times to prevent accidents.
  • Unattended Operation: Never leave the tool running unattended. Always turn off the power and remove the safety key before leaving the tool.

Maintenance Features:

  • Pre-Use Inspection: Before each use, inspect the tool for loose hardware, misalignment or binding of moving parts, cracked or broken parts, damaged electrical wiring, and any other condition that might affect safe operation.
  • Post-Use Cleaning: After use, turn off the tool, remove the safety key, disconnect from the power supply, and wipe external surfaces with a clean cloth.
  • Work Table Lubrication: Apply a light coat of paste wax to the work table to facilitate easier feeding of materials.
  • Motor Vent Cleaning: Periodically, blow dust and debris out of the motor vents using dry compressed air while wearing ANSI-approved safety goggles and NIOSH-approved breathing protection.
  • Bearing Maintenance: The sander's bearings are sealed and do not require lubrication.
  • Cord Replacement: If the power cord is damaged, it must be replaced only by a qualified service technician to prevent serious injury.
  • Sanding Disc Replacement: To replace the sanding disc, first remove the work table (if mounted) and the disc guard. Peel off the old disc, clean the backing disc with denatured alcohol, and then firmly press the new sanding disc onto the backing disc. Reinstall the disc guard and work table.
  • Sanding Belt Replacement: To replace the sanding belt, loosen the belt support locking screw and raise the belt support assembly to 45 degrees. Pull out the belt tension lever to release tension, then slide off the old belt. Slide the new belt onto the drums, ensuring the directional arrows on the belt match the direction of rotation. Push the tension lever back to tighten the belt, then lower the belt support assembly and tighten the locking screw. Check and adjust belt tracking as needed.
  • Drive Belt Replacement/Tensioning: To access the drive belt, loosen and remove the drive belt housing cover. Loosen the three Phillips-head screws securing the drive belt housing to the sander body, and then loosen the tensioning screw at the bottom of the drive belt housing to release tension. Remove the old drive belt and install the new one, ensuring it is properly seated on the pulleys. Tighten the tensioning screw clockwise to tighten the drive belt, then tighten the three Phillips-head screws. Check the drive belt tension by squeezing both sides; it should deflect 1/8 to 1/4 inch. Finally, replace the drive belt housing cover.
  • Troubleshooting: The manual includes a troubleshooting guide to help identify and resolve common issues such as the sander not turning on, motor slowing, or wood burning. Always disconnect the power supply before diagnosing or servicing the tool.

This comprehensive guide ensures that users can operate and maintain their Bauer Belt/Disc Sander safely and effectively, maximizing its lifespan and performance.

Bauer 20106E-B Specifications

General IconGeneral
BrandBauer
Model20106E-B
CategorySander
LanguageEnglish

Related product manuals